Monday, December 20, 2010

Gorjuss Christmas- FTU


Now you can download a PDF Copy of this tutorial to do without using your internet browser.
Download Here
I've used the lovely PTU artwork of Suzanne Woolcott at Gorjuss.
This is FTU kit called Holiday Cheer by Cora at Pimp’d Designz.
The mask is in My Supplies.
Font used is Cocktail.


Let’s Begin!

Open a new canvas 800x800, flood filled with white.

Open frame2 from kit.
Copy and Paste it to your canvas.

Copy and Paste your 3 tubes below the frame, showing through the windows.
Use your eraser tool to erase any portion hanging out.

Open papers pp-06, pp-10, and pp-04 from kit.
Copy and Paste them below your tubes to show behind the frame.

Open ribbon04 from kit.
Copy and Paste it above the frame.
Resize and arrange it as shown.

Open holly from kit.
Copy and Paste it as a new layer.
Resize and arrange it to the upper right as shown.

Open candy-cane2 from kit.
Copy and Paste at as a new layer.
Resize and arrange it to the left as shown.

Open gift02 from kit.
Copy and Paste it as a new layer.
Image>Mirror
Resize and arrange it to the left as shown.

Open gift01 from kit.
Copy and Paste it as a new layer.
Resize and arrange it to the left as shown.

Open cheer-snowman from kit.
Copy and Paste it as a new layer.
Resize and arrange it to the left as shown.


Open paper pp13 from kit.
Copy and Paste it at the bottom of the tag.
Add your mask by going to Layer>Load/ Save Mask>Load Mask from Disk.
Apply the mask named ASD_IndianSummer from my supplies.
Merge the mask group by right clicking the layer of the finished mask, go to Merge>Merge Group.
Resize and arrange it to fit as shown.

I used the font Cocktail. I set it to 72 pixels and a stroke width of 4.
Foreground color to white and background color to black.
Duplicate the layer and select the second font layer with the font tool.
Set the stroke width to 0.
Merge the 2 font layer and convert to a raster layer.

Drop shadow everything except the mask.
Effects>3D Effects>Drop Shadow, set the drop to 3 vertical, 2 horizontal, 75 opacity, 4 blur.

Add your copyright info and your tag.

Merge everything in Layers>Merge>Merge Visible


All Finished!

Merry Christmas- FTU


Now you can download a PDF Copy of this tutorial to do without using your internet browser.
Download Here
I've used the lovely PTU artwork of Suzanne Woolcott at Gorjuss.
This is an FTU called Santa’s Coming by Tracy F. Designz.
The mask is WSL_Mask41 and 341, by Wee Scot Lass.
Font used is Refreshment Stand.


Let’s Begin!
Open a new canvas at 800x800 pixels flood filled with white.

Open chimney from kit.
Copy and Paste it as a new layer.

Open gift1 from kit.
Copy and Paste it below the chimney layer.
Resize and arrange it to the left as shown in the tag.

Open tree4 from kit.
Copy and Paste it above the chimney.
Image>Mirror
Resize and arrange it to the right as shown.

Open gift2 from kit.
Copy and Paste it as a new layer.
Resize and arrange it to the left.

Open candycane1 from kit.
Copy and Paste as a new layer.
Image>Mirror
Resize and arrange it to the left as shown.

Open letter from kit.
Copy and Paste it above the tube.
Resize and arrange it to the left as shown.

Copy and Paste your tube as a new layer.
Arrange it to fit as you like.

Open paper10 from kit.
Copy and Paste it below the bottom layer.
Add your mask by going to Layer>Load/ Save Mask>Load Mask from Disk.
Apply the mask named WSL_Mask341.
Merge the mask group by right clicking the layer of the finished mask, go to Merge>Merge Group.
Resize and arrange it to fit as shown.

Open paper9 from kit.
Repeat the mask steps to apply WSL_Mask41.

I used the font Refreshment Stand. Set it to a size you like and a stroke width of 4.
Foreground color to white and background color to black.
Duplicate the layer and select the second font layer with the font tool.
Set the stroke width to 0.
Merge the 2 font layer and convert to a raster layer.

Drop shadow everything except the mask.
Effects>3D Effects>Drop Shadow, set the drop to 3 vertical, 2 horizontal, 75 opacity, 4 blur.

Add your copyright info and your tag.

Merge everything in Layers>Merge>Merge Visible

All Finished!

Tuesday, October 12, 2010

Beware- PTU


Now you can download a PDF Copy of this tutorial to do without using your internet browser.
I've used the PTU artwork of Elias Chatzoudis. You can purchase is art at MPT.
This is a PTU tagger kit called Halloween Town by Pimp’d Designz. You can visit her blog for links to her stores HERE.
I've used a Template #273 by Divine Intentionz. It can be found in the right column on her blog HERE.
The mask and moonlight image are provided in my tut supplies. They are for personal use only and can be downloaded HERE.
Font used is Double Feature.


Let’s Begin!

Open the tag template, and resize the canvas from the center to 800x800 by going to
Image>Canvas Size.
Delete the credits layer.

Open paper pp-07 from the kit.
Copy your paper and go to the template.
On the layer named rectangles, go to Selections>Select All, Selections>Float, Selections>Defloat.
Paste your paper by going to Edit>Paste As New Layer.
Then go to Selections>Invert and press the Delete button on your keyboard to delete the extra paper. Then Selections>Select None
Be sure to delete the original layer of the template.
(Follow this procedure when asked to Copy and Paste a paper to a layer of the template.)

Open fence from kit.
Copy and Paste it as a new layer.
Resize and arrange it to fit around the rectangles as shown.

Open paper pp-01.
Copy and Paste this paper to oval layer of the template.

On frame background layer, use your flood fill tool to fill with color #222222.

Open the moonlight image from my supplies.
Copy and Paste this as a new layer.
Arrange it above the rectangle to fit as best as you can without resizing.
Select the frame background layer do the Select All/Float/Defloat method.
Select the image and then Selections>Invert.
Hit the Delete button on your keyboard.
Selections>Select None

Copy and Paste your tube as a new layer.
Image>Mirror
Arrange it to the left as shown.
Do the Select All/Float/Defloat method to delete the extra.
Layer>Duplicate
On this upper layer go to Adjust>Blur>Gaussian Blur and set to 3.
Change the Layer Properties (by going to Layer>Properties)
and change the blend mode to Soft Light.
On the lower tube change the blend mode to luminance (legacy).

On the frame layer go to
Adjust>Add/Remove Noise>Add Noise and set it to
70%, Uniform, Monochrome.

On the oval layer do Select All/Float/Defloat,
Then go to Selections>Modify>Expand and set to 3.
Go to Selections>Modify>Select Selection Borders
Set it to 8, Inside, and Anti-alias.
Create a new Raster Layer and flood fill with white.
Add Noise at 90%.

Copy and Paste your tube above the rectangle frame layer.
Arrange it to the right as shown.
Layer>Duplicate
On this upper layer go to Adjust>Blur>Gaussian Blur and set to 3.
Change the Layer Properties (by going to Layer>Properties)
and change the blend mode to Soft Light.

Move the words layer above the tube layer.
Arrange the words layer and the beware layer to the left slightly as shown.

Open scribble-01 from kit.
Copy and Paste it above the oval frame you created.
Resize and arrange it as shown.

Open the following elements and Copy and Paste them as new layers in this order:

Bat
Ghost
Sucker-01

Open brad from kit.
Copy and Paste it above the rectangle frame.
Resize and arrange it to the left as shown.

Open flower-01 from kit.
Copy and Paste it as a new layer.
Resize and arrange it by the tube’s foot as shown.
Layer>Duplicate twice and arrange these two as shown, resizing slightly.

Open ribbon-03 from kit.
Copy and Paste it as a new layer.
Resize and arrange it to the bottom as shown.

Open candy-02 from kit.
Copy and Paste it above the wordart.
Resize and arrange it to the bottom as shown.

Open candy-01 from kit.
Copy and Paste it as a new layer.
Resize and arrange it to the bottom as shown.

Open paper pp-12 from kit.
Copy and Paste it as the bottom most layer.
Add your mask by going to Layer>Load/ Save Mask>Load Mask from Disk.
Apply the mask named photomask allenaal beestjes.
Merge the mask group by right clicking the layer of the finished mask, go to Merge>Merge Group.
Resize and arrange mask to fit as shown in the tag.

I used the font Double Feature. Set it to a size you like and a stroke width of 4.
Foreground color to white and background color to black.
Duplicate the layer and select the second font layer with the font tool.
Set the stroke width to 0.
Merge the 2 font layer and convert to a raster layer.

Drop shadow everything except the mask.
Effects>3D Effects>Drop Shadow, set the drop to 3 vertical, 2 horizontal, 75 opacity, 4 blur.

Add your copyright info and your tag.

Merge everything in Layers>Merge>Merge Visible

Crop and Resize as needed.


All Finished!

Monday, October 11, 2010

Twilight Life- PTU


Now you can download a PDF Copy of this tutorial to do without using your internet browser.

I've used the lovely PTU artwork of Irene Shpak. You can purchase her art at MPT.
This is a PTU kit called Twilight by Pimpd Designz. Visit her blog for links to her stores HERE.
Mask of choice. The mask is called photomask 2 by Timo3 but I can’t find where I got it.
Alien Skin Xenofex2- Constellation for animation and an animation program like Animation Shop.
Font used is AllisonROB.


Let’s Begin!


Open a new canvas at 800x800 pixels.

Open frame-01 from the kit.
Copy and Paste as a new layer.
Resize it a little smaller.

Copy and Paste your tube as a new layer.
I’ve used the close up tube provided.
Resize and arrange it to fit in the window.

Duplicate your frame layer and move it above the tube.
Using your eraser tool, erase the top of the upper frame covering the tube heads.
Also, erase any portion of the tube hanging out at the bottom of the frames.

Open paper pp-12 from kit.
Copy and Paste it behind the bottom frame.
Erase any portion of the paper hanging outside of the frame.

Open greens-03 from kit.
Copy and Paste it below this paper layer.
Image>Mirror
Resize and arrange it to fit as shown.

Open flowers-01 from kit.
Copy and Paste it as a new layer.
Layer>Duplicate
Move one to the upper left and one to the lower right of frame.

Open glitter-01 from kit.
Copy and Paste it above the top frame layer.

Open the following elements and paste them in this order.
Resize and arrange them as shown.

Ribbon-02
Hearts-02
Ribbon-03

Open bracket from kit.
Copy and Paste it as a new layer.
Resize and arrange it to the left of the tag as shown.
Layer>Duplicate, Image>Mirror
Move the right bracket over some more if needed.

Open ribbon02 from kit.
Copy and Paste it as a new layer.
Resize and arrange it at the bottom of the tag as shown.

Open wa-01 from kit.
Copy and Paste it as a new layer.
Resize and arrange it at the bottom of the tag as shown.
Selections>Select All, Selections>Float, Selections>Defloat
Selections>Modify>Expand- 2
Layer>New Raster Layer
Flood fill the selection with white.
Selections>Select None
Move this white layer below the wordart layer.
Merge the two layers together.

Open staple from kit.
Copy and Paste it as a new layer.
Resize and arrange it above the wordart as shown.

Open paper pp-12 from kit.
Copy and Paste it at the bottom of the tag.
Add your mask by going to Layer>Load/ Save Mask>Load Mask from Disk.
Apply your mask of choice.
Merge the mask group by right clicking the layer of the finished mask, go to Merge>Merge Group.
Resize and arrange it to fit as shown.

I used the font AllisonROB. Set it to a size you like and a stroke width of 4.
Foreground color to white and background color to black.
Duplicate the layer and select the second font layer with the font tool.
Set the stroke width to 0.
Merge the two font layers and convert to a raster layer.

Drop shadow everything except the mask.
Effects>3D Effects>Drop Shadow, set the drop to 3 vertical, 2 horizontal, 75 opacity, 4 blur.

Add your copyright info and your tag.

Merge everything in Layers>Merge>Merge Visible

Crop and resize as needed.

Animation
Merge the two bracket layers together.
Selections>Select All, Selections>Float, Selections>Defloat
New Raster Layer
Flood fill these selections with white.

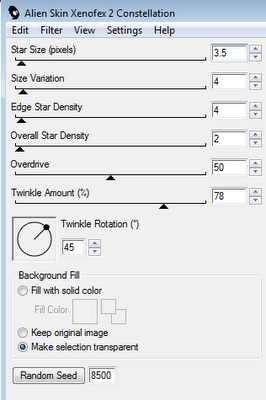
On this white layer go to Effects>Plugins and go to Xenofex Constellation.
Apply setting that you like or the settings shown below.
You must have the Background Fill set to Make Selection Transparent.
Hit Ok


Now Copy Merged and Paste it over in Animation Shop.
Back in PSP hit Undo and go to Constellation again.
Hit Random Seed at the bottom and Ok again.
Copy Merged and Paste this in AS After Current Frame.
Go back to PSP one more time and hit Undo.
Go to Constellation and hit Random Seed.
Copy and Paste this After Current Frame in AS.

Now just save as a GIF.


All Finished!

Monday, September 27, 2010

Kiss My Attitude- PTU


Now you can download a PDF Copy of this tutorial to do without using your internet browser.
I've used the PTU artwork of Elias Chatzoudis. You can buy his tubes at MPT.
This is a PTU kit called Rock-a-Billie by Pimp’d Designz. Visit her blog for links to her stores HERE.
I used the template called Kiss My Attitude by Crazy Cakes Scraps. You can get it HERE.
The mask is WSL_Mask9, by Wee Scot Lass. You can get it HERE.
Font used is Shalimar Swash ROB.


Let’s Begin!


Open the tag template. It’s a little large for my tubes so I resized it to 600x600 and then changed the canvas size from the center to 800x800.
Delete the credits layer, and the layers named sqcenter, dotline and dotline2.

Open paper pp-11 from the kit.
Copy your paper and go to the template.
On your lilrectangle layer, go to Selections>Select All, Selections>Float, Selections>Defloat.
Paste your paper as a new layer.
Then go to Selections>Invert and press the Delete button on your keyboard to delete the extra paper.
Selections>Select None
Be sure to delete the original layer of the template.
(Follow this procedure when asked to Copy and Paste a paper to a layer of the template.)

Copy and Paste the following papers to the following layers of the template:

Paper pp-09 to layers lilsqleft and lilsqright
Paper pp-02 to layers oval, dots (merge the 4 dot layers together first)
Paper pp-10 to layer frame2
Paper pp-01 to layer rectangle

On layers named lilframe and lilframe2, and rectangle3, add noise by going to
Adjust>Add/Remove Noise>Add Noise- 70%.

Copy and paste your tube under the wordart layer.
Arrange it up slightly in the center of tag.

Move the layers named gradient below their lilframes layers.
Paste tube above the gradient layer of one of the frames.
Arrange it in your frame then select the frame layer and go to
Selections>Select All, Selections>Float, Selections>Defloat
Select your tube layer then go to
Selections>Invert and press the Delete button on your keyboard to delete the extra.
Selections>Select None
Duplicate your tube by going to Layer>Duplicate.
On that duplicated tube layer go to Adjust>Blur>Gaussian Blur- 3
On the top layer change the blend mode to Soft Light
and the bottom layer to Luminance (Legacy).
Then change the opacity of the bottom layer to 65%.

Repeat this process for the other frame but Mirror the tube to fit.

Copy and Paste a second tube above the oval layer.
Layer>Duplicate, Image>Mirror
Merge the two layers together.
Do the Select All/Float/Defloat to remove the extra of the tubes hanging out.
Duplicate the tube layer, blur this layer with Gaussian Blur to 3 and blend mode to Soft Light.
Set the bottom tube layer’s blend mode to Luminance (Legacy) and opacity to 65%.

Open frame-05 from kit.
Copy and Paste it below the bottom layer.
Resize and arrange it in the center.

Open glitter-02 from kit.
Copy and Paste it as a new layer.
Resize and arrange it at the bottom.
Layer>Duplicate, Image>Flip and Mirror

Open banner-01 from kit.
Copy and Paste it above the rectangle.
Resize and arrange it as shown.
With the rectangle selected, do the SelectAll/Float/Defloat
Select the banner and hit Delete.
Select None

Open sequins from kit.
Copy and Paste it as a new layer.
Resize and arrange it to the top or bottom of the rectangle.
Layer>Duplicate and move it to the other side as shown.

Open sparrow from kit.
Copy and Paste it as a new layer.
Resize and arrange as shown.

Open flower-01 from kit.
Copy and Paste it as a new layer.
Resize and arrange it as shown.
Duplicate it 3 times and arrange them around the tag.

Open skull from kit.
Copy and Paste it as a new layer.
Resize and arrange it as shown.

Open heart-01 from kit.
Copy and Paste is as a new layer.
Resize and arrange it as shown.

Open flower-02 from kit.
Copy and Paste it above the wordart layer.
Resize and arrange it as shown.

On the wordart layer, Select All/Float/Defloat
Selections>Modify>Expand by 2
Layer>New Raster Layer
Flood fill the selection with white.
Select None
Move the white layer below the wordart and merge the two together.

Open paper pp-02 from kit.
Copy and Paste it at the bottom of the tag.
Add your mask by going to Layer>Load/ Save Mask>Load Mask from Disk.
Apply the mask named WSL_Mask9.
Merge the mask group by right clicking the layer of the finished mask, go to Merge>Merge Group.
Resize and arrange it to fit as shown.

I used the font Shalimar Swash ROB. Use a size you like and a stroke width of 3.
Foreground color to white and background color to #ab1a26.
Duplicate the layer and select the second font layer with the font tool.
Set the stroke width to 0.
Merge the 2 font layers and convert to a raster layer.

Drop shadow everything except the duplicated tube and the mask.
Effects>3D Effects>Drop Shadow, set the drop to 3 vertical, 2 horizontal, 75 opacity, 4 blur.

Add your copyright info and your tag.
Crop and Resize the tag to your liking.

Merge everything in Layers>Merge>Merge Visible


All Finished!
Monday, August 16, 2010

Angelic- FTU


Now you can download a PDF copy of this tutorial to do without using your internet browser.
Download Here
I've used the PTU artwork of Elias Chatzoudis. You can buy it HERE.
This is a FTU kit called Angelic by Toxic Desirez. Get it on her blog HERE.
The mask is called Becky_Mask038. I will honestly say that I have no idea where I got it so I will add it in my supplies. If you know where it’s from please don’t hesitate to let me know.
It's been brought to my attention that the mask is by Becky of Secrets of the Imagination.  Unfortunately her site is closed so I will continue to supply it in my supplies.
It’s of course for personal use only. Download it HERE.
Font used is Aquarelle.


Let’s Begin!

Open a new canvas 800x800 pixels.

Copy and Paste your tube to your canvas.

Open cloud1 from kit.
Copy and Paste it as a new layer.
Resize and arrange it to the bottom of the tube as shown.

Open moon from kit.
Copy and Paste it behind your tube.
Resize and arrange it to the upper right as shown.

Open splat1 from kit.
Copy and Paste it as a new layer.

Open rainbow from kit.
Copy and Paste it as a new layer.
Resize and arrange it as shown.
Using your eraser tool, set it to opacity 50% and erase the hard edges on the sides.

Open blossom1 from kit.
Copy and Paste it as a new layer.
Resize and arrange it to the left as shown.
Layer>Duplicate and Image>Mirror

Open feather from kit.
Copy and Paste it as a new layer.
Resize and arrange it to the left as shown.

Open star border from kit.
Copy and Paste it above the cloud layer.
Resize and arrange it to the right as shown.
Go to Adjust>Add/Remove Noise>Add Noise and set it to 50%

Open bow1 from kit.
Copy and Paste it as a new layer.
Resize and arrange it to the right as shown.

Open diamond from kit.
Copy and Paste it as a new layer.
Resize and arrange it into one of the positions on the cloud.
Layer>Duplicate another 6 times (or to your liking) and arrange it around the cloud.

Open paper16 from kit.
Copy and Paste it at the bottom layer of the tag.
Add your mask by going to Layer>Load/ Save Mask>Load Mask from Disk.
Apply the mask named Becky_Mask038.
Merge the mask group by right clicking the layer of the finished mask,
go to Merge>Merge Group.
Resize and arrange it as needed.

I used the font Aquarelle. Set it to a size you like, and a stroke width of 5.
Foreground color to white and background color to #7cb4b8.
Duplicate the layer and select the second font layer with the font tool.
Change the foreground color to #eb8bbb. On the background color set it to gradient so that the two colors show.
Set the stroke width to 0.
Add noise to this layer by going to Adjust>Add/Remove Noise>Add Noise and set it to 50%
Merge the 2 font layer and convert to a raster layer.

Drop shadow everything except the rainbow by going to
Effects>3D Effects>Drop Shadow, set the drop to 3 vertical, 2 horizontal, 75 opacity, 4 blur.

Add your copyright info and your tag.

Merge everything in Layers>Merge>Merge Visible

Crop and Resize your tag as needed.

All Finished!

Saturday, August 14, 2010

The Girl- FTU


Now you can download a PDF copy of this tutorial to do without using your internet browser.
Download Here
I've used the FTU artwork of Psyco Jimi. You still need a license through MtA to use his work, which you can get for free HERE.
You'll need your license number to join the group HERE.
This is a FTU kit called Toxic Candyland by Cinnamon Scraps. You can get it HERE.
I've used Template “I’m the Girl You Will Never Be” by Crazy Cakes Scraps. You can get it HERE.
The diamond doesn’t have a home and the fairy dust was created by me. These items are in my supplies which are for personal use only. You can download HERE.
I used mask Vix_Mask362 by Vixen. Download it on her blog HERE.
Font used is WaterBrush ROB.


Let’s Begin!


Open the tag template. I’ve resized the template to 700x700 by going to Image>Resize and then resize the canvas from the center to 800x800 by going to Image>Canvas Size.
Delete the credits layer.

Open paper11 from the kit.
Copy your paper and go to the template.
On the layer named halfcircle, go to Selections>Select All, Selections>Float, Selections>Defloat.
Paste your paper by going to Edit>Paste As New Layer.
Then go to Selections>Invert and press the Delete button on your keyboard to delete the extra paper.
Go to Selections>None
Be sure to delete the original layer of the template.
(Follow this procedure when asked to Copy and Paste a paper to a layer of the template.)

Copy and Paste the following papers to the layers stated:

Paper14 to blackcircle
Paper15 to rectangle
Paper1 to oval
Paper8 to silverrectangle
Paper3 to circle1 and circle2
Paper4 to smcircle and smcircle2

Move the small circle2 down a little as shown in the tag.

Copy and Paste your tube of choice above the glitterframe layer.
Resize and arrange it to fit in the center as shown.

Copy and paste the same tube above circle1 (black circle).
Resize and arrange it so the face of the tube is above the circle.
On the circle layer go to Selections>Select All, Selections>Float, Selections>Defloat.
Select the tube layer and go to Selections>Invert and press the Delete button on your keyboard.
Selections>None
Duplicate the tube layer by going to Layers>Duplicate
On the bottom tube layer change the blend mode by going to
Layers>Properties and change the Blend Mode to Luminance (Legacy)
On the upper tube layer go to Adjust>Blur>Gaussian Blur and set the radius to 3.
Change its blend mode to Soft Light.

Repeat this entire procedure for the other circle.
Mirror the tube by going to Image>Mirror before arranging the way you want.

I’ve used a second tube for the oval behind the main tube.
Copy and Paste your tube of choice above the oval.
Resize and arrange to the side so it is facing outward.
Use the Select All/Float/Defloat method to delete the extra portion of the tube.
Layers>Duplicate the tube.
On the bottom tube change the blend mode to Luminance (Legacy).
Change its opacity to 50% in the Layer Properties as well.
On the upper tube change the blend mode to Soft Light.

Repeat this entire procedure for the other side of the oval.
Mirror the tube by going to Image>Mirror before arranging the way you want.

Open diamond from my supplies.
Copy and Paste it above the glitter frame.
Arrange it to the left where the oval meets the rectangles.
Layer>Duplicate it 5 times and arrange them around the oval as shown.

Open flower3 from kit.
Copy and Paste it as a new layer.
Resize and arrange it behind the elbow on the right as shown.
Layer>Duplicate, Image>Mirror

Open flower1 from kit.
Copy and Paste it above the last skinny rectangle before the circles.
Resize and arrange it as shown in the tag.

Open flower6 from kit.
Copy and Paste it as a new layer.
Image>Mirror
Resize and arrange it as shown in the tag.

Open bow9 from kit.
Copy and Paste it above the 2 small circles.
Resize and arrange it above the circle as shown.

Open string2 from kit.
Copy and Paste it as a new layer.
Resize and arrange it to the bottom as shown.

Open fairy dust from my supplies.
Copy and Paste it as a new layer.

Open paper1 from kit.
Copy and Paste it at the bottom layer of the tag.
Add your mask by going to Layer>Load/ Save Mask>Load Mask from Disk.
Apply the mask named Vix_Mask362.
Merge the mask group by right clicking the layer of the finished mask,
go to Merge>Merge Group.

I used the font WaterBrush ROB. Set it to a size you like, and a stroke width of 3.
Foreground color to white and background color to black.
Duplicate the layer and select the second font layer with the font tool.
Set the stroke width to 0.
Merge the 2 font layer and convert to a raster layer.

Drop shadow everything by going to
Effects>3D Effects>Drop Shadow, set the drop to 3 vertical, 2 horizontal, 75 opacity, 4 blur.

Add your copyright info and your tag.

Merge everything in Layers>Merge>Merge Visible

You can crop and resize your image as desired.


All Finished!

Bluetonic- PTU


Now you can download a PDF copy of this tutorial to do without using your internet browser.

You can use a tube of choice.
I've used an FTU tube by Ronne Barton which was available at MPT but is no longer there.
This is a PTU kit called Bluetonic by Seven’s Scraps. You can visit her blog for links to her stores HERE.
The mask is WSL_Mask359, by Wee Scot Lass. You can get it HERE.
Font used is Aquarelle.


Let’s Begin!


Open a new canvas 800x800.

Open paper 12 from kit.
Copy and Paste it as a new layer.

Copy and Paste your tube as a new layer.

Open frame02 from kit.
Copy and Paste it as a new layer.
Resize it slightly if needed so that the tube fits within frame.
Using your magic wand tool select on the outside of the frame so the extra space outside of the frames are selected.
Go to Selections>Modify>Expand, and expand by 2.
Select your tube layer and hit the Delete button on your keyboard to delete the excess.
Select the paper layer and hit the Delete button.

Open flowerbow03 from kit.
Copy and Paste it above the kit.
Resize and arrange it to the upper left.

Open butterfly01 from kit.
Copy and Paste it as a new layer.
Resize and arrange it above the flower bow.

Open doodle03 from kit.
Copy and Paste it as a new layer.
Image>Mirror
Resize and arrange it to the bottom of the frame.

Open tag03 from kit.
Copy and Paste it as a new layer.
Resize and arrange it to the left.

Open ribbon05 and from kit.
Copy and Paste it as a new layer.
Resize and arrange it at the bottom of the tag.

Open buttons01 from kit.
Copy and Paste it below the paper behind the frame.
Resize and arrange it to the bottom of the frame.

Open paper22 from kit.
Copy and Paste it at the bottom, below the buttons.
Add your mask by going to Layer>Load/ Save Mask>Load Mask from Disk.
Apply the mask named WSL_Mask359.
Merge the mask group by right clicking the layer of the finished mask, go to Merge>Merge Group.

I used the font Aquarelle. Use a size you like and a stroke width of 3.
Foreground color to white and background color to #3b54a1.
Duplicate the layer and select the second font layer with the font tool.
Set the stroke width to 0.
Merge the 2 font layers and convert to a raster layer.

Drop shadow everything except the frame.
Effects>3D Effects>Drop Shadow, set the drop to 3 vertical, 2 horizontal, 75 opacity, 4 blur.

Add your copyright info and your tag.

Merge everything in Layers>Merge>Merge Visible

Crop and Resize as you like.


All Finished!

Saturday, August 7, 2010

California Girl- PTU


Now you can download a PDF copy of this tutorial to do without using your internet browser.
Download Here
I've used the lovely PTU artwork of Elias Chatzoudis. You can purchase the art HERE.
This is a PTU kit called California Girls from Cora’s Creations (Pimp'd Designz). Visit her blog for links to her store HERE.
I used Template 327 by Missy at Divine Intentionz. You can get it HERE.
The mask is WSL_Mask192, by Wee Scot Lass. You can get it HERE.
Font used is Carpenter.


Let’s Begin!

Open the tag template, and resize the canvas from the center to 800x800 by going to
Image>Canvas Size.
Delete the credit layers, the wordart layer, hearts layer, and dotted lines.

Open paper pp06 from the kit.
Copy your paper and go to the template.
On your layer named frame background 1, go to Selections>Select All, Selections>Float, Selections>Defloat.
Paste your paper by going to Edit>Paste As New Layer.
Then go to Selections>Invert and press the Delete button on your keyboard to delete the extra paper.Selections>Select None
Be sure to delete the original layer of the template.

Follow the procedure for the following papers and their layer:

Paper pp06 to frame background 2
Paper pp08 to circle 1
Paper pp12 to circle 2
Paper pp01 to circle 03
Paper pp10 to raster 1 (black rectangle)

On layers named frame1 and frame2, add noise.
Go to Adjust>Add/Remove Noise>Add Noise
Select Uniform and Monochrome, and set the noise to 75%.

Copy and Paste your close-up tube (if you have one) above the top circle.
I’ve mirrored the tube by going to Image>Mirror.
Once you have it where you like it, select the circle layer.
Go to Selections>Select All, Selections>Float, Selections>Defloat.
Select the tube layer and go to Selections>Invert.
Hit the Delete key on the keyboard.
Selections>Select None
Image>Duplicate the tube.
On the bottom tube change the Layer Properties to Luminance by going to
Layers>Properties and change the blend mode to Luminance (Legacy).
On the top tube layer change the Layer Properties to Soft Light.

Open glitter01 from kit.
Copy and Paste it above the green rectangle layer.
Resize and arrange it as shown.

Open flower02 from kit.
Copy and Paste it above the orange circle layer.
Resize and arrange it to the left as shown.

Open sun from kit.
Copy and Paste it above the pink circle layer.
Resize and arrange it to the right as shown.

Open surfboard from kit.
Copy and Paste it above the close-up tube.
Resize and arrange it to the left as shown.

Open ribbon04 from kit.
Copy and Paste it as a new layer.
Resize and arrange it as shown.

Open swirl01 from kit.
Copy and Paste it as a new layer.
Resize and arrange it as shown.

Open hearts01 from kit.
Copy and Paste it as a new layer.
Resize and arrange it as shown.

Open ribbon03 from kit.
Copy and Paste it as a new layer.
Resize and arrange it as shown.

Open starfish from kit.
Copy and Paste it as a new layer.
Resize and arrange as shown.

Open wordart02 from kit.
Copy and Paste it as a new layer.
Resize and arrange it as shown.

Open flower01 from kit.
Copy and Paste it as a new layer.
Resize and arrange it as shown.

Open paper pp09 from kit.
Copy and Paste it at the bottom of the tag.
Add your mask by going to Layer>Load/ Save Mask>Load Mask from Disk.
Apply the mask named WSL_Mask192.
Merge the mask group by right clicking the layer of the finished mask, go to Merge>Merge Group.
Resize and arrange it to fit as shown.

I used the font Carpenter. Use a size you like and a stroke width of 3.
Foreground color to white and background color to #eb6789.
Duplicate the layer and select the second font layer with the font tool.
Set the stroke width to 0.
Merge the 2 font layers and convert to a raster layer.

Drop shadow everything except the duplicated tube and the mask.
Effects>3D Effects>Drop Shadow, set the drop to 3 vertical, 2 horizontal, 75 opacity, 4 blur.

Add your copyright info and your tag.

Merge everything in Layers>Merge>Merge Visible


All Finished!

Thursday, June 24, 2010

Under Water- PTU


Now you can download a PDF copy of this tutorial to do without using your internet browser.
Download Here
I've used the lovely PTU artwork of Elias Chatzoudis. You can purchase his art HERE.
This is PTU kit called Flip Flop Weather from Cora’s Creations (Pimp'd Designz). Visit her blog for links to her store HERE.
Font used is Pretty Baby.
I have used Eye Candy 5 Impact- Glass on the frame but it is not mandatory to complete.


Let’s Begin!

Open a new canvas that’s 800x800 pixels.
Copy and Paste your tube onto your canvas.
Move and resize it to your liking.

Open frame01 from kit.
Copy and Paste it above the tube.
Resize and arrange it as shown.
Apply Eye Candy Impact Glass by going to
Effects>Plugins>Eye Candy 5 Impact>GlassApply the following settings


Select the tube layer and
Layer>Duplicate
Move the upper tube above the frame.
Using your eraser tool, erase the portion of the body covering the center line of the frame.
Open paper pp06 from kit.
Copy and Paste it behind the bottom tube.
Delete the portions of the paper hanging outside of the frame.

Open fish-01 from kit.
Copy and Paste it as a new layer.
Resize and arrange it as shown.

Open fence from kit.
Copy and Paste it below the paper.
Resize and arrange it as shown.

Open net-01 from kit.
Copy and Paste it as a new layer.
Resize and arrange it as shown.

Open print-01 from kit.
Copy and Paste it as a new layer.
Resize and arrange it to the top as shown.
Layer>Duplicate and move to the bottom as shown.

Open water-drops-01 from kit.
Copy and Paste it as a new layer.
Resize and arrange it as shown.

Open greens-04 from kit.
Copy and Paste it as a new layer.
Resize and arrange it to one side as shown.
Layer>Duplicate and move it to the other side.

Open waves-04 from kit.
Copy and Paste it as a new layer.
Resize and arrange it to the top as shown.

Open the following items in this order from the kit and arrange them as shown around the frame.
Shell-01
Flower-01- Duplicate and move
Flower-04
Flower-03
Flower-05

Open fish-03 from kit.
Copy and Paste it above the frame.
Resize and arrange it as shown.

Open doodle-02 from kit.
Copy and Paste it as shown.
Resize and arrange it to the bottom as shown.

Open seahorse from kit.
Copy and Paste it as a new layer.
Resize and arrange it as shown.

Open waterdrops-03 from kit.
Copy and Paste it as a new layer.
Resize and arrange it to the bottom as shown.

Open waves-03 from kit.
Copy and Paste it as a new layer as shown.
Resize and arrange it to the bottom as shown.

I used a the font called Pretty Baby. Set it to a size that you like and a stroke width of 3.
Foreground color to white and background color to #983264.
Duplicate the layer and select the second font layer with the font tool.
Set the stroke width to 0.
Merge the 2 font layer and convert to a raster layer.

Drop shadow everything except the mask.
Effects>3D Effects>Drop Shadow, set the drop to 3 vertical, 2 horizontal, 75 opacity, 4 blur.

Add your copyright info and your tag.

Merge everything in Layers>Merge>Merge Visible


All Finished!

Delicious- FTU


Now you can download a PDF copy of this tutorial to do without using your internet browser.
Download Here
I've used the lovely PTU artwork of Elias Chatzoudis. You can purchase his art HERE.
This is my PTU kit called Delicious. Visit my blog for links to my stores HERE.
This kit is now FTU and is available on my Blog.
The mask is WSL_Mask208, by Wee Scot Lass. You can get it HERE.
Font used is Toonish.


Let’s Begin!
Open a new canvas at 800x800 pixels.

Open frame1 from kit.
Copy and Paste it onto your canvas.

Open paper12 from kit.
Copy and Paste it below the frame.
Using your eraser tool, erase portions of the paper hanging outside of the frame.
It won’t be exact since the frame is not exact but get it close and it won’t matter.

Copy and Paste your tube as a new layer above the frame.
Arrange it in the center (you may need to resize the paper and the frame to fit).
Layer>Duplicate the tube and move the bottom tube below the frame.
Select the paper layer and go to
Selections>Select All, Selections>Float, Selections>Defloat.
Select the bottom tube under the frame and go to
Selections>Invert, hit the Delete button on your keyboard, Selections>None.
Select the upper tube above the frame and erase the portions of the tube hanging below the frame.

Open element29 (leaves) from kit.
Copy and Paste it below the paper
Resize and arrange it to the right as shown.
Layer>Duplicate, Image>Mirror

Open element35 (swirl) from kit.
Copy and Paste it as a new layer.
Resize and rotate it as shown to one side.
Layer>Duplicate, Image>Mirror

Open element36 (beads) from kit.
Copy and Paste as a new layer.
Resize and arrange it to the right as shown.
Layer>Duplicate, Image>Mirror

Open element33 (pink ribbon) from kit.
Copy and Paste it above the tube.
Resize and arrange it to the bottom as shown.

Open element26 (cherries) from kit.
Copy and Paste it as a new layer.
Resize and arrange it to the left as shown.

Open element18 (blue lollipop) from kit.
Copy and Paste it as a new layer.
Resize and arrange it to the right as shown.

Open element14 (pink word art) from kit.
Copy and Paste it as a new layer.
Resize and arrange it to the bottom as shown.

Open paper3 from kit.
Copy and Paste it at the bottom, below the leaves.
Add your mask by going to Layer>Load/ Save Mask>Load Mask from Disk.
Apply the mask named WSL_Mask208.
Merge the mask group by right clicking the layer of the finished mask, go to Merge>Merge Group.
Resize and arrange it to fit as shown.

I used the font Toonish. Set it to a size you like and a stroke width of 5.
Foreground color to white and background color to #c33e66.
Duplicate the layer and select the second font layer with the font tool.
Set the stroke width to 0.
Merge the 2 font layer and convert to a raster layer.

Drop shadow everything except the mask.
Effects>3D Effects>Drop Shadow, set the drop to 3 vertical, 2 horizontal, 75 opacity, 4 blur.

Add your copyright info and your tag.

Merge everything in Layers>Merge>Merge Visible

All Finished!

Wednesday, May 5, 2010

Puppy Love- FTU


Now you can download a PDF copy of this tutorial to do without using your internet browser.
Download Here
This is FTU kit called Puppy Love by Sinfully Creative Scraps. Visit her blog HERE.
The mask is WSL_Mask98, by Wee Scot Lass. You can get it HERE.
Font used is Carpenter.


Let’s Begin!

Open a new canvas that’s 800x800 pixels.

Copy and Paste the following elements in this order.
Resize and arrange them to fit as shown in the tag.

Grassy hill
Puppy house 2
Word art
Pink bike with puppy
Puppy sitting
Cookie

Copy and paste the following elements in this order starting underneath the grassy hill.
Resize and arrange them to fit as shown in the tag.

Flowers (Layer>Duplicate, Image>Mirror)
Gate (in the frames folder, Duplicate and Mirror)
Greenery (Duplicate and Mirror)
Pawprint

Open paper1 from kit.
Copy and Paste it at the bottom of the tag.
Add your mask by going to Layer>Load/ Save Mask>Load Mask from Disk.
Apply the mask named WSL_Mask98.
Merge the mask group by right clicking the layer of the finished mask, go to Merge>Merge Group.
Resize and arrange it to fit as shown.

I used the font Carpenter. Set it to a size that you like and a stroke width of 5.
Foreground color to white and background color to #f02b7c.
Duplicate the layer and select the second font layer with the font tool.
Set the stroke width to 0.
Merge the 2 font layer and convert to a raster layer.

Drop shadow everything except the mask.
Effects>3D Effects>Drop Shadow, set the drop to 3 vertical, 2 horizontal, 75 opacity, 4 blur.

Add your copyright info and your tag.

Merge everything in Layers>Merge>Merge Visible


All Finished!

Wednesday, April 14, 2010

Springlicious- PTU


Now you can download a PDF copy of this tutorial to do without using your internet browser.
Download Here
I've used the lovely PTU artwork of Shawli. You can purchase her art HERE.
This is a PTU kit called Springlicious by Seven’s Scraps. You can visit her blog for links HERE.
The mask is provided in my supplies which is for personal use only! You can download it HERE.
Font used is Aquarelle.


Let’s Begin!

Open a new canvas, 800x800 pixels.

Open frame20 from kit.
Copy and Paste it as a new layer onto your canvas.

Open papers 27 from kit.
Using the magic wand select inside the open area of the frame.
Selections>Modify>Expand by 5.
Copy your paper and paste as a new layer.
Selections>Invert and hit the delete button on your keyboard.
Selections>None and move the paper layer below the frame.

Copy and Paste your tube on top of the frame.
Arrange it to the left.
Layer>Duplicate and Image>Mirror the tube
and move the tube behind the frame.
Resize and arrange it as shown, erasing portions of the tube hanging outside of the frame.
Layer>Duplicate, Adjust>Blur>Gaussian Blur- 3
Layer>Properties and set the Blend Mode to Soft Light
On the lower tube set the Blend Mode to Luminance (Legacy)

Open the following elements in the following order.
Copy and Paste them starting above the frame layer and
Resize and arrange as shown.

Paperdoodle02
String02
Ribbon05
Flower09 (duplicate 2 times and arrange)
Flower05
Butterfly01
Pearls02
Shamrock04 (Image>Mirror)
Shamrock01

Open paper13 from kit.
Copy and Paste it at the bottom of the tag.
Add your mask by going to Layer>Load/ Save Mask>Load Mask from Disk.
Apply the mask named 2 from supplies.
Merge the mask group by right clicking the layer of the finished mask, go to Merge>Merge Group.
Change the opacity of the mask layer to 50%

I used the font Aquarelle. Set it a size you like and a stroke width of 5.
Foreground color to white and background color to #b14555.
Duplicate the layer and select the second font layer with the font tool.
Set the stroke width to 0.
Merge the 2 font layer and convert to a raster layer.

Drop shadow everything except the mask.
Effects>3D Effects>Drop Shadow, set the drop to 3 vertical, 2 horizontal, 50 opacity, 4 blur.

Add your copyright info and your tag.

Merge everything in Layers>Merge>Merge Visible

All Finished!
Tuesday, April 13, 2010

Fan Club- PTU


Now you can download a PDF copy of this tutorial to do without using your internet browser.
I've used the lovely FTU artwork of Psyco Jimi. It’s free but you have to apply for a MtA license and join the Yahoo group. Start the process HERE.
This is PTU kit called Flashback from Cora’s Creations Pimp'd Designz). Visit her blog for links to her store HERE.
I used Template 340 by Missy at Divine Intentionz. You can get it HERE.
The mask is WSL_Mask44, by Wee Scot Lass. You can get it HERE.
Font used is Pussycat.


Let’s Begin!

Open the tag template, and resize the canvas from the center to 800x800 by going to
Image>Canvas Size.
Delete the credits layer.

Open paper pp04 from the kit.
Copy your paper and go to the template.
On your black circle2 layer, go to Selections>Select All, Selections>Float, Selections>Defloat.
Paste your paper by going to Edit>Paste As New Layer.
Then go to Selections>Invert and press the Delete button on your keyboard to delete the extra paper.
Be sure to delete the original layer of the template.
(Follow this procedure when asked to Copy and Paste a paper to a layer of the template.)

Copy and Paste the following papers to the following layers of the template:

Paper pp-01 to layers shape 3 and 4
Paper pp-03 to layers shape 1 and 2
Paper pp-11 to layer circle1

On layers named thin rectangle 1 and 2, and glittered circle, add noise by going to
Adjust>Add/Remove Noise>Add Noise- 90%.

Copy and paste your tube above layer frame1.
Resize and arrange to the right of tag.
Paste tube above framebackground1 and
Image>Mirror
Arrange it in your frame then on the frame layer,
Selections>Select All, Selections>Float, Selections>Defloat
Select your tube layer then go to
Selections>Invert and press the Delete button on your keyboard to delete the extra.
Duplicate your tube by going to Layer>Duplicate.
On that duplicated tube layer go to Adjust>Blur>Gaussian Blur- 3
Go to Layers>Properties>Blend Mode to Soft Light
On the bottom tube change the blend mode to Luminance (Legacy)

Open epoxy-spill from kit.
Copy and Paste it above the thin rectangles.
Resize and arrange it to the left.
Layer>Duplicate, Image>Mirror, Image>Flip

Open beads-03 from kit.
Copy and Paste it above the circles.
Resize and arrange it as shown.

Open ribbon-02 from kit.
Copy and Paste it as a new layer.
Resize and arrange it as shown.

Open heart-01 from kit.
Copy and Paste it as a new layer.
Resize and arrange it as shown.

Open bff bracelet from kit.
Copy and Paste it under the main tube.
Resize and arrange as shown.

Open star-02 from kit.
Copy and Paste it as a new layer.
Resize and arrange it as shown.

Open paper pp10 from kit.
Copy and Paste it at the bottom of the tag.
Add your mask by going to Layer>Load/ Save Mask>Load Mask from Disk.
Apply the mask named WSL_Mask44.
Merge the mask group by right clicking the layer of the finished mask, go to Merge>Merge Group.
Resize and arrange it to fit as shown.

I used the font Pussycat. Use a size you like and a stroke width of 3.
Foreground color to white and background color to black.
Duplicate the layer and select the second font layer with the font tool.
Set the stroke width to 0.
Merge the 2 font layers and convert to a raster layer.

Drop shadow everything except the duplicated tube and the mask.
Effects>3D Effects>Drop Shadow, set the drop to 3 vertical, 2 horizontal, 75 opacity, 4 blur.

Add your copyright info and your tag.

Merge everything in Layers>Merge>Merge Visible


All Finished!

Monday, April 12, 2010

Easter Time- PTU


Now you can download a PDF copy of this tutorial to do without using your internet browser.
I've used the lovely PTU artwork of Suzanne Woolcott of Gorjuss. You can purchase her art and a license HERE.
This is a PTU kit called Precious Easter by Seven’s Scraps. You can visit her blog for links HERE.
The mask is by Kirsty’s Scraps. Download it on her blog HERE.
The image and animation are in my supplies, which are for personal use only. Download them HERE.
Font used is Problem Secretary.
You will need an animation program like Animation Shop 3 to complete the animation portion of this tutorial.


Let’s Begin!


Open a new canvas, 800x800 pixels.

Open frame28 from kit.
Copy and Paste it as a new layer onto your canvas.

Copy and Paste your tube as a new layer.
Arrange it in the left of the frames.

Open image from supplies.
Copy and Paste it as a new layer behind the frame.
Resize and arrange it as shown in tag.
Erase any portions of the image hanging out.

Open the following elements and Copy and Paste them in this order above the frame.
Resize and arrange them as shown in the tag.

Fence02
Grass02 (twice)
Ribbon03
Leaf08
Flower04
Flower08
Bow06
Butterfly04
Egg06
Bubbles01
Flower12
Leaf01

Open paper08 from kit.
Copy and Paste it at the bottom, below the frame.
Add your mask by going to Layer>Load/ Save Mask>Load Mask from Disk.
Apply the mask named Kirsty06_Mask_24.
Merge the mask group by right clicking the layer of the finished mask, go to Merge>Merge Group.

I used the font Problem Secretary. Set it to a size you like, and a stroke width of 5.
Foreground color to white and background color to #564c94.
Duplicate the layer and select the second font layer with the font tool.
Set the stroke width to 0.
Merge the 2 font layer and convert to a raster layer.

Drop shadow everything except the light and the mask.
Effects>3D Effects>Drop Shadow, set the drop to 3 vertical, 2 horizontal, 50 opacity, 4 blur.

Add your copyright info and your tag.

Merge everything in Layers>Merge>Merge Visible


Animation

Open the tag in Animation Shop.
Right click on the tag and duplicate it until you have 4 frames.

Open the animation from the supplies.
Go to Edit>Select All, Edit>Copy

Go to the tag with the first frame selected,
Go to Edit Select All, Edit>Paste Into Selected Frame

Your animation will show up at the end of your mouse cursor.
Use this to position the animation where you would like over the image and click to paste.
This will paste all four frames of the animation onto all four frames of the tag making the animation seamless.

You may need to undo and retry over and over until you get it the way you want it!
Once you’re all set you are able to view your animation and save as a GIF file!


All Finished!

Wednesday, March 31, 2010

Forever Twilight- PTU


Now you can download a PDF copy of this tutorial to do without using your internet browser.
Download Here
I've used the lovely PTU artwork of Irene Shpak. You can purchase her art HERE.
This is PTU kit called Forever from Cora’s Creations (Pimp'd Designz). Visit her blog for links to her store HERE.
The mask is WSL_Mask7, by Wee Scot Lass. You can get it HERE.
Font used is Adios Script (Pro and Caps II).


Let’s Begin!

Open a new canvas that’s 800x800 pixels.

Copy and Paste your tube onto your canvas.
Move and resize it to your liking.

Open kayboard from kit.
Copy and Paste it as a new layer.
Resize and arrange it as shown.

Open greens-01 from kit.
Copy and Paste it below the tube.
Resize and arrange it over to the right.
Layer>Duplicate, Image>Mirror over to the right.
Move the right one around a little so they aren’t exactly the same.

Open greens-02 from kit.
Copy and Paste it as a new layer.
Resize and arrange it to the bottom as shown.
Layer>Duplicate, Image>Flip and move to the middle of the tube.

Open rose petals from kit.
Copy and Paste it above the keyboard.
Resize and arrange it as shown.

Open ribbon-01 from kit.
Copy and Paste it as a new layer.
Resize and arrange it as shown.

Open music-note from kit.
Copy and Paste it as a new layer.
Resize and arrange it as shown.
Layer>Duplicate and move the lower music note below the ribbon.
On the top music note and using the eraser tool,
Erase a little bit of the music note so that it looks as if it’s around the ribbon.

Open charm from kit.
Copy and Paste it as a new layer.
Resize and arrange it as shown.
Layer>Duplicate and move the lower charm below the ribbon.
On the top charm and using the eraser tool,
Erase a little bit of the charm loop so that it looks as if it’s around the ribbon.

Open star-01 from kit.
Copy and Paste it as a new layer.
Resize and arrange it as shown.

Open flower-01 from kit.
Copy and Paste it into your canvas.
Image>Duplicate it 3 times.
Move these flowers around the tag as shown, behind different layers.

Open wa-01 from kit.
Copy and Paste it as a new layer on top of everything.
Resize and arrange it as shown.

Open print2 from kit.
Copy and Paste it behind everything.
Resize and arrange it to the left.
Layer>Duplicate, Image>Mirror

Open paper pp-04 from kit.
Copy and Paste it at the bottom of the tag.
Add your mask by going to Layer>Load/ Save Mask>Load Mask from Disk.
Apply the mask named WSL_Mask7.
Merge the mask group by right clicking the layer of the finished mask, go to Merge>Merge Group.
Resize and arrange it to fit as shown.

I used a combination of Adios Script, both Pro and Caps II. Set it to a size that you like and a stroke width of 3.
Foreground color to white and background color to black.
I used the Adios Script Caps II for the first letter, and Adios Script Pro for the lower case letters.
Duplicate the layer and select the second font layer with the font tool.
Set the stroke width to 0.
Merge the 2 font layer and convert to a raster layer.

Drop shadow everything except the mask.
Effects>3D Effects>Drop Shadow, set the drop to 3 vertical, 2 horizontal, 75 opacity, 4 blur.

Add your copyright info and your tag.

Merge everything in Layers>Merge>Merge Visible


All Finished!

Tuesday, March 30, 2010

Doctor Doctor- FTU

Now you can download a PDF copy of this tutorial to do without using your internet browser.
Download Here
I've used the lovely PTU artwork of Elias Chatzoudis. You can purchase his art HERE.
This is my PTU kit called Doctor Doctor. Visit my blog for links to my stores HERE.
This kit is now FTU and can be found on my Blog.
I used my Doctor WA Freebie. You can get it on my blog HERE.
The mask is WSL_Mask7, by Wee Scot Lass. You can get it HERE.
Font used is LD Jilly Nilly.


Let’s Begin!

Open a new canvas at 800x800 pixels.

Open element7 (clipboard) from kit.
Copy and Paste it onto your canvas.
Rotate it to the left slightly and move over to the left.

Copy and Paste your tube as a new layer and arrange it slightly to the right.

Copy and Paste your tube (preferably a closeup) above the clipboard.
Arrange it above the “paper” for how you want it to show through.
Now with your magic wand tool and your clip board selected,
Select the paper part of the clipboard.
Go to the closeup tube layer and go to
Selections>Invert, hit the Delete button on your keyboard.
Selections>None

Open element33 (leaves) from kit.
Copy and Paste it below the clipboard.
Resize and arrange it to the right as shown.

Open element28 (red & white swirl) from kit.
Copy and Paste it as a new layer.
Resize and arrange it as shown.

Open element14 (pin) from kit.
Copy and Paste it above the closeup tube.
Resize and arrange it to the left as shown.

Open element29 (dots) from kit.
Copy and Paste it as a new layer.
Resize and arrange it to the left of the clipboard.

Open element6 (syringe) from kit.
Copy and Paste it as a new layer.
Resize and arrange it to the left as shown.

Open element5 (case) from kit.
Copy and Paste it as a new layer.
Resize and arrange it to the left as shown.

Open element8 (pill) from kit.
Copy and Paste it as a new layer.
Resize and arrange it to the left as shown.

Open element31 (red swirls) from kit.
Copy and Paste it as a new layer.
Resize and arrange it to the bottom as shown.

Open element30 (tag) from kit.
Copy and Paste it above the main tube.
Resize and arrange it in the middle as shown.

Open element2 (stethoscope) from kit.
Copy and Paste it as a new layer.
Resize and arrange it to the right as shown.

Open element9 (bow) from kit.
Copy and Paste it as a new layer.
Resize and arrange it as shown.

Open Doctor WA 1-2 from Freebie.
Copy and Paste it as a new layer.
Resize and arrange it above the tag as shown.

Open paper3 from kit.
Copy and Paste it at the bottom, below the leaves.
Add your mask by going to Layer>Load/ Save Mask>Load Mask from Disk.
Apply the mask named WSL_Mask7.
Merge the mask group by right clicking the layer of the finished mask, go to Merge>Merge Group.
Resize and arrange it to fit as shown.

I used the font LD Jilly Nilly. Set it to a size you like and a stroke width of 5.
Foreground color to white and background color to black.
Duplicate the layer and select the second font layer with the font tool.
Set the stroke width to 0.
Merge the 2 font layer and convert to a raster layer.

Drop shadow everything except the mask.
Effects>3D Effects>Drop Shadow, set the drop to 3 vertical, 2 horizontal, 75 opacity, 4 blur.

Add your copyright info and your tag.

Merge everything in Layers>Merge>Merge Visible

All Finished!

Thursday, March 25, 2010

Just Dance- PTU


Now you can download a PDF copy of this tutorial to do without using your internet browser.

I've used the lovely FTU tube by Irene Shpak. You can get it HERE. You still need a MPT license to use this tube. If you don’t have one, request one from customer service.
This is a PTU tagger kit called Rock Me by Cora’s Creations (Pimp'd Designz). Visit her blog for links ot her store HERE.
Font used is Toonish and Carpenter.


Let’s Begin!


Open a new canvas that’s 800x800 pixels.

Open frame-05 from kit.
Copy and Paste it as a new layer.

Open paper pp-02.
Using your magic wand tool select within the frame.
Selections>Modify>Expand- 6
Copy and Paste your paper as a new layer.
Selections>Invert, hit the Delete button on your keyboard to delete the excess.
Move the paper below the frame.

Copy and Paste your tube above the paper.
Layers>Duplicate
On the upper tube go to Adjust>Blur>Gaussian Blur- 3
Layers>Properties- Blend Mode to Soft Light

Open beads-01 from kit.
Copy and Paste it behind the tube.
Resize and arrange it as shown.
Effects>Photo Effects>Black and White Film
Brightness and Clarify set to 0.

Open ribbon-03 from kit.
Copy and Paste it as a new layer.
Resize and arrange it as shown.

Open flower-03 from kit.
Copy and Paste it as a new layer.
Resize and arrange it as shown.

Open music-note-05 from kit.
Copy and Paste it as a new layer.
Resize and arrange it as shown.

Open music-note-04 from kit.
Copy and Paste it above the frame.
Resize and arrange it around the frame as shown.

Open skull from kit.
Copy and Paste it as a new layer.
Resize and arrange it to the right as shown.

Open wire from kit.
Copy and Paste it underneath everything.
Resize and arrange it as shown.

I used the font Toonish for “JUST DANCE”.
Set it to a size you like and the color to black.

I used the font Carpenter for the name. Set it to a size you like, and a stroke width of 3.
Foreground color to white and background color to #7a5793.
Duplicate the layer and select the second font layer with the font tool.
Set the stroke width to 0.
Merge the 2 font layer and convert to a raster layer.

Drop shadow everything except the mask.
Effects>3D Effects>Drop Shadow, set the drop to 3 vertical, 2 horizontal, 75 opacity, 4 blur.

Add your copyright info and your tag.

Merge everything in Layers>Merge>Merge Visible

All Finished!

Rock Me- PTU


Now you can download a PDF copy of this tutorial to do without using your internet browser.
Download Here
I've used the lovely PTU artwork of Elias Chatzoudis. You can purchase his work HERE.
This is a PTU tagger kit called Rock Me by Cora’s Creations (Pimp'd Designz). Visit her blog for links to her store HERE.
Font used is Aquarelle.


Let’s Begin!

Open a new canvas that’s 800x800 pixels.

Open frame-01 from kit.
Copy and Paste it as a new layer.

Open paper pp-03.
Using your magic wand tool select within the left square of the frame.
Selections>Modify>Expand- 6
Copy and Paste your paper as a new layer.
Selections>Invert, hit the Delete button on your keyboard to delete the excess.
Move your paper below the frame.

Follow this procedure with the remaining squares.
Put paper pp-06 in the top square.
Put paper pp-12 in the right square.
Put paper pp-07 in the bottom square.

Copy and Paste your main tube for the outside of the frame on top of the frame.
Arrange it as shown to the left of the frame.
Go to Effects>Photo Effects>Black and White Film
Set the Brightness to 50 and Clarify to 0.
Layers>Duplicate the tube.
On the upper tube, Adjust>Blur>Gaussian Blur- 3
Layers>Properties- Blend Mode to Soft Light

Open crowd from kit.
Copy and Paste it above the paper for the bottom square.
Resize and arrange it in the center of the bottom square.
Layer>Duplicate it and move it to the right, right next to the first one.

Copy and Paste the crowd again into the top square.
Resize and arrange it as shown.

Copy and Paste another tube for the top square.
Erase the portions of the tube hanging outside of the square.
Black and White the tube with Brightness and Clarify set to 0.
Again Duplicate, Blur, and Soft Light the upper tube.

Copy and Paste another tube for the left square.
Erase the portions of the tube hanging outside of the square.
Black and White the tube with Brightness and Clarify set to 0.
Again Duplicate, Blur, and Soft Light the upper tube.
On the lower tube set the blend mode to Luminance (Legacy).

Open flowers-02 from kit.
Copy and Paste it as a new layer.
Resize and arrange it in the left square as shown.

Open speaker from kit.
Copy and Paste it above the paper for the right square.
Resize and arrange it in the right square as shown.
Erase any portions of the speaker hanging outside of the square.

Open guitar from kit.
Copy and Paste it as a new layer.
Resize and arrange it in the right square as shown.

Copy and Paste another tube for the right square.
Erase the portions of the tube hanging outside of the square.
Black and White the tube with Brightness and Clarify set to 0.
Again Duplicate, Blur, and Soft Light the upper tube.

Open spot-light from kit.
Copy and Paste it as a new layer.
Resize and arrange it in the right square as shown.

Open music-note-01 from kit.
Copy and Paste it above the frame.
Resize and arrange it in the middle as shown.

Open music-note-02 from kit.
Copy and Paste it as a new layer.
Resize and arrange it to the right as shown.

Open sparkle from kit.
Copy and Paste it as a new layer.

Open mic from kit.
Copy and Paste it as a new layer.
Resize and arrange it to the right as shown.

Open mask from kit.
Copy and Paste it as a new layer underneath everything.

I used the font Aquarelle. Set it to a size you like, and a stroke width of 5.
Foreground color to white and background color to #7a5793.
Duplicate the layer and select the second font layer with the font tool.
Set the stroke width to 0.
Merge the 2 font layer and convert to a raster layer.

Drop shadow everything except the mask.
Effects>3D Effects>Drop Shadow, set the drop to 3 vertical, 2 horizontal, 75 opacity, 4 blur.

Add your copyright info and your tag.

Merge everything in Layers>Merge>Merge Visible


All Finished!

Tuesday, March 16, 2010

Ms Bunny- FTU


Now you can download a PDF copy of this tutorial to do without using your internet browser.
Download Here
I've used the lovely PTU artwork of Elias Chatzoudis. You can purchase his work HERE.
This is a FTU tagger kit called Ms Bunny by Cora’s Creations (Pimp'd Designz). Visit her blog and get it HERE.
The mask was not by me but I did alter it for use in PSP and have added it to my supplies. It is for personal use only and you can get it HERE.
Font used is LD Jilly Nilly.


Let’s Begin!


Open a new canvas that’s 800x800 pixels.

Open frame-02 from kit.
Copy and Paste it as a new layer.

Open paper pp05.
Copy and Paste this paper behind the frame.
Move the paper up so that the bottom of the rays show through the frame.
Erase the paper that shows outside of the frame.

Copy and Paste your tube above the frame.
Arrange it to the right of the frame as shown.
This tube has the bunny on a separate layer.
Copy and Paste the bunny as a new layer and arrange next to the tube.

Open swirl-01 from kit.
Copy and Paste it above the frame.
Resize and arrange in center of frame as shown.

Open grass from kit.
Copy and Paste it as a new layer.
Resize and arrange it to the left as shown.
Layer>Duplicate and move to the let between the bunny and tube.

Open balloon-01 from kit.
Copy and Paste it as a new layer.
Resize and arrange it by the grass as shown.

Open hearts-01 from kit.
Copy and Paste it as a new layer.
Resize and arrange it to the left as shown.

Open egg-01 from kit.
Copy and Paste it as a new layer.
Resize and arrange it as shown.

Open paper pp06 and Copy and Paste it below everything.
Add your mask by going to Layer>Load/ Save Mask>Load Mask from Disk.
Apply the mask named ASD_IndianSummer.
Merge the mask group by right clicking the layer of the finished mask, go to Merge>Merge Group.
Resize and arrange mask to fit as shown in the tag.

I used the font LD Jilly Nilly. Set it to a size you like, and a stroke width of 5.
Foreground color to white and background color to black.
Duplicate the layer and select the second font layer with the font tool.
Set the stroke width to 0.
Merge the 2 font layer and convert to a raster layer.

Drop shadow everything except the mask.
Effects>3D Effects>Drop Shadow, set the drop to 3 vertical, 2 horizontal, 75 opacity, 4 blur.

Add your copyright info and your tag.

Merge everything in Layers>Merge>Merge Visible


All Finished!

Sunday, March 14, 2010

Only In My Dreams- PTU


Now you can download a PDF copy of this tutorial to do without using your internet browser.
Download Here
I've used an FTU tube from Zindy S.D.Nielsen. You can get it HERE. Make sure to read her free tube TOU to properly credit her if you do not have a license for her.
This is PTU kit called Only In My Dreams from Cora’s Creations (Pimp'd Designz). Visit her blog for links to her stores HERE.
The mask 349 by Vixen. Download it on her blog HERE.
Font used is Adine.


Let’s Begin!

Open a new canvas that’s 800x800 pixels.

Open cloud-01 from kit.
Copy and Paste it to your canvas.
Move it down slightly to make room for the rest of the tag.

Open stars-01 from kit.
Copy and Paste it as a new layer.

Copy and Paste your tube as a new layer.
Arrange it slightly up so that it looks like it’s sitting on the cloud.

Copy and Paste the following elements in this order and
Resize and arrange them as shown in the tag:
Stars-06
Ribbon-05
Feather
Cloud-02 (Duplicate, Mirror, and resize and arrange the second one)
Ribbon-01
Moon-01
Stars-05
Lights-01

Open paper pp-03 from kit.
Copy and Paste below the bottom layer of the tag.
Add your mask by going to Layer>Load/ Save Mask>Load Mask from Disk.
Apply the mask named Vix_Mask349.
Resize the mask layer and Layer>Flip as needed before merging.
Merge the mask group by right clicking the layer of the finished mask, go to Merge>Merge Group.

I used the font Adine. Set it to a size that you like and a stroke width of 5.
Foreground color to white and background color to black.
Duplicate the layer and select the second font layer with the font tool.
Set the stroke width to 0.
Merge the 2 font layer and convert to a raster layer.

Drop shadow everything except the feather, stars-06, tube, and mask layers.
Effects>3D Effects>Drop Shadow, set the drop to 3 vertical, 2 horizontal, 50 opacity, 5 blur.

Add your copyright info and your tag.

Merge everything in Layers>Merge>Merge Visible

All Finished!