

You can use a tube of choice.
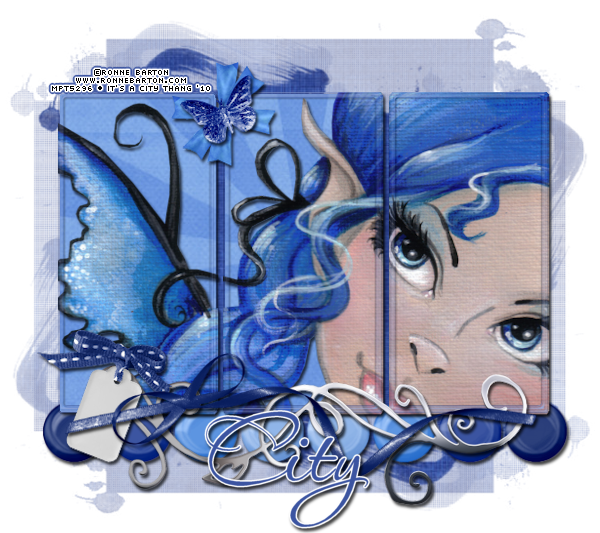
I've used an FTU tube by Ronne Barton which was available at MPT but is no longer there.
This is a PTU kit called Bluetonic by Seven’s Scraps. You can visit her blog for links to her stores HERE.
The mask is WSL_Mask359, by Wee Scot Lass. You can get it HERE.
Font used is Aquarelle.
Let’s Begin!
Open a new canvas 800x800.
Open paper 12 from kit.
Copy and Paste it as a new layer.
Copy and Paste your tube as a new layer.
Open frame02 from kit.
Copy and Paste it as a new layer.
Resize it slightly if needed so that the tube fits within frame.
Using your magic wand tool select on the outside of the frame so the extra space outside of the frames are selected.
Go to Selections>Modify>Expand, and expand by 2.
Select your tube layer and hit the Delete button on your keyboard to delete the excess.
Select the paper layer and hit the Delete button.
Open flowerbow03 from kit.
Copy and Paste it above the kit.
Resize and arrange it to the upper left.
Open butterfly01 from kit.
Copy and Paste it as a new layer.
Resize and arrange it above the flower bow.
Open doodle03 from kit.
Copy and Paste it as a new layer.
Image>Mirror
Resize and arrange it to the bottom of the frame.
Open tag03 from kit.
Copy and Paste it as a new layer.
Resize and arrange it to the left.
Open ribbon05 and from kit.
Copy and Paste it as a new layer.
Resize and arrange it at the bottom of the tag.
Open buttons01 from kit.
Copy and Paste it below the paper behind the frame.
Resize and arrange it to the bottom of the frame.
Open paper22 from kit.
Copy and Paste it at the bottom, below the buttons.
Add your mask by going to Layer>Load/ Save Mask>Load Mask from Disk.
Apply the mask named WSL_Mask359.
Merge the mask group by right clicking the layer of the finished mask, go to Merge>Merge Group.
I used the font Aquarelle. Use a size you like and a stroke width of 3.
Foreground color to white and background color to #3b54a1.
Duplicate the layer and select the second font layer with the font tool.
Set the stroke width to 0.
Merge the 2 font layers and convert to a raster layer.
Drop shadow everything except the frame.
Effects>3D Effects>Drop Shadow, set the drop to 3 vertical, 2 horizontal, 75 opacity, 4 blur.
Add your copyright info and your tag.
Merge everything in Layers>Merge>Merge Visible
Crop and Resize as you like.
All Finished!
No comments:
Post a Comment