

Now you can download a PDF Copy of this tutorial to do without using your internet browser.
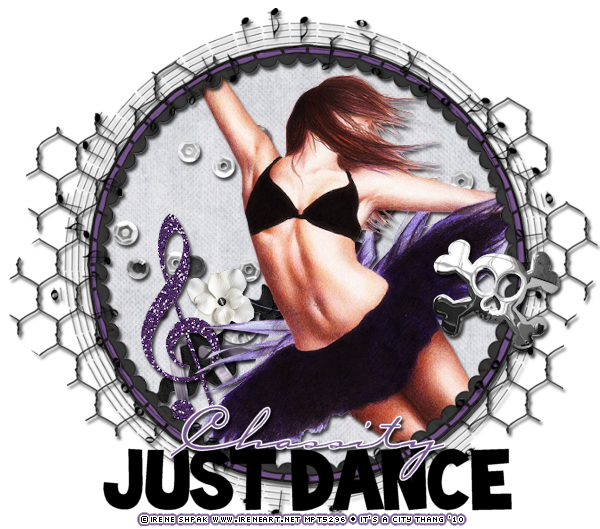
I've used the lovely PTU artwork of Irene Shpak. You can purchase her art at MPT.
This is a PTU kit called Twilight by Pimpd Designz. Visit her blog for links to her stores HERE.
Mask of choice. The mask is called photomask 2 by Timo3 but I can’t find where I got it.
Alien Skin Xenofex2- Constellation for animation and an animation program like Animation Shop.
Font used is AllisonROB.
Let’s Begin!
Open a new canvas at 800x800 pixels.
Open frame-01 from the kit.
Copy and Paste as a new layer.
Resize it a little smaller.
Copy and Paste your tube as a new layer.
I’ve used the close up tube provided.
Resize and arrange it to fit in the window.
Duplicate your frame layer and move it above the tube.
Using your eraser tool, erase the top of the upper frame covering the tube heads.
Also, erase any portion of the tube hanging out at the bottom of the frames.
Open paper pp-12 from kit.
Copy and Paste it behind the bottom frame.
Erase any portion of the paper hanging outside of the frame.
Open greens-03 from kit.
Copy and Paste it below this paper layer.
Image>Mirror
Resize and arrange it to fit as shown.
Open flowers-01 from kit.
Copy and Paste it as a new layer.
Layer>Duplicate
Move one to the upper left and one to the lower right of frame.
Open glitter-01 from kit.
Copy and Paste it above the top frame layer.
Open the following elements and paste them in this order.
Resize and arrange them as shown.
Ribbon-02
Hearts-02
Ribbon-03
Open bracket from kit.
Copy and Paste it as a new layer.
Resize and arrange it to the left of the tag as shown.
Layer>Duplicate, Image>Mirror
Move the right bracket over some more if needed.
Open ribbon02 from kit.
Copy and Paste it as a new layer.
Resize and arrange it at the bottom of the tag as shown.
Open wa-01 from kit.
Copy and Paste it as a new layer.
Resize and arrange it at the bottom of the tag as shown.
Selections>Select All, Selections>Float, Selections>Defloat
Selections>Modify>Expand- 2
Layer>New Raster Layer
Flood fill the selection with white.
Selections>Select None
Move this white layer below the wordart layer.
Merge the two layers together.
Open staple from kit.
Copy and Paste it as a new layer.
Resize and arrange it above the wordart as shown.
Open paper pp-12 from kit.
Copy and Paste it at the bottom of the tag.
Add your mask by going to Layer>Load/ Save Mask>Load Mask from Disk.
Apply your mask of choice.
Merge the mask group by right clicking the layer of the finished mask, go to Merge>Merge Group.
Resize and arrange it to fit as shown.
I used the font AllisonROB. Set it to a size you like and a stroke width of 4.
Foreground color to white and background color to black.
Duplicate the layer and select the second font layer with the font tool.
Set the stroke width to 0.
Merge the two font layers and convert to a raster layer.
Drop shadow everything except the mask.
Effects>3D Effects>Drop Shadow, set the drop to 3 vertical, 2 horizontal, 75 opacity, 4 blur.
Add your copyright info and your tag.
Merge everything in Layers>Merge>Merge Visible
Crop and resize as needed.
Animation
Merge the two bracket layers together.
Selections>Select All, Selections>Float, Selections>Defloat
New Raster Layer
Flood fill these selections with white.
On this white layer go to Effects>Plugins and go to Xenofex Constellation.
Apply setting that you like or the settings shown below.
You must have the Background Fill set to Make Selection Transparent.
Hit Ok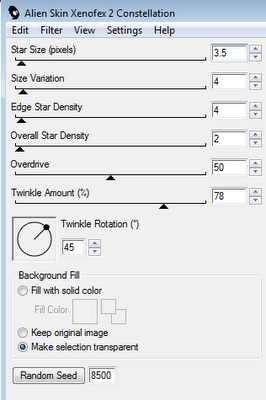
Now Copy Merged and Paste it over in Animation Shop.
Back in PSP hit Undo and go to Constellation again.
Hit Random Seed at the bottom and Ok again.
Copy Merged and Paste this in AS After Current Frame.
Go back to PSP one more time and hit Undo.
Go to Constellation and hit Random Seed.
Copy and Paste this After Current Frame in AS.
Now just save as a GIF.
All Finished!

