Showing posts with label Pimp'd Designz Kit. Show all posts

Wednesday, July 27, 2011

Atlantis- PTU


Download this tut in a PDF file.
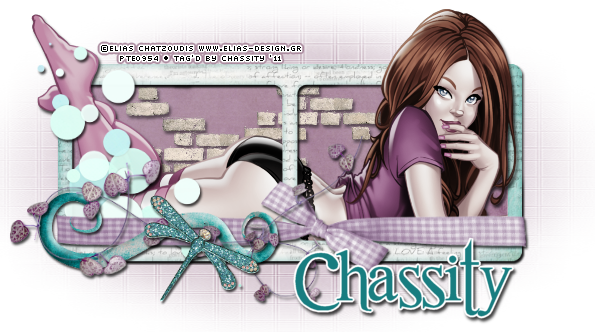
I've used the lovely PTU tube by Elias Chatzoudis. You can get it at PTE.
This is a PTU tagger kit called Atlantis by Pimp’d Designz. Visit her blog for links to her store.
Font used is WaterBrush by Rob Lusche.


Let’s Begin!


Open a new canvas that’s 800x800 pixels.

Open frame-02 from kit.
Copy and Paste it as a new layer.
Resize it down some to make it easier to work around.

Open paper pp-05.
Copy and Paste it below your frame.
Resize it down so that the frame on the paper is behind the actual frame.
Use your eraser tool to erase any portion of the paper hanging outside of the frame.

Copy and Paste your tube above the frame.
Layers>Duplicate
On the lower tube go to Effects>Photo Effects>Black & White Film,
Brightness: -50, Contrast: 25
On the upper tube go to Layers>Properties- Blend Mode to Soft Light

Open sea-grass-01 from kit.
Copy and Paste it above the frame’s paper.
Resize and arrange it at the bottom as shown.

Open coral from kit.
Copy and Paste it as a new layer.
Resize and arrange it at the bottom as shown.

Open jelly-fish2 from kit.
Copy and Paste it as a new layer.
Resize and arrange it at the top as shown.

Open light-01 from kit.
Copy and Paste it as a new layer.
Resize and arrange it in the upper left corner as shown.
Erase any portion of the light hanging outside of the frame.

Open mesh-02 from kit.
Copy and Paste it below the paper.
Resize and arrange it around the frame as shown.

Open print-01 from kit.
Copy and Paste it below the mesh frame.
Resize and arrange it around the mesh frame as shown.

Open splash-02 from kit.
Copy and Paste it above frame.
Resize and arrange it over the window as shown.

Open waves-01 from kit.
Copy and Paste it as a new layer.
Resize and arrange it to the left as shown.

Open sand from kit.
Copy and Paste it as a new layer.
Resize and arrange it to the bottom right as shown.

Open compass from kit.
Copy and Paste it as a new layer.
Resize and arrange it to the top left as shown.

Open net from kit.
Copy and Paste it above the tube layers.
Resize and arrange it to the left as shown.

Open rope-02 from kit.
Copy and Paste it as a new layer.
Layer>Mirror
Resize and arrange it to the left as shown.

Open anchor from kit.
Copy and Paste it as a new layer.
Resize and arrange it to the left as shown.

Open rope-01 from kit.
Copy and Paste it as a new layer.
Resize and arrange it to the bottom as shown.

Open bottle2 from kit.
Copy and Paste it as a new layer.
Resize and arrange it to the left as shown.

Open rock-02 from kit.
Copy and Paste it as a new layer.
Resize and arrange it to the left as shown.

Open hook from kit.
Copy and Paste it as a new layer.
Resize and arrange it to the left as shown.

I used the font WaterBrush. Set it to a size you like, and a stroke width of 4.
Foreground color to white and background color to #e15a37.
Duplicate the layer and select the second font layer with the font tool.
Set the stroke width to 0.
Merge the 2 font layer and convert to a raster layer.

Drop shadow everything except the mask.
Effects>3D Effects>Drop Shadow, set the drop to 3 vertical, 2 horizontal, 75 opacity, 4 blur.

Add your copyright info and your tag.

Merge everything in Layers>Merge>Merge Visible


All Finished!

Sunday, July 3, 2011

Love Forever- FTU


Download a PDF file of this tutorial.
I've used the lovely PTU artwork of Zindy Nielsen.
This is a FTU kit called Love Forever from Pimp’d Designz and is available through the Taggers Art Magazine May Issue.
I used a modified mask by Tempus Fugit. You can get the modified version HERE.
Font used is Shit Happens.

Let’s Begin!


Open a new canvas that’s 800x800 pixels.

Open frame-04 from kit.
Copy and Paste it to your canvas.
Resize it slightly if needed and arrange it in the center of your canvas.

Copy and Paste the tube below the frame and arrange it as shown.
Erase any portion of your tube hanging outside of your frame.
Duplicate the tube and change the upper tube's blend mode to soft light.

Open paper pp-06 from kit.
Copy and Paste your paper below your tube.
Resize it slightly to fit behind the tube as you like.
Erase any portion of the paper hanging outside of the frame’s edges.

Open moon from kit.
Copy and Paste it behind the bottom paper layer.
Resize and arrange it behind the upper right corner.
Open diamond-rain from kit.
Copy and Paste it above the frame layer.
Resize it and arrange it over the upper right corner as shown.

Open ribbon-02 from kit.
Copy and Paste it as a new layer.
Resize and arrange it as a new layer.
Duplicate it and move the lower layer below the paper layer (above the moon layer).
On the upper ribbon layer, erase the right side to make it look like it’s draped over the edge.
Erase the lower part of the ribbon that’s bent to the left.

Open lace-01 from kit.Copy and Paste it as a new layer.
Resize and arrange it to the bottom right as shown.

Open splatter-01 from kit.
Copy and Paste it as a new layer.
Resize and arrange it over the lace as shown.
Duplicate it and resize it smaller and move it to the left side of the frame.
Open swirl-01 from kit.
Copy and Paste it as a new layer.
Resize and arrange it to the left as shown.

Open flower-01 from kit.
Copy and Paste it as a new layer.
Layer>Mirror it.
Resize and arrange it to the bottom as shown.
Open leaves-01 from kit.
Copy and Paste it as a new layer.
Layer>Mirror it.
Resize and arrange it at the bottom as shown.

Open heart-02 from kit.
Copy and Paste it as a new layer.
Resize and arrange it at the upper edge of the lace.
Layer>Duplicate, resize it smaller and move it to down.
On the bigger heart layer erase the right heart, on the smaller erase the left.
Open leaves-03 from kit.
Copy and Paste it as a new layer.
Resize and arrange it as shown.

Open apple from kit.
Copy and Paste it as a new layer.
Resize and arrange it to the right as shown.

Open paper pp-06 from kit.
Copy and Paste it at the bottom of the tag.Add your mask by going to Layer>Load/ Save Mask>Load Mask from Disk.
Apply the mask.
Merge the mask group by right clicking the layer of the finished mask, go to Merge>Merge Group.
Resize and arrange it to fit as shown.

I used the font Shit Happens. Set it to a size you like and a stroke width of 4.
Foreground color to white and background color to #9b081a.
Duplicate the layer and select the second font layer with the font tool.
Set the stroke width to 0.
Merge the 2 font layer and convert to a raster layer.

Drop shadow everything except the mask.
Effects>3D Effects>Drop Shadow, set the drop to 3 vertical, 2 horizontal, 75 opacity, 4 blur.

Add your copyright info and your tag.

Merge everything in Layers>Merge>Merge Visible


All Finished!

Sunday, April 10, 2011

Into Forever- PTU


Download this tutorial in a PDF file.
I've used the lovely PTU artwork of Lady Mishka. Visit her site for info on where she will be selling.
This is PTU kit called Into Forever from Pimp’d Designz. Visit her blog for links to her stores HERE.
The mask is Vix_Mask109, by VixPSP.
Font used is Carpenter.


Let’s Begin!


Open a new canvas that’s 800x800 pixels.

Open frame-04 from kit.
Copy and Paste it to the canvas.
Resize as needed to fit better within your canvas.

Copy and Paste your tube behind your frame.
Resize and arrange it to fit within the opening of the frame.
Duplicate your tube layer.
Change the bottom tube layer to Black & White by going to
Effects>Photo Effects>Black and White Film
On the upper tube layer change the blend mode to Soft Light.

Open paper pp-09 from kit.
Copy and Paste it below the bottom tube layer.
Resize it so that the upper right of the paper shows through the frame.

Open the following elements from the kit.
Copy and paste them in this order below the paper layer.
Resize and arrange them as shown.

Moon
Music-sheets
wings

Open the following elements from the kit.
Copy and paste them in this order above the frame layer.
Resize and arrange them as shown.

Ribbon-03
Flora-07
Flower-05
Flower-04
Clock
Flower-03
Sparkle

Open paper pp-09 from kit.
Copy and Paste it at the bottom of the tag.
Add your mask by going to Layer>Load/ Save Mask>Load Mask from Disk.
Apply the mask named Vix_Mask109.
Merge the mask group by right clicking the layer of the finished mask, go to Merge>Merge Group.
Resize and arrange it to fit as shown.

I used the font Carpenter. Set it to a size that you like and a stroke width of 3.
Foreground color to white and background color to black.
Duplicate the layer and select the second font layer with the font tool.
Set the stroke width to 0.
Merge the 2 font layer and convert to a raster layer.

Drop shadow everything except the mask.
Effects>3D Effects>Drop Shadow, set the drop to 3 vertical, 2 horizontal, 75 opacity, 4 blur.

Add your copyright info and your tag.

Merge everything in Layers>Merge>Merge Visible


All Finished!

Just Gorjuss- PTU


Download this tutorial in a PDF file.
I've used the lovely PTU artwork of Suzanne Woolcott at Gorjuss.
This is PTU kit called Just Gorjuss from Pimp’d Designz. Visit her blog for links to her stores HERE.
The mask is WSL_Mask81, by Wee Scot Lass.
Font used is Porcelain.


Let’s Begin!


Open a new canvas that’s 800x800 pixels.

Open frame-02 from kit.
Copy and Paste it to the canvas.
Rotate it 90 degrees to the left.
Resize as needed to fit better within your canvas.

Copy and Paste your tube as a new layer.
Resize and arrange it over to the left within the frame’s window as shown.

Once you have your tube the way you want it,
duplicate your frame layer and move it above the tube layer.
Using your eraser tool, erase any portion of the frame that’s covering the upper part of the tube.
Erase the part of the tube hanging below the bottom of the frame.

Open paper pp-03 from kit.
Copy and Paste it below the bottom frame layer.
Resize it to fit the opening of the frame.

Open the following elements from the kit.
Copy and paste them in this order above the upper frame layer.
Resize and arrange them as shown.

Bracket-01
Doodle-01
Heart-03
Umbrella
Swirl-01
Heart-01
Pinwheel
Flower-03
Flower-04

Open paper pp-02 from kit.
Copy and Paste it at the bottom of the tag.
Add your mask by going to Layer>Load/ Save Mask>Load Mask from Disk.
Apply the mask named WSL_Mask81.
Merge the mask group by right clicking the layer of the finished mask, go to Merge>Merge Group.
Resize and arrange it to fit as shown.

I used the font Porcelain. Set it to a size you like and a stroke width of 3.
Foreground color to white and background color to black.
Duplicate the layer and select the second font layer with the font tool.
Set the stroke width to 0.
Merge the 2 font layer and convert to a raster layer.

Drop shadow everything except the mask.
Effects>3D Effects>Drop Shadow, set the drop to 3 vertical, 2 horizontal, 75 opacity, 4 blur.

Add your copyright info and your tag.

Merge everything in Layers>Merge>Merge Visible


All Finished!

Tuesday, February 15, 2011

True Blood Sam- PTU


Download this tutorial in a PDF file.

I've used the lovely PTU artwork of Elias Chatzoudis. You can purchase it at PTE.
This is a PTU kit called True Blood: Sam by Pimp’d Designz. Visit her blog for links to her store HERE.
The mask is WSL_Mask254, by Wee Scot Lass.
Font used is Trueblood.


Let’s Begin!

Open a new canvas that’s 800x800 pixels.

Open frame-01 from kit.
Copy and Paste it as a new layer.

Copy and Paste your tube under your frame.
Resize and arrange it to fit the frame as shown.

Layers>Duplicate your frame.
Move your second frame below your tube layer.
Select the upper frame and use your eraser tool to erase portions of the frame covering the tube’s upper body.
Erase any portion of the tube hanging out of the bottom of the frame.

Open paper pp-01 from kit.
Copy and Paste it below your bottom frame.
Resize it slightly so that the right side of the paper is showing through the frame as shown.
Erase any portion of the paper hanging out.

Open stitches from kit.
Copy and Paste it below the paper.
Resize and arrange it as shown.

Open tree from kit.
Copy and Paste it as a new layer.
Resize and arrange it to the right as shown.

Open sand from kit.
Copy and Paste it above the upper frame.
Resize and arrange it to the bottom as shown.

Open thread from kit.
Copy and Paste it as a new layer.
Resize and arrange it to the bottom right as shown.

Open greens-02 from kit.
Copy and Paste it as a new layer.
Resize and arrange it to the bottom as shown.

Open ribbon-03 from kit.
Copy and Paste it as a new layer.
Resize and arrange it to the bottom right as shown.

Open ribbon-05 from kit.
Copy and Paste it as a new layer.
Resize and arrange it to the bottom as shown.

Open flower-02 from kit.
Copy and Paste it as a new layer.
Resize and arrange it to the bottom right as shown.

Open ribbon-01 from kit.
Copy and Paste it as a new layer.
Resize and arrange it as shown.

Open paper pp-10 from kit.
Copy and Paste it at the bottom of the tag.
Add your mask by going to Layer>Load/ Save Mask>Load Mask from Disk.
Apply the mask named WSL_Mask254.
Merge the mask group by right clicking the layer of the finished mask, go to Merge>Merge Group.
Resize and arrange it to fit as shown.

I used the font Trueblood. Use a size you like and a stroke width of 3.
Foreground color to white and background color to #201d1e.
Duplicate the layer and select the second font layer with the font tool.
Set the stroke width to 0.
Merge the 2 font layers and convert to a raster layer.

Drop shadow your elements by going to
Effects>3D Effects>Drop Shadow, set the drop to 3 vertical, 2 horizontal, 75 opacity, 4 blur.

Add your copyright info and your tag.

Merge everything in Layers>Merge>Merge Visible

Crop and resize as needed!


All Finished!

True Blood Jessica- PTU


Download this tutorial in a PDF file.
I've used the lovely PTU artwork of Jamie Kidd. You can purchase it at CDO.
This is a PTU kit called True Blood: Jessica by Pimp’d Designz. Visit her blog for links to her store HERE.
I’ve used masks Vix_Mask11 and 112 by Vix PSP.
Font used is Callie Hand.


Let’s Begin!

Open a new canvas that’s 800x800 pixels.

Open frame-02 from kit.
Copy and Paste it as a new layer.

Copy and Paste your tube under your frame.
Resize and arrange it to fit the frame as shown.

Layers>Duplicate your frame.
Move your second frame below your tube layer.
Select the upper frame and use your eraser tool to erase portions of the frame covering the tube’s head.
Erase any portion of the tube hanging out of the bottom of the frame.

Open paper pp-11 from kit.
Copy and Paste it below your bottom frame.
Erase any portion of the paper hanging out.

Open sparkle-01 from kit.
Copy and Paste it below the paper.
Resize and arrange it as shown.

Open flower-01 and flower-02 from kit.
Copy and Paste them above the upper frame.
Resize and arrange it to the bottom as shown.
Layers>Duplicate as needed to cover the bottom as shown.

Open butterfly from kit.
Copy and Paste it above all the flowers.
Resize and arrange it to the left as shown.

Open heart-01 from kit.
Copy and Paste it as a new layer.
Resize and arrange it to the bottom as shown.

Open string-01 from kit.
Copy and Paste it as a new layer.
Resize and arrange it to the bottom right as shown.

Open paper pp-08 from kit.
Copy and Paste it at the bottom of the tag.
Add your mask by going to Layer>Load/ Save Mask>Load Mask from Disk.
Apply the mask named Vix_Mask11.
Merge the mask group by right clicking the layer of the finished mask, go to Merge>Merge Group.
Resize and arrange it to fit as shown.
Copy and Paste paper pp-07 as a new layer.
Repeat this procedure and apply the mask named Vix_Mask112.

I used the font Callie Hand. Use a size you like and a stroke width of 3.
Foreground color to white and background color to #262458.
Duplicate the layer and select the second font layer with the font tool.
Set the stroke width to 0.
Merge the 2 font layers and convert to a raster layer.

Drop shadow your elements by going to
Effects>3D Effects>Drop Shadow, set the drop to 3 vertical, 2 horizontal, 75 opacity, 4 blur.

Add your copyright info and your tag.

Merge everything in Layers>Merge>Merge Visible

Crop and resize as needed!


All Finished!


True Blood Jason- PTU


Download this tutorial in a PDF file.
I've used the lovely PTU artwork of Simon Han. You can purchase it at PTE.
This is a PTU kit called True Blood: Jason by Pimp’d Designz. Visit her blog for links to her store HERE.
The mask is WSL_Mask25, by Wee Scot Lass.
Font used is Good Vibrations ROB.


Let’s Begin!

Open a new canvas that’s 800x800 pixels.

Open frame-02 from kit.
Copy and Paste it as a new layer.
Resize it smaller a little to give yourself more room to work, and center.

Copy and Paste your tube under your frame.
Resize and arrange it to fit the frame as shown.

Layers>Duplicate your frame.
Move your second frame below your tube layer.
Select the upper frame and use your eraser tool to erase portions of the frame covering the tube’s head.

Open paper pp-01 from kit.
Copy and Paste it below your bottom frame.
Erase any portion of the paper hanging out.

Open print-01 from kit.
Copy and Paste it above the upper frame.
Resize and arrange it to the bottom right as shown.

Open ribbon-01 from kit.
Copy and Paste it as a new layer.
Resize and arrange it to the bottom as shown.

Open jean-02 from kit.
Copy and Paste it as a new layer.
Resize and arrange it to the bottom as shown.

Open journal from kit.
Copy and Paste it as a new layer.
Resize and arrange it to the bottom as shown.

Open greens-01 from kit.
Copy and Paste it as a new layer.
Resize and arrange it to the right as shown.

Open ribbon-02 from kit.
Copy and Paste it as a new layer.
Resize and arrange it to the right as shown.

Open flower-01 from kit.
Copy and Paste it as a new layer.
Resize and arrange it to the bottom right as shown.

Open paper pp-06 from kit.
Copy and Paste it at the bottom of the tag.
Add your mask by going to Layer>Load/ Save Mask>Load Mask from Disk.
Apply the mask named WSL_Mask25.
Merge the mask group by right clicking the layer of the finished mask, go to Merge>Merge Group.
Resize and arrange it to fit as shown.

I used the font Good Vibrations ROB. Use a size you like and a stroke width of 3.
Foreground color to white and background color to #91ab1f.
Duplicate the layer and select the second font layer with the font tool.
Set the stroke width to 0.
Merge the 2 font layers and convert to a raster layer.

Drop shadow your elements by going to
Effects>3D Effects>Drop Shadow, set the drop to 3 vertical, 2 horizontal, 75 opacity, 4 blur.

Add your copyright info and your tag.

Merge everything in Layers>Merge>Merge Visible

Crop and resize as needed!


All Finished!


Monday, February 14, 2011

True Blood Tara- PTU


Download this tutorial in a PDF file.
I've used the lovely PTU artwork of Elias Chatzoudis. You can purchase it at PTE.
This is a PTU kit called True Blood: Tara by Pimp’d Designz. Visit her blog for links to her store HERE.
The mask is WSL_Mask62, by Wee Scot Lass.
Font used is Romance Fatal Serif.


Let’s Begin!


Open a new canvas that’s 800x800 pixels.

Open frame-03 from kit.
Copy and Paste it as a new layer.
Resize it smaller a little to give yourself more room to work, and center.

Copy and Paste your tube under your frame.
Image>Mirror
Resize and arrange it to fit the frame as shown.
Layers>Duplicate the tube.
On the bottom tube layer, change it to black and white by going to
Effects>Photo Effects>Black and White Film
Set the Brightness and Clarify to 0
On the upper tube layer, change the blend mode to soft light by going to
Layers>Properties and change the Blend Mode to Soft Light.

Layers>Duplicate your frame.
Move your second frame below your tube layer.
Select the upper frame and use your eraser tool to erase portions of the frame covering the tube’s head and feet.

Open paper pp-09 from kit.
Copy and Paste it below your bottom frame.
Resize it to fit behind the frame and erase any portion hanging out.

Open bricks from kit.
Copy and Paste it as a new layer.
Resize and arrange it to the left as shown.
Layers>Duplicate and move it to the right and up some.
Erase any portion of the bricks hanging outside of the frame.

Open circles from kit.
Copy and Paste it above the upper frame layer.
Resize and arrange it to the left as shown.

Open ribbon-02 from kit.
Copy and Paste it as a new layer.
Resize and arrange it to the bottom as shown.

Open swirl-02 from kit.
Copy and Paste it as a new layer.
Resize and arrange it to the left as shown.

Open string-01 from kit.
Copy and Paste it as a new layer.
Resize and arrange it to the bottom as shown.

Open dragonfly from kit.
Copy and Paste it as a new layer.
Resize, rotate and arrange it to the bottom as shown.

Open paper pp-09 from kit.
Copy and Paste it at the bottom of the tag.
Add your mask by going to Layer>Load/ Save Mask>Load Mask from Disk.
Apply the mask named WSL_Mask62.
Merge the mask group by right clicking the layer of the finished mask, go to Merge>Merge Group.
Resize and arrange it to fit as shown.

I used the font Romance Fatal Serif. Use a size you like and a stroke width of 4.
Foreground color to white and background color to #187d80.
Duplicate the layer and select the second font layer with the font tool.
Set the stroke width to 0.
Merge the 2 font layers and convert to a raster layer.

Drop shadow everything except the duplicated tube and the mask.
Effects>3D Effects>Drop Shadow, set the drop to 3 vertical, 2 horizontal, 75 opacity, 4 blur.

Add your copyright info and your tag.

Merge everything in Layers>Merge>Merge Visible

Crop and resize as needed!


All Finished!


True Blood Lafayette- PTU


Download this tutorials in a PDF file.
I've used the lovely PTU artwork of PinUp Toons. You can purchase it at CDO.
This is a PTU kit called True Blood: Lafayette by Pimp’d Designz. Visit her blog for links to her store HERE.
The mask is WSL_Mask65, by Wee Scot Lass.
Font used is The King & Queen.


Let’s Begin!


Open a new canvas that’s 800x800 pixels.

Open frame-04 from kit.
Copy and Paste it as a new layer.
Resize it smaller a little to give yourself more room to work, and center.

Copy and Paste your tube under your frame.
Resize and arrange it to fit the frame as shown.

Layers>Duplicate your frame.
Move your second frame below your tube layer.
Select the upper frame and use your eraser tool to erase portions of the frame covering the tube’s head and feet.

Open paper pp-08 from kit.
Copy and Paste it below your bottom frame.
Resize it to fit behind the frame and erase any portion hanging out.

Open mat from kit.
Copy and Paste it behind the paper layer.
Resize and arrange it as shown.

Open glitter-01 from kit.
Copy and Paste it above the upper frame layer.
Resize and arrange it to the bottom as shown.

Open print-01 from kit.
Copy and Paste it as a new layer.
Resize and arrange it to the bottom as shown.

Open belt from kit.
Copy and Paste it as a new layer.
Resize and arrange it to the bottom as shown.

Open stars-02 from kit.
Copy and Paste it as a new layer.
Resize and arrange it to the right as shown.

Open ribbon-02 from kit.
Copy and Paste it as a new layer.
Resize and arrange it as shown.

Open swirl-01 from kit.
Copy and Paste it as a new layer.
Resize and arrange it to the right as shown.

Open stars-01 from kit.
Copy and Paste it as a new layer.
Resize and arrange it to the right as shown.

Open lights from kit.
Copy and Paste it as a new layer.
Resize and arrange it to the left as shown.
Erase the upper portion of the strings that are hanging above the frame.

Open paper pp-07 from kit.
Copy and Paste it at the bottom of the tag.
Add your mask by going to Layer>Load/ Save Mask>Load Mask from Disk.
Apply the mask named WSL_Mask65.
Merge the mask group by right clicking the layer of the finished mask, go to Merge>Merge Group.
Resize and arrange it to fit as shown.

I used the font The King & Queen. Use a size you like and a stroke width of 4.
Foreground color to white and background color to black.
Duplicate the layer and select the second font layer with the font tool.
Set the stroke width to 0.
Merge the 2 font layers and convert to a raster layer.

Drop shadow everything except the duplicated tube and the mask.
Effects>3D Effects>Drop Shadow, set the drop to 3 vertical, 2 horizontal, 75 opacity, 4 blur.

Add your copyright info and your tag.

Merge everything in Layers>Merge>Merge Visible

Crop and resize as needed!


All Finished!


Sunday, February 6, 2011

True Blood Pam- PTU


Download this tutorial in a PDF file.

I've used the lovely PTU artwork of PinUp Toons. You can purchase it at CDO.
This is a PTU kit called True Blood: Pam by Pimp’d Designz. Visit her blog for links to her store HERE.
The mask is WSL_Mask62, by Wee Scot Lass.
Font used is Twinkle Star ROB.


Let’s Begin!


Open a new canvas that’s 800x800 pixels.

Open frame-02 from kit.
Copy and Paste it as a new layer.
Resize it smaller a little to give yourself more room to work and center.

Copy and Paste your tube over your frame.
Resize and arrange it to fit the frame as shown.

Layers>Duplicate your frame layer.
Move this second frame above your tube layer.
Use your eraser tool to erase the portions of the frame above the tube except the very bottom.
This will allow it to look like the tube is coming out of the frame.

Open paper pp-09 from kit.
Copy and Paste it below the bottom frame.
Erase any portion of the paper hanging outside of the frame.

Open flower-02 from kit.
Copy and Paste it above the bottom frame layer.
Resize and arrange it to the left as shown.
If the frame is covering it then erase that portion of the frame if possible.

Open pin from kit.
Copy and Paste it as a new layer.
Resize and arrange it to the left as shown.

Open print from kit.
Copy and Paste it above the upper frame layer.
Resize and arrange it to the bottom as shown.
I erased a little portion on the left, but you can do this after all the elements are in place.

Open ribbon-01 from kit.
Copy and Paste it as a new layer.
Resize and arrange it to the bottom as shown.
I erased a little portion on the left, but you can do this after all the elements are in place.

Open flower-bead from kit.
Copy and Paste it as a new layer.
Resize and arrange it to the bottom left as shown.

Open button-01 from kit.
Copy and Paste it as a new layer.
Resize arrange it to the bottom left as shown.

Open swirl-01 from kit.
Copy and Paste it as a new layer.
Resize and arrange it to the bottom as shown.

Open corset from kit.
Copy and Paste it as a new layer.
Resize and arrange it to the bottom as shown.

Open paper pp-03 from kit.
Copy and Paste it at the bottom of the tag.
Add your mask by going to Layer>Load/ Save Mask>Load Mask from Disk.
Apply the mask named WSL_Mask62.
Merge the mask group by right clicking the layer of the finished mask, go to Merge>Merge Group.
Resize and arrange it to fit as shown.

I used the font TwinkleStarROB. Use a size you like and a stroke width of 4.
Foreground color to white and background color to #b12b45.
Duplicate the layer and select the second font layer with the font tool.
Set the stroke width to 0.
Merge the 2 font layers and convert to a raster layer.

Drop shadow everything except the mask.
Effects>3D Effects>Drop Shadow, set the drop to 3 vertical, 2 horizontal, 75 opacity, 4 blur.

Add your copyright info and your tag.

Merge everything in Layers>Merge>Merge Visible

Crop and resize as needed!


All Finished!

True Blood Eric- PTU


Download this tutorials in a PDF file.
I've used the lovely PTU artwork of PinUp Toons. You can purchase it at CDO.
This is a PTU kit called True Blood: Eric by Pimp’d Designz. Visit her blog for links to her store HERE.
The mask is WSL_Mask356, by Wee Scot Lass.
Font used is Fangtasia.


Let’s Begin!

Open a new canvas that’s 800x800 pixels.

Open frame-03 from kit.
Copy and Paste it as a new layer.
Resize it smaller a little to give yourself more room to work and center.

Copy and Paste your close up tube under your frame.
Resize and arrange it to fit the frame.

Copy and paste your regular sized tube on the top of the frame.
Image>Mirror
Resize and arrange it to the left of the frame.

Do this for both tubes.
Layers>Duplicate your tube layer.
Adjust>Blur>Gaussian Blur- 3
Change the blend mode to Soft Light.

Open paper pp-01 from kit.
Copy and Paste it below your tube.
Rotate it to the right slightly so the teeth show a little more.
Erase any portion of the paper hanging outside of the frame.

Open blood-01 from kit.
Copy and Paste it as a new layer.
Resize and arrange it to fit better within the frame so all portions of the blood drips show.
Erase any portion hanging outside of the frame.

Open coffin from kit.
Copy and Paste it at the bottom layer.
Resize and arrange it to the left as shown.

Open moon from kit.
Copy and Paste it as a new layer.
Resize and arrange it to the top left as shown.

Open ribbon-01 from kit.
Copy and Paste it as a new layer.
Resize and arrange it to the right as shown.

Open blood-02 from kit.
Copy and Paste it above the frame layer.
Resize and arrange it to the right as shown.

Open flower-01 from kit.
Copy and Paste it as a new layer.
Resize arrange it to the bottom as shown.
Layers>Duplicate
Resize smaller and arrange a little to the left.
Move this flower below the bigger flower.

Open V from kit.
Copy and Paste it as a new layer.
Resize and arrange it to the right as shown.

Open paper pp-12 from kit.
Copy and Paste it at the bottom of the tag.
Add your mask by going to Layer>Load/ Save Mask>Load Mask from Disk.
Apply the mask named WSL_Mask356.
Merge the mask group by right clicking the layer of the finished mask, go to Merge>Merge Group.
Resize and arrange it to fit as shown.

I used the font Fangtasia. Use a size you like and a stroke width of 4.
Foreground color to white and background color to #911817.
Duplicate the layer and select the second font layer with the font tool.
Set the stroke width to 0.
Merge the 2 font layers and convert to a raster layer.

Drop shadow everything except the duplicated tube, moon and the mask.
Effects>3D Effects>Drop Shadow, set the drop to 3 vertical, 2 horizontal, 75 opacity, 4 blur.

Add your copyright info and your tag.

Merge everything in Layers>Merge>Merge Visible

Crop and resize as needed!


All Finished!


Friday, February 4, 2011

True Blood Sookie- PTU


Download this tutorial in a PDF file.
I've used the lovely PTU artwork of Zindy S.D. Nielsen. You can purchase it at her site.
This is a PTU kit called True Blood: Sookie by Pimp’d Designz. Visit her blog for links to her store HERE.
The mask is WSL_Mask353, by Wee Scot Lass.
Font used is TheNautiGal.


Let’s Begin!

Open a new canvas that’s 800x800 pixels.

Open frame-03 from kit.
Copy and Paste it as a new layer.
Resize it smaller a little to give yourself more room to work and center.

Copy and Paste your tube under your frame.
Resize and arrange it to the right of the frame.

Open paper pp-03 from kit.
Copy and Paste it below your tube.
Resize it to fit behind the frame exactly.

Open gem from kit.
Copy and Paste it above the frame.
Resize and arrange it to the left as shown.
Erase the end of the stem that’s hanging over the frame.

Open greens-01 from kit.
Copy and Paste it as a new layer.
Resize and arrange it to the left as shown.

Open flower-05 from kit.
Copy and Paste it as a new layer.
Resize and arrange it to the left as shown.

Open tag-01 from kit.
Copy and Paste it as a new layer.
Resize and arrange it to the left as shown.

Open ribbon-01 from kit.
Copy and Paste it as a new layer.
Image>Mirror
Resize and arrange it to the bottom as shown.

Open stitches from kit.
Copy and Paste it as a new layer.
Resize, rotate and arrange it to the bottom as shown.

Open curtain from kit.
Copy and Paste it as a new layer.
Image>Mirror
Resize and arrange it to the left as shown.

Open wings from kit.
Copy and Paste as a new layer.
Resize and arrange it to the left as shown.

Open paper pp-09 from kit.
Copy and Paste it at the bottom of the tag.
Add your mask by going to Layer>Load/ Save Mask>Load Mask from Disk.
Apply the mask named WSL_Mask353.
Merge the mask group by right clicking the layer of the finished mask, go to Merge>Merge Group.
Resize and arrange it to fit as shown.

I used the font TheNautiGal. Use a size you like and a stroke width of 4.
Foreground color to white and background color to #582241.
Duplicate the layer and select the second font layer with the font tool.
Set the stroke width to 0.
Merge the 2 font layers and convert to a raster layer.

Drop shadow everything except the duplicated tube and the mask.
Effects>3D Effects>Drop Shadow, set the drop to 3 vertical, 2 horizontal, 75 opacity, 4 blur.

Add your copyright info and your tag.

Merge everything in Layers>Merge>Merge Visible

Crop and resize as needed!


All Finished!


True Blood Bill- PTU


Download this tutorial in a PDF file.
I've used the lovely PTU artwork of PinUp Toons. You can purchase it at CDO.
This is a PTU kit called True Blood: Bill by Pimp’d Designz. Visit her blog for links to her store HERE.
The mask is WSL_Mask360 and 44, by Wee Scot Lass.
Font used is Snaggle Puss.

Let’s Begin!
Open a new canvas that’s 800x800 pixels.
Open frame-03 from kit.
Copy and Paste it as a new layer.
Resize it smaller a little to give yourself more room to work and center.

Copy and Paste your tube as a new layer above your frame.
Layers>Duplicate your frame and drag the layer above your tube layer.
Use your eraser tool to erase the portions of the upper frame that are over the left leg and the
hands. Also erase the left side of the upper frame (you’ll see why later).

On your tube layer, Layers>Duplicate.
Adjust>Blur>Gaussian Blur- 3
Change the blend mode to Soft Light.

Open paper pp-11 from kit.
Copy and Paste it below your bottom frame.
Resize it to fit behind the frame and erase any portion hanging outside of the frame.

Open print-01 from kit.
Copy and Paste it below the background paper.
Resize and arrange it to the left as shown.
Layers>Duplicate, Image>Mirror to place one on the right.

Open green-01 from kit.
Copy and Paste it as a new layer.
Resize and arrange it to the left as shown.
Layers>Duplicate, Image>Mirror to place one on the right.

Open button-02 from kit.
Copy and Paste it under your tube layer.
Resize and arrange it to the left as shown.
Make sure that your upper frame isn’t covering it.
If it is then just erase it some more.

Open key from kit.
Copy and Paste it as a new layer.
Resize and arrange it to the left as shown.

Open button-03 from kit.
Copy and Paste it above the upper frame.
Resize and arrange it to the right as shown.

Open ribbon-01 from kit.
Copy and Paste it as a new layer.
Resize and arrange it to the right as shown.

Open paper pp-08 from kit.
Copy and Paste it at the bottom of the tag.
Add your mask by going to Layer>Load/ Save Mask>Load Mask from Disk.
Apply the mask named WSL_Mask360.
Merge the mask group by right clicking the layer of the finished mask,
go to Merge>Merge Group.
Resize and arrange it to fit as shown.

Follow the same process using paper pp-07 as a new layer, and applying mask WSL_Mask44.

I used the font Snaggle Puss. Use a size you like and a stroke width of 4.
Foreground color to white and background color to #593117.
Duplicate the layer and select the second font layer with the font tool.
Set the stroke width to 0.
Merge the 2 font layers and convert to a raster layer.

Drop shadow everything except the duplicated tube and the mask.
Effects>3D Effects>Drop Shadow, set the drop to 3 vertical, 2 horizontal, 75 opacity, 4 blur.

Add your copyright info and your tag.
Merge everything in Layers>Merge>Merge Visible
Crop and resize as needed!


All Finished!

Tuesday, January 18, 2011

I ♥ You- PTU


Now you can download a PDF Copy of this tutorial to do without using your internet browser.
I've used the lovely PTU artwork of Elias Chatzoudis. You can get it at MPT.
This is a PTU kit called I ♥ You by Pimp’d Designz. Visit her blog for links to her stores.
The mask is WSL_Mask65, by Wee Scott Lass.
Font used is called Showcard Gothic.


Let’s Begin!

Open a new canvas that’s 800x800 pixels.

Open frame-01 from kit.
Copy and Paste it to your canvas.

Copy and Paste your tube as a new layer.

Layer>Duplicate the frame and move the second frame above the tube.
Erase any portion of the frame covering the upper portion of the tube a shown.
Erase any portion of the tube hanging out the bottom of the frame.

Open paper pp-01 from kit.
Using the magic wand tool, select inside the circle of the bottom frame layer.
Go to Selections>Modify>Expand by 5.
Copy and Paste your paper as a new layer.
Selections>Invert and hit the Delete button on your keyboard to delete the extra paper.
Selections>Select None
Move the paper layer below the bottom frame layer.

Open bracket from kit.
Copy and Paste it above the upper frame layer.
Image>Mirror
Resize and arrange it to the right as shown.

Open print-04 from kit.
Copy and Paste it as a new layer.
Resize and arrange it to the bottom as shown.

Open ribbon-04 from kit.
Copy and Paste as a new layer.
Resize and arrange it over the bracket as shown.

Open heart-03 element.
Copy and Paste it as a new layer.
Resize and arrange it over the ribbon as shown.

Open beads-01 from kit.
Copy and Paste it as a new layer.
Resize and arrange it over the bracket as shown.

Open swirl-01 from kit.
Copy and Paste it as a new layer.
Image>Mirror
Resize and arrange it to the bottom as shown.

Open tag-02 from kit.
Copy and Paste it as a new layer.
Resize and arrange it to the bottom as shown.

Open badge-01 from kit.
Copy and Paste it as a new layer.
Resize, rotate slightly and arrange it to the right as shown.

Open button-01 from kit.
Copy and Paste it as a new layer.
Resize and arrange it to the bottom as shown.

Open flower-02 from kit.
Copy and Paste it as a new layer.
Resize and arrange it to the right as shown.
Layers>Duplicate
Resize and arrange it to the left.

Open paper pp-09 from kit.
Copy and Paste it below everything.
Add your mask by going to Layer>Load/ Save Mask>Load Mask from Disk.
Apply the mask named Vix_Mask65.
Merge the mask group by right clicking the layer of the finished mask,
go to Merge>Merge Group.
Resize to fit tag as shown.

I used the font Showcard Gothic. Set it to a size you like and a stroke width of 5.
Foreground color to white and background color to #980000.
Duplicate the layer and select the second font layer with the font tool.
Set the stroke width to 0.
Merge the 2 font layer and convert to a raster layer.

Add drop shadows by going to
Effects>3D Effects>Drop Shadow, set the drop to 3 vertical, 2 horizontal, 75 opacity, 4 blur.

Add your copyright info and your tag.
Crop your image as needed.


All Finished!

Thursday, January 13, 2011

Can't Be Tamed- PTU


Now you can download a PDF Copy of this tutorial to do without using your internet browser.
I've used the lovely PTU artwork of Keith Garvey. You can purchase his art at MPT.
This is a PTU kit called Can’t Be Tamed from Pimp’d Designz. Visit her blog for links to her stores HERE.
Mask of choice.
Font used is Shalimar Swash ROB.


Let’s Begin!


Open a new canvas that’s 800x800 pixels.

Copy and Paste your tube as a new layer.

Open frame-04 from kit.
Copy and Paste it to your canvas.
Resize and arrange it below your tube as shown.

Open paper pp-01 from kit.
Copy your paper.
On your frame layer, using the magic wand tool, select within the inside of the frame.
Selections>Modify>Expand-5.
Layers> New Raster Layer.
Paste the paper Into Selection.
Selections>Select None

Open prints-01 from kit.
Copy and Paste it as a new layer.
Erase anything hanging outside of the frame.

Open fence-01 from kit.
Copy and Paste it as a new layer.
Resize it and arrange it into the frame as shown.

Open wings from kit.
Copy and Paste it below the bottom layer.
Resize and arrange it behind your tube as shown.

Open sparkle-01 from kit.
Copy and Paste it as a new layer.
Resize and arrange it over the wings to your liking.

Open glitter-01 from kit.
Copy and Paste it as a new layer.
Resize and arrange it over the wings as shown.

Open flower-02 from kit.
Copy and Paste it as a new layer.
Resize and arrange it to the left as shown.
Layers>Duplicate and size it down a little and move over to the right as shown.

Open flower-01 from kit.
Copy and Paste it as a new layer.
Resize and arrange it to the right as shown.
Layers>Duplicate and move over to the left as shown.

Open feather-02 from kit.
Copy and Paste it below the flowers.
Resize and arrange it at the center right as shown.
Layers>Duplicate it 2 times and resize and arrange them to the left and right as shown.

Open button-02 from kit.
Copy and Paste it above the frame.
Resize and arrange it to the right side of the frame.
Layer>Duplicate, Image>Mirror and place on opposite side of frame.

Open flower-03 from kit.
Copy and Paste it as a new layer.
Resize and arrange it to the left as shown.
Layers>Duplicate and resize it down slightly and arrange it to the right.

Open metal-bow from kit.
Copy and Paste it as a new layer.
Resize and arrange it to the right of the tube.

Open charm-01 from kit.
Copy and Paste it as a new layer.
Resize, rotate and arrange it as shown.

Open cage-01 from kit.
Copy and Paste it as a new layer.
Resize and arrange it to the left as shown.

Open feather-01 from kit.
Copy and Paste it as a new layer.
Resize and arrange it over the cage as shown.

Open circles from kit.
Copy and Paste it under the bottom layer.
Resize and arrange it as shown.

Open paper pp-08 from kit.
Copy and Paste it at the bottom of the tag.
Add your mask by going to Layer>Load/ Save Mask>Load Mask from Disk.
Apply the mask of choice.
Merge the mask group by right clicking the layer of the finished mask, go to Merge>Merge Group.
Resize and arrange it to fit as shown.

I used the font ShalimarSwashROB. Set it to a size you like and a stroke width of 3.
Foreground color to white and background color to black.
Duplicate the layer and select the second font layer with the font tool.
Set the stroke width to 0.
Merge the 2 font layer and convert to a raster layer.

Drop shadow everything except the mask.
Effects>3D Effects>Drop Shadow, set the drop to 3 vertical, 2 horizontal, 75 opacity, 4 blur.

Add your copyright info and your tag.

Merge everything in Layers>Merge>Merge Visible


All Finished!

Wednesday, January 12, 2011

Love- PTU


Now you can download a PDF Copy of this tutorial to do without using your internet browser.
Download Here
I've used the lovely PTU artwork of Elias Chatzoudis. You can purchase his art at MPT.
This is a PTU kit called Techie Love from Pimp’d Designz. Visit her blog for links to her stores HERE.
The mask is WSL_Mask62, by Wee Scot Lass.
Font used is Aquarelle.


Let’s Begin!

Open a new canvas that’s 800x800 pixels.

Open metal-bg from kit.
Copy and Paste it to your canvas.

Open print-02 from kit.
Copy and Paste it behind the metal-bg.
Resize and arrange it as shown.

Open screw from kit.
Copy and Paste it above the metal-bg.
Resize it and arrange it to the right as shown in the tag.
Layers>Duplicate and move this new one to the left as shown.

Copy and Paste your tube as a new layer.
Resize and arrange it slightly to the right as shown.

Open wa-01 from kit.
Copy and Paste it below the tube.
Resize and arrange it to the left as shown.

Open heart-string-01 from kit.
Copy and Paste it as a new layer.
Resize and arrange it to the left as shown.

Open flower-01 from kit.
Copy and Paste it as a new layer.
Resize and arrange it to the right as shown.
Layers>Duplicate and move it to the left as shown.

Open print-03 from kit.
Copy and Paste it above your tube.
Resize and arrange it as shown.

Open paper pp-12 from kit.
Copy and Paste it at the bottom of the tag.
Add your mask by going to Layer>Load/ Save Mask>Load Mask from Disk.
Apply the mask named WSL_Mask62.
Merge the mask group by right clicking the layer of the finished mask, go to Merge>Merge Group.
Resize and arrange it to fit as shown.

I used the font Aquarelle. Set it to a size you like and a stroke width of 5.
Foreground color to white and background color to #930909.
Duplicate the layer and select the second font layer with the font tool.
Set the stroke width to 0.
Merge the 2 font layer and convert to a raster layer.

Drop shadow everything except the mask.
Effects>3D Effects>Drop Shadow, set the drop to 3 vertical, 2 horizontal, 75 opacity, 4 blur.

Add your copyright info and your tag.

Merge everything in Layers>Merge>Merge Visible


All Finished!

Monday, December 20, 2010

Gorjuss Christmas- FTU


Now you can download a PDF Copy of this tutorial to do without using your internet browser.
Download Here
I've used the lovely PTU artwork of Suzanne Woolcott at Gorjuss.
This is FTU kit called Holiday Cheer by Cora at Pimp’d Designz.
The mask is in My Supplies.
Font used is Cocktail.


Let’s Begin!

Open a new canvas 800x800, flood filled with white.

Open frame2 from kit.
Copy and Paste it to your canvas.

Copy and Paste your 3 tubes below the frame, showing through the windows.
Use your eraser tool to erase any portion hanging out.

Open papers pp-06, pp-10, and pp-04 from kit.
Copy and Paste them below your tubes to show behind the frame.

Open ribbon04 from kit.
Copy and Paste it above the frame.
Resize and arrange it as shown.

Open holly from kit.
Copy and Paste it as a new layer.
Resize and arrange it to the upper right as shown.

Open candy-cane2 from kit.
Copy and Paste at as a new layer.
Resize and arrange it to the left as shown.

Open gift02 from kit.
Copy and Paste it as a new layer.
Image>Mirror
Resize and arrange it to the left as shown.

Open gift01 from kit.
Copy and Paste it as a new layer.
Resize and arrange it to the left as shown.

Open cheer-snowman from kit.
Copy and Paste it as a new layer.
Resize and arrange it to the left as shown.


Open paper pp13 from kit.
Copy and Paste it at the bottom of the tag.
Add your mask by going to Layer>Load/ Save Mask>Load Mask from Disk.
Apply the mask named ASD_IndianSummer from my supplies.
Merge the mask group by right clicking the layer of the finished mask, go to Merge>Merge Group.
Resize and arrange it to fit as shown.

I used the font Cocktail. I set it to 72 pixels and a stroke width of 4.
Foreground color to white and background color to black.
Duplicate the layer and select the second font layer with the font tool.
Set the stroke width to 0.
Merge the 2 font layer and convert to a raster layer.

Drop shadow everything except the mask.
Effects>3D Effects>Drop Shadow, set the drop to 3 vertical, 2 horizontal, 75 opacity, 4 blur.

Add your copyright info and your tag.

Merge everything in Layers>Merge>Merge Visible


All Finished!

Tuesday, October 12, 2010

Beware- PTU


Now you can download a PDF Copy of this tutorial to do without using your internet browser.
I've used the PTU artwork of Elias Chatzoudis. You can purchase is art at MPT.
This is a PTU tagger kit called Halloween Town by Pimp’d Designz. You can visit her blog for links to her stores HERE.
I've used a Template #273 by Divine Intentionz. It can be found in the right column on her blog HERE.
The mask and moonlight image are provided in my tut supplies. They are for personal use only and can be downloaded HERE.
Font used is Double Feature.


Let’s Begin!

Open the tag template, and resize the canvas from the center to 800x800 by going to
Image>Canvas Size.
Delete the credits layer.

Open paper pp-07 from the kit.
Copy your paper and go to the template.
On the layer named rectangles, go to Selections>Select All, Selections>Float, Selections>Defloat.
Paste your paper by going to Edit>Paste As New Layer.
Then go to Selections>Invert and press the Delete button on your keyboard to delete the extra paper. Then Selections>Select None
Be sure to delete the original layer of the template.
(Follow this procedure when asked to Copy and Paste a paper to a layer of the template.)

Open fence from kit.
Copy and Paste it as a new layer.
Resize and arrange it to fit around the rectangles as shown.

Open paper pp-01.
Copy and Paste this paper to oval layer of the template.

On frame background layer, use your flood fill tool to fill with color #222222.

Open the moonlight image from my supplies.
Copy and Paste this as a new layer.
Arrange it above the rectangle to fit as best as you can without resizing.
Select the frame background layer do the Select All/Float/Defloat method.
Select the image and then Selections>Invert.
Hit the Delete button on your keyboard.
Selections>Select None

Copy and Paste your tube as a new layer.
Image>Mirror
Arrange it to the left as shown.
Do the Select All/Float/Defloat method to delete the extra.
Layer>Duplicate
On this upper layer go to Adjust>Blur>Gaussian Blur and set to 3.
Change the Layer Properties (by going to Layer>Properties)
and change the blend mode to Soft Light.
On the lower tube change the blend mode to luminance (legacy).

On the frame layer go to
Adjust>Add/Remove Noise>Add Noise and set it to
70%, Uniform, Monochrome.

On the oval layer do Select All/Float/Defloat,
Then go to Selections>Modify>Expand and set to 3.
Go to Selections>Modify>Select Selection Borders
Set it to 8, Inside, and Anti-alias.
Create a new Raster Layer and flood fill with white.
Add Noise at 90%.

Copy and Paste your tube above the rectangle frame layer.
Arrange it to the right as shown.
Layer>Duplicate
On this upper layer go to Adjust>Blur>Gaussian Blur and set to 3.
Change the Layer Properties (by going to Layer>Properties)
and change the blend mode to Soft Light.

Move the words layer above the tube layer.
Arrange the words layer and the beware layer to the left slightly as shown.

Open scribble-01 from kit.
Copy and Paste it above the oval frame you created.
Resize and arrange it as shown.

Open the following elements and Copy and Paste them as new layers in this order:

Bat
Ghost
Sucker-01

Open brad from kit.
Copy and Paste it above the rectangle frame.
Resize and arrange it to the left as shown.

Open flower-01 from kit.
Copy and Paste it as a new layer.
Resize and arrange it by the tube’s foot as shown.
Layer>Duplicate twice and arrange these two as shown, resizing slightly.

Open ribbon-03 from kit.
Copy and Paste it as a new layer.
Resize and arrange it to the bottom as shown.

Open candy-02 from kit.
Copy and Paste it above the wordart.
Resize and arrange it to the bottom as shown.

Open candy-01 from kit.
Copy and Paste it as a new layer.
Resize and arrange it to the bottom as shown.

Open paper pp-12 from kit.
Copy and Paste it as the bottom most layer.
Add your mask by going to Layer>Load/ Save Mask>Load Mask from Disk.
Apply the mask named photomask allenaal beestjes.
Merge the mask group by right clicking the layer of the finished mask, go to Merge>Merge Group.
Resize and arrange mask to fit as shown in the tag.

I used the font Double Feature. Set it to a size you like and a stroke width of 4.
Foreground color to white and background color to black.
Duplicate the layer and select the second font layer with the font tool.
Set the stroke width to 0.
Merge the 2 font layer and convert to a raster layer.

Drop shadow everything except the mask.
Effects>3D Effects>Drop Shadow, set the drop to 3 vertical, 2 horizontal, 75 opacity, 4 blur.

Add your copyright info and your tag.

Merge everything in Layers>Merge>Merge Visible

Crop and Resize as needed.


All Finished!

Monday, October 11, 2010

Twilight Life- PTU


Now you can download a PDF Copy of this tutorial to do without using your internet browser.

I've used the lovely PTU artwork of Irene Shpak. You can purchase her art at MPT.
This is a PTU kit called Twilight by Pimpd Designz. Visit her blog for links to her stores HERE.
Mask of choice. The mask is called photomask 2 by Timo3 but I can’t find where I got it.
Alien Skin Xenofex2- Constellation for animation and an animation program like Animation Shop.
Font used is AllisonROB.


Let’s Begin!


Open a new canvas at 800x800 pixels.

Open frame-01 from the kit.
Copy and Paste as a new layer.
Resize it a little smaller.

Copy and Paste your tube as a new layer.
I’ve used the close up tube provided.
Resize and arrange it to fit in the window.

Duplicate your frame layer and move it above the tube.
Using your eraser tool, erase the top of the upper frame covering the tube heads.
Also, erase any portion of the tube hanging out at the bottom of the frames.

Open paper pp-12 from kit.
Copy and Paste it behind the bottom frame.
Erase any portion of the paper hanging outside of the frame.

Open greens-03 from kit.
Copy and Paste it below this paper layer.
Image>Mirror
Resize and arrange it to fit as shown.

Open flowers-01 from kit.
Copy and Paste it as a new layer.
Layer>Duplicate
Move one to the upper left and one to the lower right of frame.

Open glitter-01 from kit.
Copy and Paste it above the top frame layer.

Open the following elements and paste them in this order.
Resize and arrange them as shown.

Ribbon-02
Hearts-02
Ribbon-03

Open bracket from kit.
Copy and Paste it as a new layer.
Resize and arrange it to the left of the tag as shown.
Layer>Duplicate, Image>Mirror
Move the right bracket over some more if needed.

Open ribbon02 from kit.
Copy and Paste it as a new layer.
Resize and arrange it at the bottom of the tag as shown.

Open wa-01 from kit.
Copy and Paste it as a new layer.
Resize and arrange it at the bottom of the tag as shown.
Selections>Select All, Selections>Float, Selections>Defloat
Selections>Modify>Expand- 2
Layer>New Raster Layer
Flood fill the selection with white.
Selections>Select None
Move this white layer below the wordart layer.
Merge the two layers together.

Open staple from kit.
Copy and Paste it as a new layer.
Resize and arrange it above the wordart as shown.

Open paper pp-12 from kit.
Copy and Paste it at the bottom of the tag.
Add your mask by going to Layer>Load/ Save Mask>Load Mask from Disk.
Apply your mask of choice.
Merge the mask group by right clicking the layer of the finished mask, go to Merge>Merge Group.
Resize and arrange it to fit as shown.

I used the font AllisonROB. Set it to a size you like and a stroke width of 4.
Foreground color to white and background color to black.
Duplicate the layer and select the second font layer with the font tool.
Set the stroke width to 0.
Merge the two font layers and convert to a raster layer.

Drop shadow everything except the mask.
Effects>3D Effects>Drop Shadow, set the drop to 3 vertical, 2 horizontal, 75 opacity, 4 blur.

Add your copyright info and your tag.

Merge everything in Layers>Merge>Merge Visible

Crop and resize as needed.

Animation
Merge the two bracket layers together.
Selections>Select All, Selections>Float, Selections>Defloat
New Raster Layer
Flood fill these selections with white.

On this white layer go to Effects>Plugins and go to Xenofex Constellation.
Apply setting that you like or the settings shown below.
You must have the Background Fill set to Make Selection Transparent.
Hit Ok


Now Copy Merged and Paste it over in Animation Shop.
Back in PSP hit Undo and go to Constellation again.
Hit Random Seed at the bottom and Ok again.
Copy Merged and Paste this in AS After Current Frame.
Go back to PSP one more time and hit Undo.
Go to Constellation and hit Random Seed.
Copy and Paste this After Current Frame in AS.

Now just save as a GIF.


All Finished!

Monday, September 27, 2010

Kiss My Attitude- PTU


Now you can download a PDF Copy of this tutorial to do without using your internet browser.
I've used the PTU artwork of Elias Chatzoudis. You can buy his tubes at MPT.
This is a PTU kit called Rock-a-Billie by Pimp’d Designz. Visit her blog for links to her stores HERE.
I used the template called Kiss My Attitude by Crazy Cakes Scraps. You can get it HERE.
The mask is WSL_Mask9, by Wee Scot Lass. You can get it HERE.
Font used is Shalimar Swash ROB.


Let’s Begin!


Open the tag template. It’s a little large for my tubes so I resized it to 600x600 and then changed the canvas size from the center to 800x800.
Delete the credits layer, and the layers named sqcenter, dotline and dotline2.

Open paper pp-11 from the kit.
Copy your paper and go to the template.
On your lilrectangle layer, go to Selections>Select All, Selections>Float, Selections>Defloat.
Paste your paper as a new layer.
Then go to Selections>Invert and press the Delete button on your keyboard to delete the extra paper.
Selections>Select None
Be sure to delete the original layer of the template.
(Follow this procedure when asked to Copy and Paste a paper to a layer of the template.)

Copy and Paste the following papers to the following layers of the template:

Paper pp-09 to layers lilsqleft and lilsqright
Paper pp-02 to layers oval, dots (merge the 4 dot layers together first)
Paper pp-10 to layer frame2
Paper pp-01 to layer rectangle

On layers named lilframe and lilframe2, and rectangle3, add noise by going to
Adjust>Add/Remove Noise>Add Noise- 70%.

Copy and paste your tube under the wordart layer.
Arrange it up slightly in the center of tag.

Move the layers named gradient below their lilframes layers.
Paste tube above the gradient layer of one of the frames.
Arrange it in your frame then select the frame layer and go to
Selections>Select All, Selections>Float, Selections>Defloat
Select your tube layer then go to
Selections>Invert and press the Delete button on your keyboard to delete the extra.
Selections>Select None
Duplicate your tube by going to Layer>Duplicate.
On that duplicated tube layer go to Adjust>Blur>Gaussian Blur- 3
On the top layer change the blend mode to Soft Light
and the bottom layer to Luminance (Legacy).
Then change the opacity of the bottom layer to 65%.

Repeat this process for the other frame but Mirror the tube to fit.

Copy and Paste a second tube above the oval layer.
Layer>Duplicate, Image>Mirror
Merge the two layers together.
Do the Select All/Float/Defloat to remove the extra of the tubes hanging out.
Duplicate the tube layer, blur this layer with Gaussian Blur to 3 and blend mode to Soft Light.
Set the bottom tube layer’s blend mode to Luminance (Legacy) and opacity to 65%.

Open frame-05 from kit.
Copy and Paste it below the bottom layer.
Resize and arrange it in the center.

Open glitter-02 from kit.
Copy and Paste it as a new layer.
Resize and arrange it at the bottom.
Layer>Duplicate, Image>Flip and Mirror

Open banner-01 from kit.
Copy and Paste it above the rectangle.
Resize and arrange it as shown.
With the rectangle selected, do the SelectAll/Float/Defloat
Select the banner and hit Delete.
Select None

Open sequins from kit.
Copy and Paste it as a new layer.
Resize and arrange it to the top or bottom of the rectangle.
Layer>Duplicate and move it to the other side as shown.

Open sparrow from kit.
Copy and Paste it as a new layer.
Resize and arrange as shown.

Open flower-01 from kit.
Copy and Paste it as a new layer.
Resize and arrange it as shown.
Duplicate it 3 times and arrange them around the tag.

Open skull from kit.
Copy and Paste it as a new layer.
Resize and arrange it as shown.

Open heart-01 from kit.
Copy and Paste is as a new layer.
Resize and arrange it as shown.

Open flower-02 from kit.
Copy and Paste it above the wordart layer.
Resize and arrange it as shown.

On the wordart layer, Select All/Float/Defloat
Selections>Modify>Expand by 2
Layer>New Raster Layer
Flood fill the selection with white.
Select None
Move the white layer below the wordart and merge the two together.

Open paper pp-02 from kit.
Copy and Paste it at the bottom of the tag.
Add your mask by going to Layer>Load/ Save Mask>Load Mask from Disk.
Apply the mask named WSL_Mask9.
Merge the mask group by right clicking the layer of the finished mask, go to Merge>Merge Group.
Resize and arrange it to fit as shown.

I used the font Shalimar Swash ROB. Use a size you like and a stroke width of 3.
Foreground color to white and background color to #ab1a26.
Duplicate the layer and select the second font layer with the font tool.
Set the stroke width to 0.
Merge the 2 font layers and convert to a raster layer.

Drop shadow everything except the duplicated tube and the mask.
Effects>3D Effects>Drop Shadow, set the drop to 3 vertical, 2 horizontal, 75 opacity, 4 blur.

Add your copyright info and your tag.
Crop and Resize the tag to your liking.

Merge everything in Layers>Merge>Merge Visible


All Finished!