

I've used the PTU artwork of Elias Chatzoudis. You can purchase is art at MPT.
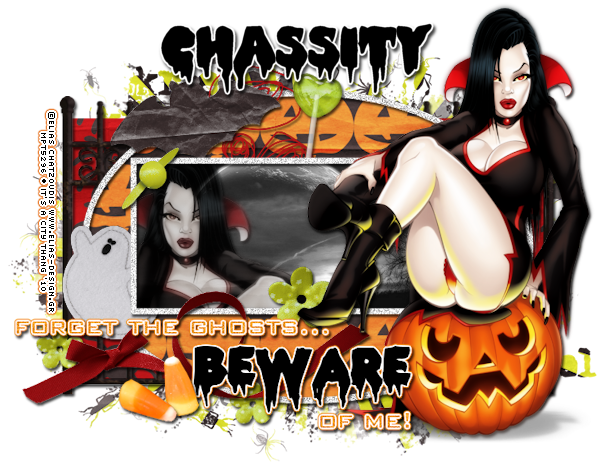
This is a PTU tagger kit called Halloween Town by Pimp’d Designz. You can visit her blog for links to her stores HERE.
I've used a Template #273 by Divine Intentionz. It can be found in the right column on her blog HERE.
The mask and moonlight image are provided in my tut supplies. They are for personal use only and can be downloaded HERE.
Font used is Double Feature.
Let’s Begin!
Open the tag template, and resize the canvas from the center to 800x800 by going to
Image>Canvas Size.
Delete the credits layer.
Open paper pp-07 from the kit.
Copy your paper and go to the template.
On the layer named rectangles, go to Selections>Select All, Selections>Float, Selections>Defloat.
Paste your paper by going to Edit>Paste As New Layer.
Then go to Selections>Invert and press the Delete button on your keyboard to delete the extra paper. Then Selections>Select None
Be sure to delete the original layer of the template.
(Follow this procedure when asked to Copy and Paste a paper to a layer of the template.)
Open fence from kit.
Copy and Paste it as a new layer.
Resize and arrange it to fit around the rectangles as shown.
Open paper pp-01.
Copy and Paste this paper to oval layer of the template.
On frame background layer, use your flood fill tool to fill with color #222222.
Open the moonlight image from my supplies.
Copy and Paste this as a new layer.
Arrange it above the rectangle to fit as best as you can without resizing.
Select the frame background layer do the Select All/Float/Defloat method.
Select the image and then Selections>Invert.
Hit the Delete button on your keyboard.
Selections>Select None
Copy and Paste your tube as a new layer.
Image>Mirror
Arrange it to the left as shown.
Do the Select All/Float/Defloat method to delete the extra.
Layer>Duplicate
On this upper layer go to Adjust>Blur>Gaussian Blur and set to 3.
Change the Layer Properties (by going to Layer>Properties)
and change the blend mode to Soft Light.
On the lower tube change the blend mode to luminance (legacy).
On the frame layer go to
Adjust>Add/Remove Noise>Add Noise and set it to
70%, Uniform, Monochrome.
On the oval layer do Select All/Float/Defloat,
Then go to Selections>Modify>Expand and set to 3.
Go to Selections>Modify>Select Selection Borders
Set it to 8, Inside, and Anti-alias.
Create a new Raster Layer and flood fill with white.
Add Noise at 90%.
Copy and Paste your tube above the rectangle frame layer.
Arrange it to the right as shown.
Layer>Duplicate
On this upper layer go to Adjust>Blur>Gaussian Blur and set to 3.
Change the Layer Properties (by going to Layer>Properties)
and change the blend mode to Soft Light.
Move the words layer above the tube layer.
Arrange the words layer and the beware layer to the left slightly as shown.
Open scribble-01 from kit.
Copy and Paste it above the oval frame you created.
Resize and arrange it as shown.
Open the following elements and Copy and Paste them as new layers in this order:
Bat
Ghost
Sucker-01
Open brad from kit.
Copy and Paste it above the rectangle frame.
Resize and arrange it to the left as shown.
Open flower-01 from kit.
Copy and Paste it as a new layer.
Resize and arrange it by the tube’s foot as shown.
Layer>Duplicate twice and arrange these two as shown, resizing slightly.
Open ribbon-03 from kit.
Copy and Paste it as a new layer.
Resize and arrange it to the bottom as shown.
Open candy-02 from kit.
Copy and Paste it above the wordart.
Resize and arrange it to the bottom as shown.
Open candy-01 from kit.
Copy and Paste it as a new layer.
Resize and arrange it to the bottom as shown.
Open paper pp-12 from kit.
Copy and Paste it as the bottom most layer.
Add your mask by going to Layer>Load/ Save Mask>Load Mask from Disk.
Apply the mask named photomask allenaal beestjes.
Merge the mask group by right clicking the layer of the finished mask, go to Merge>Merge Group.
Resize and arrange mask to fit as shown in the tag.
I used the font Double Feature. Set it to a size you like and a stroke width of 4.
Foreground color to white and background color to black.
Duplicate the layer and select the second font layer with the font tool.
Set the stroke width to 0.
Merge the 2 font layer and convert to a raster layer.
Drop shadow everything except the mask.
Effects>3D Effects>Drop Shadow, set the drop to 3 vertical, 2 horizontal, 75 opacity, 4 blur.
Add your copyright info and your tag.
Merge everything in Layers>Merge>Merge Visible
Crop and Resize as needed.
All Finished!
No comments:
Post a Comment