Wednesday, July 27, 2011

Atlantis- PTU


Download this tut in a PDF file.
I've used the lovely PTU tube by Elias Chatzoudis. You can get it at PTE.
This is a PTU tagger kit called Atlantis by Pimp’d Designz. Visit her blog for links to her store.
Font used is WaterBrush by Rob Lusche.


Let’s Begin!


Open a new canvas that’s 800x800 pixels.

Open frame-02 from kit.
Copy and Paste it as a new layer.
Resize it down some to make it easier to work around.

Open paper pp-05.
Copy and Paste it below your frame.
Resize it down so that the frame on the paper is behind the actual frame.
Use your eraser tool to erase any portion of the paper hanging outside of the frame.

Copy and Paste your tube above the frame.
Layers>Duplicate
On the lower tube go to Effects>Photo Effects>Black & White Film,
Brightness: -50, Contrast: 25
On the upper tube go to Layers>Properties- Blend Mode to Soft Light

Open sea-grass-01 from kit.
Copy and Paste it above the frame’s paper.
Resize and arrange it at the bottom as shown.

Open coral from kit.
Copy and Paste it as a new layer.
Resize and arrange it at the bottom as shown.

Open jelly-fish2 from kit.
Copy and Paste it as a new layer.
Resize and arrange it at the top as shown.

Open light-01 from kit.
Copy and Paste it as a new layer.
Resize and arrange it in the upper left corner as shown.
Erase any portion of the light hanging outside of the frame.

Open mesh-02 from kit.
Copy and Paste it below the paper.
Resize and arrange it around the frame as shown.

Open print-01 from kit.
Copy and Paste it below the mesh frame.
Resize and arrange it around the mesh frame as shown.

Open splash-02 from kit.
Copy and Paste it above frame.
Resize and arrange it over the window as shown.

Open waves-01 from kit.
Copy and Paste it as a new layer.
Resize and arrange it to the left as shown.

Open sand from kit.
Copy and Paste it as a new layer.
Resize and arrange it to the bottom right as shown.

Open compass from kit.
Copy and Paste it as a new layer.
Resize and arrange it to the top left as shown.

Open net from kit.
Copy and Paste it above the tube layers.
Resize and arrange it to the left as shown.

Open rope-02 from kit.
Copy and Paste it as a new layer.
Layer>Mirror
Resize and arrange it to the left as shown.

Open anchor from kit.
Copy and Paste it as a new layer.
Resize and arrange it to the left as shown.

Open rope-01 from kit.
Copy and Paste it as a new layer.
Resize and arrange it to the bottom as shown.

Open bottle2 from kit.
Copy and Paste it as a new layer.
Resize and arrange it to the left as shown.

Open rock-02 from kit.
Copy and Paste it as a new layer.
Resize and arrange it to the left as shown.

Open hook from kit.
Copy and Paste it as a new layer.
Resize and arrange it to the left as shown.

I used the font WaterBrush. Set it to a size you like, and a stroke width of 4.
Foreground color to white and background color to #e15a37.
Duplicate the layer and select the second font layer with the font tool.
Set the stroke width to 0.
Merge the 2 font layer and convert to a raster layer.

Drop shadow everything except the mask.
Effects>3D Effects>Drop Shadow, set the drop to 3 vertical, 2 horizontal, 75 opacity, 4 blur.

Add your copyright info and your tag.

Merge everything in Layers>Merge>Merge Visible


All Finished!
Spring Song- FTU


Download this tutorial in a PDF file.
I've used the lovely PTU artwork of Lady Mishka. Visit her site for where to buy her tubes.
This is my FTU kit called Spring Song. You can get it on My Blog.
The mask is AR315_CM_mask129, by Aqua. You can get it on the Creative Misfits Blog.
Font used is Automobile.


Let’s Begin!

Open a new canvas at 800x800 pixels.

Open frame2 from kit.
Copy and Paste it onto your canvas.

Copy and Paste your tube as a new layer.
Resize and arrange it as shown.

Open paper1 from kit.
Copy and Paste it below the frame.
Using your eraser tool, erase portions of the paper hanging outside of the frame.

Copy and Paste your tube as a new layer above the paper.
Arrange it so the face is in the middle square of the frame.
Layer>Duplicate the tube, Image>Mirror and arrange it in the top square.
Layer>Duplicate this tube and arrange it in the bottom square.
Using your eraser, erase any portions of all three tubes hanging outside of each of their windows.
Merge the three frames tubes together on one layer.
Duplicate this layer and change its blend mode to soft light.
On the lower tube layer, go to Effects>Photo Effects>Black and White Film, and set both
Brightness and Contrast to 0.

Open frame6 from kit.
Copy and Paste it below the paper
Resize and arrange it around the image as shown.

Open leaves2 from kit.
Copy and Paste it as a new layer.
Resize and arrange it to the left side.

Open flowerscatter1 from kit.
Copy and Paste it as a new layer.
Resize and arrange it to the left of the frame as shown.
Layer>Duplicate and move it to the right of the frame and tube.

Open flower1 from kit.
Copy and Paste it as a new layer.
Resize and arrange it to the left as shown.
Layer>Duplicate, resize and move it to the right as shown.

Open flower4 from kit.
Copy and Paste it as a new layer.
Resize and arrange it to the right as shown.
Layer>Duplicate, resize and move it to the left as shown.

Open flower3 from kit.
Copy and Paste it as a new layer.
Resize and arrange it to the right as shown.
Layer>Duplicate, resize and move it to the left as shown.

Open ribbon6 from kit.
Copy and Paste it as a new layer.
Resize and arrange it to the left as shown.

Open bird from kit.
Copy and Paste it above the frame.
Resize and arrange it to the left as shown.

Open nest from kit.
Copy and Paste it under the bottom most layer.
Layer>Duplicate and move it above the upper most layer.
Use your eraser and erase the portions of the nest that is in the inside and back of the nest.
This will make everything look as if it is sitting inside of the nest.

Open paper11 from kit.
Copy and Paste it at the bottom, below the nest.
Add your mask by going to Layer>Load/ Save Mask>Load Mask from Disk.
Apply the mask named AR315_CM_mask129.
Merge the mask group by right clicking the layer of the finished mask, go to Merge>Merge Group.
Resize and arrange it to fit as shown.

I used the font Automobile. Set it to a size you like and a stroke width of 4.
Foreground color to white and background color to #38b1b4.
Duplicate the layer and select the second font layer with the font tool.
Set the stroke width to 0.
Merge the 2 font layer and convert to a raster layer.

Drop shadow everything except the mask.
Effects>3D Effects>Drop Shadow, set the drop to 3 vertical, 2 horizontal, 75 opacity, 4 blur.

Add your copyright info and your tag.

Merge everything in Layers>Merge>Merge Visible

All Finished!

Tuesday, July 19, 2011

Fairy Freak- PTU


Download this tutorial in a PDF file.
I've used the lovely PTU artwork of Lady Mishka. Get it at SATC.
This is PTU kit called Fairy Freak from Designs by Sarah. Get it at PMTw/S.
I used masks WSL_Mark75 and 414 by Wee Scott Lass.
Font used is Ruge Bookie.


Let’s Begin!


Open a new canvas that’s 800x800 pixels.

Open frame2 from kit.
Copy and Paste it as a new layer.
Rotate it to the right and resize it down to fit within your canvas.

For my tube I used both the blonde/pink, and the brunette/purple layers to achieve the desired color.
Copy and Paste your purple tube layer as a new image.
Copy and Paste your pink tube layer as a new layer over your purple tube layer.
Set you pink layer’s blend mode to soft light.
Copy and Paste your tube as a merged copy as a new layer over your frame.
Resize and arrange it as needed to fit as shown.

Duplicate your frame layer and move it above the tube.
Use your eraser tool to erase any portion of the frame covering the face.
You may need to erase any portion of your tube hanging outside of the bottom of the frame.

Open paper pp6 from kit.
Copy and Paste it below the bottom frame layer.
Resize as desired and erase any portion of the frame hanging outside of the frame.

Open web1 from kit.
Copy and Paste it behind your tube layer.
You may need to erase more portions of the upper frame layer so it will show.
Resize and arrange the web as shown.

Open brackets from kit.
Copy and Paste it as a new layer.
Resize and arrange it as needed to fit.

Open flower2 from kit.
Copy and Paste it as a new layer.
Resize and arrange it to the left as shown.

Open flower3 from kit.
Copy and Paste it above the upper frame layer.
Resize and arrange it as shown.

Open flower1 from kit.
Copy and Paste it as a new layer.
Resize and arrange it as shown.

Open flower5 from kit.
Copy and Paste it as a new layer.
Resize and arrange it as shown.

Open button1 from kit.
Copy and Paste it as a new layer.
Resize and arrange it to the bottom left as shown.

Open bow7 from kit.
Copy and Paste it as a new layer.
Resize and arrange it as shown.

Open grenery3 from kit.
Copy and Paste it behind the frame paper.
Resize and arrange it as shown.

Open paper pp11 from kit.
Copy and Paste it at the bottom of the tag.
Add your mask by going to Layer>Load/ Save Mask>Load Mask from Disk.
Apply the mask named WSL_Mask75.
Merge the mask group by right clicking the layer of the finished mask, go to Merge>Merge Group.
Resize and arrange it to fit as shown.

I used the font Ruge Boogie. Set it to a size you like and a stroke width of 3.
Foreground color to white and background color to black.
Duplicate the layer and select the second font layer with the font tool.
Set the stroke width to 0.
Merge all the font layers and convert to a raster layer.

Drop shadow everything except the mask.
Effects>3D Effects>Drop Shadow, set the drop to 3 vertical, 2 horizontal, 75 opacity, 4 blur.

Add your copyright info and your tag.

Merge everything in Layers>Merge>Merge Visible

Crop and resize as needed!


All Finished!

Sunday, July 3, 2011

Love Forever- FTU


Download a PDF file of this tutorial.
I've used the lovely PTU artwork of Zindy Nielsen.
This is a FTU kit called Love Forever from Pimp’d Designz and is available through the Taggers Art Magazine May Issue.
I used a modified mask by Tempus Fugit. You can get the modified version HERE.
Font used is Shit Happens.

Let’s Begin!


Open a new canvas that’s 800x800 pixels.

Open frame-04 from kit.
Copy and Paste it to your canvas.
Resize it slightly if needed and arrange it in the center of your canvas.

Copy and Paste the tube below the frame and arrange it as shown.
Erase any portion of your tube hanging outside of your frame.
Duplicate the tube and change the upper tube's blend mode to soft light.

Open paper pp-06 from kit.
Copy and Paste your paper below your tube.
Resize it slightly to fit behind the tube as you like.
Erase any portion of the paper hanging outside of the frame’s edges.

Open moon from kit.
Copy and Paste it behind the bottom paper layer.
Resize and arrange it behind the upper right corner.
Open diamond-rain from kit.
Copy and Paste it above the frame layer.
Resize it and arrange it over the upper right corner as shown.

Open ribbon-02 from kit.
Copy and Paste it as a new layer.
Resize and arrange it as a new layer.
Duplicate it and move the lower layer below the paper layer (above the moon layer).
On the upper ribbon layer, erase the right side to make it look like it’s draped over the edge.
Erase the lower part of the ribbon that’s bent to the left.

Open lace-01 from kit.Copy and Paste it as a new layer.
Resize and arrange it to the bottom right as shown.

Open splatter-01 from kit.
Copy and Paste it as a new layer.
Resize and arrange it over the lace as shown.
Duplicate it and resize it smaller and move it to the left side of the frame.
Open swirl-01 from kit.
Copy and Paste it as a new layer.
Resize and arrange it to the left as shown.

Open flower-01 from kit.
Copy and Paste it as a new layer.
Layer>Mirror it.
Resize and arrange it to the bottom as shown.
Open leaves-01 from kit.
Copy and Paste it as a new layer.
Layer>Mirror it.
Resize and arrange it at the bottom as shown.

Open heart-02 from kit.
Copy and Paste it as a new layer.
Resize and arrange it at the upper edge of the lace.
Layer>Duplicate, resize it smaller and move it to down.
On the bigger heart layer erase the right heart, on the smaller erase the left.
Open leaves-03 from kit.
Copy and Paste it as a new layer.
Resize and arrange it as shown.

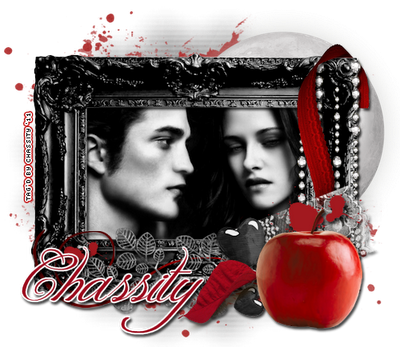
Open apple from kit.
Copy and Paste it as a new layer.
Resize and arrange it to the right as shown.

Open paper pp-06 from kit.
Copy and Paste it at the bottom of the tag.Add your mask by going to Layer>Load/ Save Mask>Load Mask from Disk.
Apply the mask.
Merge the mask group by right clicking the layer of the finished mask, go to Merge>Merge Group.
Resize and arrange it to fit as shown.

I used the font Shit Happens. Set it to a size you like and a stroke width of 4.
Foreground color to white and background color to #9b081a.
Duplicate the layer and select the second font layer with the font tool.
Set the stroke width to 0.
Merge the 2 font layer and convert to a raster layer.

Drop shadow everything except the mask.
Effects>3D Effects>Drop Shadow, set the drop to 3 vertical, 2 horizontal, 75 opacity, 4 blur.

Add your copyright info and your tag.

Merge everything in Layers>Merge>Merge Visible


All Finished!

Thursday, April 14, 2011

Sugar Coated Forum Set- FTU


Download this tutorial in a PDF file.
I used the lovely PTU artwork of Jose Cano. You can purchase it at PTE.
You must have a license to use this work.
This is FTU kit called Sugar Coated by Scraps by Jessica.
The Animation is by Missy at Divine Intentionz.
I used a pink Tiny Heart Twinks by Jaljax Designs.
Font used is Aquarelle.
You will need an animation program, I’m using Animation Shop 3 to animate banner and avatar.
The plugin Eye Candy 4000 is optional to achieve the effect on the copyright info.


Let’s Begin!


First things first, I altered the animation slightly.
I used the animation titled circlesparkles_bymissy.Open your animation in AS.
Delete the frames 1-11.Then go to Edit>Select All, File>Save Frames As and save them in the same folder for later.


We’re going to start the banner now.
Open a new canvas that’s 600x250 pixels and a white background.
You can of course use any size you like for different looks.

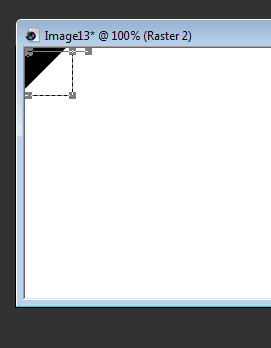
Now we’re going to cut out the corners.Promote your background layer by going to
Layers>Promote Background to Layer.
Open another canvas that’s sized 75x50 pixels and set it a color you can see on the white.
I used black.
Copy and paste it to your banner canvas.
Rotate it 45 degree to the left by going to
Image>Free Rotate, and set it to Left and 45 degrees.
Move it into the corner so that the center of the rectangle is in the edge of the corner.

Duplicate and Mirror the rectangle by going to
Layers>Duplicate, Image>Mirror
Merge the two corners together by going to Layers>Merge>Merge Down
Duplicate and Flip the corners by going to
Layers>Duplicate, Image>FlipMerge these corners with the previous corners again by going to
Layers>Merge>Merge Down
Select the corners layers and go to
Selections>Select All, Selections>Float, Selections>Defloat
Then select your white background layer and hit the Delete button on your keyboard.
This should delete the corners of your white background layer and you should be able to delete your black corners layer now.

Open paper5 from kit.
On your background layer repeat the selection process of
Selections>Select All, Selections>Float, Selections>Defloat
Copy and paste your paper as a new layer.
Selections>Invert
Then hit the Delete key on your keyboard.
This will delete the extra paper you don’t need.Selections>Select None
You can delete the white background layer if you like.

On your paper layer do the selections process again
Select All/Float/DefloatOpen a new raster layer by going to
Layers>New Raster Layer and hit Yes.
Go to Selectiosn>Modify>Select Selection Borders
And set it a width of 8 pixels.
Flood fill this selection with the color #f38c8c.
Create another new raster layer and flood fill it with the color #a1cab5.Selections>Select None
Using your Rectangle Selection Tool, draw a rectangle around the upper portion of this border layer. It can be the upper half or a little more like I’ve done.
Hit the Delete button on your keyboard to delete this portion of the green border.
Selections>Select None

Using your Pen Tool, set it to a Line Style of Diamond and a Width of 2, color White.
Draw lines from corner to corner in the center of the border.
When you’re done, convert it a raster layer by going to
Layers>Convert to Raster Layer.
Merge it down with the two border layers to make one border layer.

Copy and paste your close-up tube above your paper layer.
Image>Mirror and move it to the right of the tag.
Resize it as needed.
Do the selection process of Select All/Float/Defloat on the paper layer.
Select the tube layer and go to Selections>Invert
Hit the Delete button on your keyboard to delete the parts of the tube hanging out.
Selections>Select None.
Change the opacity of the tube to 50% by going to
Layers>Properties>Under the General tab change the opacity to 50%.
Then copy and paste your regular sized tube as a new layer above your close-up.
Move it to the left as shown.
Use the selection process to delete any excess hanging out.
From the kit I used the following elements.
Copy and paste them in this order above your close-up tube and behind your regular tube.
Resize and arrange them as shown.

Curlystring1 (on the right of the tube)
Brownleaves1 (duplicate and one on each side)
Flowersticker1 (on left)Knottedbow2 (on right)
Flowersticker2 (on right)
Flowersticker3 (on right)
Cupcake2 (on right)

Drop shadow all of your layers by going to
Effects>3D Effects>Drop Shadow, set the drop to 3 vertical, 2 horizontal, 50 opacity, 4 blur.

Now we will add the text. I added my name and the words Sugar Coated.
I used the font Aquarelle. Set it to a size that you like and a stroke width of 4.
Foreground color to white and background color to #54a67c.
Duplicate the layer and select the second font layer with the font tool.
Set the stroke width to 0.
Merge the 2 font layer and convert to a raster layer.

Add your copyright info and your watermark.
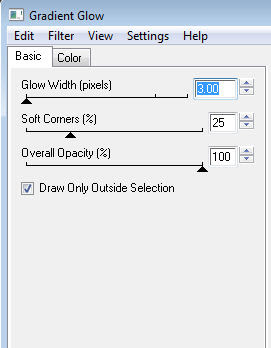
I’ve added the plugin Eye Candy 4000- Gradient Glow to this layer.
First you’ll have to convert your copyright to a raster layer.
Apply the plugin under Effect and use these settingsGlow Width- 3, Soft Corners- 25, Opacity- 100.
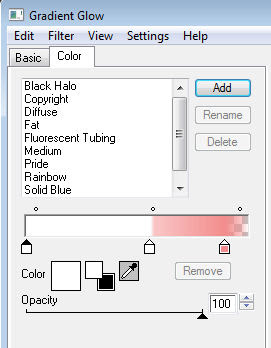
Use a color profile something like what you see on the right.

Now you can add the animation frames.
Open all 6 of the frames you saved earlier in PSP.
Copy and paste the first frame into your banner above the close-up tube.
There’s no need to move it or resize it, in fact if you do then you run the risk of the animation being off when you run it.

Copy Merged and paste it into AS as a new animation.
Go back to PSP and erase this animation layer in the banner.
Copy and paste the next animation frame into the banner at the same place.
Copy Merged and go to AS and paste it after your current frame by right clicking your image and go to Paste>After Current Frame.
Continue this process with each of the 6 frames from the animation.
Once done you should have 6 frames in the animation in AS.

You’ll need to change the speed of the animation.
Go to Edit>Select All, Animation>Frame Properties- 20.
You can now view your animation by going to View>Animation.
If it’s to your liking then Save it and you’re done!


For your avatar you’ll follow the same process as the banner.
Do the corners and cut them out.
I resized the paper to 150x150 before I pasted it.
Do the border the same except set it to 6 pixels.
I added the elements brownleaves1 and cupcake2 from the kit really small behind the tube.
Drop shadow everything again.
Add your copyright info and your watermark.
Add your name and rotate it 90 degrees to the left.

Once it’s the way you like it, copy merged and paste it as a new animation in AS.
Open your pink heart twink in AS.
Duplicate your avatar layer until you have the same amount of frames as your twink by going to Edit>Duplicate Selected until you have enough.
If you’re using the pink heart twink, that’s 10 frames.
Go to Edit>Select All on your avatar.
On your twink animation go to Edit>Select All, Edit>Copy.

Back on your avatar animation right-click the first frame and hit Paste>Into Selected Frame.
Your twink should appear at the end of your cursor.
Place it where you would like it to go and click.
This will place the animation onto your avatar.
You’re now done. You can view and save your avatar.


All Finished!

Sunday, April 10, 2011

Into Forever- PTU


Download this tutorial in a PDF file.
I've used the lovely PTU artwork of Lady Mishka. Visit her site for info on where she will be selling.
This is PTU kit called Into Forever from Pimp’d Designz. Visit her blog for links to her stores HERE.
The mask is Vix_Mask109, by VixPSP.
Font used is Carpenter.


Let’s Begin!


Open a new canvas that’s 800x800 pixels.

Open frame-04 from kit.
Copy and Paste it to the canvas.
Resize as needed to fit better within your canvas.

Copy and Paste your tube behind your frame.
Resize and arrange it to fit within the opening of the frame.
Duplicate your tube layer.
Change the bottom tube layer to Black & White by going to
Effects>Photo Effects>Black and White Film
On the upper tube layer change the blend mode to Soft Light.

Open paper pp-09 from kit.
Copy and Paste it below the bottom tube layer.
Resize it so that the upper right of the paper shows through the frame.

Open the following elements from the kit.
Copy and paste them in this order below the paper layer.
Resize and arrange them as shown.

Moon
Music-sheets
wings

Open the following elements from the kit.
Copy and paste them in this order above the frame layer.
Resize and arrange them as shown.

Ribbon-03
Flora-07
Flower-05
Flower-04
Clock
Flower-03
Sparkle

Open paper pp-09 from kit.
Copy and Paste it at the bottom of the tag.
Add your mask by going to Layer>Load/ Save Mask>Load Mask from Disk.
Apply the mask named Vix_Mask109.
Merge the mask group by right clicking the layer of the finished mask, go to Merge>Merge Group.
Resize and arrange it to fit as shown.

I used the font Carpenter. Set it to a size that you like and a stroke width of 3.
Foreground color to white and background color to black.
Duplicate the layer and select the second font layer with the font tool.
Set the stroke width to 0.
Merge the 2 font layer and convert to a raster layer.

Drop shadow everything except the mask.
Effects>3D Effects>Drop Shadow, set the drop to 3 vertical, 2 horizontal, 75 opacity, 4 blur.

Add your copyright info and your tag.

Merge everything in Layers>Merge>Merge Visible


All Finished!

Just Gorjuss- PTU


Download this tutorial in a PDF file.
I've used the lovely PTU artwork of Suzanne Woolcott at Gorjuss.
This is PTU kit called Just Gorjuss from Pimp’d Designz. Visit her blog for links to her stores HERE.
The mask is WSL_Mask81, by Wee Scot Lass.
Font used is Porcelain.


Let’s Begin!


Open a new canvas that’s 800x800 pixels.

Open frame-02 from kit.
Copy and Paste it to the canvas.
Rotate it 90 degrees to the left.
Resize as needed to fit better within your canvas.

Copy and Paste your tube as a new layer.
Resize and arrange it over to the left within the frame’s window as shown.

Once you have your tube the way you want it,
duplicate your frame layer and move it above the tube layer.
Using your eraser tool, erase any portion of the frame that’s covering the upper part of the tube.
Erase the part of the tube hanging below the bottom of the frame.

Open paper pp-03 from kit.
Copy and Paste it below the bottom frame layer.
Resize it to fit the opening of the frame.

Open the following elements from the kit.
Copy and paste them in this order above the upper frame layer.
Resize and arrange them as shown.

Bracket-01
Doodle-01
Heart-03
Umbrella
Swirl-01
Heart-01
Pinwheel
Flower-03
Flower-04

Open paper pp-02 from kit.
Copy and Paste it at the bottom of the tag.
Add your mask by going to Layer>Load/ Save Mask>Load Mask from Disk.
Apply the mask named WSL_Mask81.
Merge the mask group by right clicking the layer of the finished mask, go to Merge>Merge Group.
Resize and arrange it to fit as shown.

I used the font Porcelain. Set it to a size you like and a stroke width of 3.
Foreground color to white and background color to black.
Duplicate the layer and select the second font layer with the font tool.
Set the stroke width to 0.
Merge the 2 font layer and convert to a raster layer.

Drop shadow everything except the mask.
Effects>3D Effects>Drop Shadow, set the drop to 3 vertical, 2 horizontal, 75 opacity, 4 blur.

Add your copyright info and your tag.

Merge everything in Layers>Merge>Merge Visible


All Finished!

Tuesday, March 22, 2011

Pretty Mermaid- FTU


Download this tutorial in a PDF file.
I've used the lovely PTU artwork of Lady Mishka. You can purchase it at PTE.
This is my PTU kit called Pretty Mermaid. You can purchase it at PMTw/S.
This kit is now FTU and can be found on my Blog.
The mask is WSL_Mask84, by Wee Scot Lass.
Font used is QwitcherBychenROB.


Let’s Begin!


Open a new canvas at 800x800 pixels.

Open frame1 from kit.
Copy and Paste it onto your canvas.
Resize it a little smaller to give yourself more room to work.

Copy and Paste your full body tube as a new layer on top of the frame.

Open paper8 from kit.
Copy and Paste it below the frame.
Using your eraser tool, erase portions of the paper hanging outside of the frame.

Open circles from kit.
Copy and Paste it as a new layer above the paper.
Resize and arrange it to the left side of the frame as shown.

Copy and Paste your close up tube as a new layer.
Image>Mirror
Arrange it in the right. You may need to resize it down a little.
Layer>Duplicate the tube.
On the bottom tube layer, change the blend mode to Luminance (Legacy).
On the top tube layer, change the blend mode to Soft Light.

Open frame2 from kit.
Copy and Paste it below the paper
Resize and arrange it to fir around the frame as shown.

Open leaves2 from kit.
Copy and Paste it above the top frame.
Resize and rotate it as shown to the bottom as shown.

Open leaves3 from kit.
Copy and Paste as a new layer.
Image>Mirror
Resize and arrange it to the left as shown.

Open flower scatter from kit.
Copy and Paste it as a new layer.
Resize and arrange it to the left as shown.

Open flowers5 from kit.
Copy and Paste it as a new layer.
Resize and arrange it to the left as shown.

Open swirl2 from kit.
Copy and Paste it as a new layer.
Resize and arrange it to the left as shown.

Open flower3 from kit.
Copy and Paste it as a new layer.
Resize and arrange it to the bottom as shown.

Open circle strip from kit.
Copy and Paste it as a new layer.
Erase a small portion from the left.
Resize it slightly and arrange it to the bottom.

Open ribbon3 from kit.
Copy and Paste it as a new layer.
Resize and arrange it to the left as shown.

Open flower3 from kit.
Copy and Paste it as a new layer.
Resize and arrange it to the left as shown.

Open frame3 from kit.
Copy and Paste it as a new layer.
Resize and arrange it to the left as shown.

Open shell from kit.
Copy and Paste it as a new layer.
Resize and arrange it to the bottom as shown.

Open starfish from kit.
Copy and Paste it as a new layer.
Resize and arrange it to the left as shown.

Open glitter from kit.
Copy and Paste it above the top, full body tube.
Resize and arrange it over the tubes as shown.

Open paper12 from kit.
Copy and Paste it at the bottom, below the leaves.
Add your mask by going to Layer>Load/ Save Mask>Load Mask from Disk.
Apply the mask named WSL_Mask84.
Merge the mask group by right clicking the layer of the finished mask, go to Merge>Merge Group.
Resize and arrange it to fit as shown.

I used the font QwitcherBychen. Set it to a size you like and a stroke width of 4.
Foreground color to white and background color to #c7336d.
Duplicate the layer and select the second font layer with the font tool.
Set the stroke width to 0.
Merge the 2 font layer and convert to a raster layer.

Drop shadow everything except the mask.
Effects>3D Effects>Drop Shadow, set the drop to 3 vertical, 2 horizontal, 75 opacity, 4 blur.

Add your copyright info and your tag.

Merge everything in Layers>Merge>Merge Visible

All Finished!
Sunday, March 6, 2011

Glitzy Dame- PTU


Download this tutorial in a PDF file.
I've used the lovely PTU artwork of Keith Garvey. Get it at PTE.
This is a PTU kit called Dr. Feel Good from TammyKat Dezigns. Get it at PMTw/S.
The mask is WSL_Mask117 by Wee Scot Lass.
Font used is Alex Brush.


Let’s Begin!

Open a new canvas that’s 800x800 pixels.

Open blingframe1 from kit.
Copy and Paste it as a new layer on your canvas.

Copy and Paste your regular sized tube above the frame.
Resize the tube as needed to be as you like it.
Layers>Duplicate your frame layer and move one above your tube.
Using your eraser tool, erase any portion of the tube hanging out the bottom of the frame.
On the upper frame layer, erase any portion of the frame at the top that’s covering your tube.

Copy and Paste your close up tube under the bottom frame.
Duplicate this tube.
On the bottom one of this tube, turn it to black white by going to
Effects>Photo Effects>Black and White Film and set everything to 0.
On the duplicated tube change the blend mode to Soft Light.

Open paper pattern2 from kit.
Copy and Paste it below the bottom tubes.
Resize it to fit the frame slightly so that the pattern shows through.
Erase any portion of the paper hanging outside the frame.

Open acryliccircles1-lips from kit.
Copy and Paste it behind the paper.
Resize and arrange it as shown.

Open blingystitches-black from kit.
Copy and Paste it above the frame.
Resize and arrange it at the bottom as shown.

Open blingystitches-pink from kit.
Copy and Paste it as a new layer.
Resize and arrange it at the bottom as shown.

Open blingybracket from kit.
Copy and Paste it as a new layer.
Resize and arrange it to the right as shown.

Open star2 from kit.
Copy and Paste it as a new layer.
Resize and arrange it to the bottom as shown.

Open paperstrips1 from kit.
Copy and Paste it as a new layer.
Image>Mirror
Resize and arrange it to the bottom right as shown.

Open heart-pinned from kit.
Copy and Paste it as a new layer.
Resize and arrange it to the bottom as shown.

Open greyflower from kit.
Copy and Paste it as a new layer.
Resize and arrange it to the right as shown.

Open starflair from kit.
Copy and Paste it as a new layer.
Resize and arrange it to the right as shown.

Open pinkflower from kit.
Copy and Paste it as a new layer.
Resize and arrange it to the right as shown.

Open damask4-paper from kit.
Copy and Paste it at the bottom of the tag.
Add your mask by going to Layer>Load/ Save Mask>Load Mask from Disk.
Apply the mask named WSL_Mask117.
Merge the mask group by right clicking the layer of the finished mask, go to Merge>Merge Group.
Resize and arrange it to fit as shown.

I used the font Alex Brush. Set it to a size you like and a stroke width of 3.
Foreground color to white and background color to #d62f5c.
Duplicate the layer and select the second font layer with the font tool.
Set the stroke width to 0.
Merge the 2 font layer and convert to a raster layer.

Drop shadow everything except the mask.
Effects>3D Effects>Drop Shadow, set the drop to 3 vertical, 2 horizontal, 75 opacity, 4 blur.

Add your copyright info and your tag.

Merge everything in Layers>Merge>Merge Visible

Crop and resize as needed!


All Finished!

Inspiration- PTU


Download this tutorial in a PDF file.

I've used the lovely PTU artwork of Keith Garvey. Get it at PTE.
This is PTU kit called Come on Get Happy from Designs by Sarah. Get it at PMTw/S.
I used template 351 by Missy at Divine Intentionz.
I used mask Vix_Mask364 by Vix PSP.
Font used is Ephesis.


Let’s Begin!

Open the tag template, and resize the canvas from the center to 800x800 by going to
Image>Canvas Size.
Delete the copyright, wordart, dotted line, thin rectangle, and thin rectangle 2 layers.

Open paper pp4 from the kit.
Copy your paper and go to the template.
On your circle left layer, go to Selections>Select All, Selections>Float, Selections>Defloat.
Paste your paper by going to Edit>Paste As New Layer.
Then go to Selections>Invert and press the Delete button on your keyboard to delete the extra paper.
Be sure to delete the original layer of the template.
(Follow this procedure when asked to Copy and Paste a paper to a layer of the template.)

Copy and Paste the following papers to their respective template layers.
Paper pp10 to rectangle shape.
Paper pp2 to thin rectangle (xero)
Paper pp7 to circle right
Paper pp12 to heart

On the Polaroid layers, use your magic wand tool and select the black area of each pic.
Go to Selections>Modify>Expand by 1.
Hit the Delete button on your keyboard to delete the black space.

Open paper pp9 from kit.
Copy and Paste it behind each Polaroid and erase any portion of the paper hanging outside.

Copy and Paste your tubes above each of the papers behind the Polaroids.
Mirror the tube on the left and use a close up if you like for the middle.
Erase any portion of the tubes hanging outside of the polaroids.
On the tubes on the left and right, duplicate the tubes.
On the bottom tubes, change the blend mode to Luminance (Legacy).
On the upper tubes, change the blend mode to Soft Light.

Open watercolor smear1 from kit.
Copy and Paste it above the circles.
Resize and arrange it behind the left Polaroid as shown.

Open bead spill1 from kit.
Copy and Paste it as a new layer.
Resize and arrange it to the top as shown.

Open tag2 from kit.
Copy and Paste it above the Polaroid frames as shown.
Resize and arrange it to the right as shown.

Open ribbon4 from kit.
Copy and Paste it as a new layer.
Resize and arrange it to the bottom as shown.

Open littleflower3 from kit.
Copy and Paste it above the heart layer.
Resize and arrange it at the bottom.

Open button2 from kit.
Copy and Paste it as a new layer.
Resize and arrange it to the bottom as shown.

Open keys from kit.
Copy and Paste it as a new layer.
Resize and arrange it above the Polaroids from kit.

Open sequins staple1 from kit.
Copy and paste it as a new layer.
Resize and arrange it over the Polaroids as shown.

Open sequins staple2 from kit.
Copy and paste it as a new layer.
Resize and arrange it over the Polaroids as shown.

Open beadspill1 from kit.
Copy and Paste it as a new layer.
Resize and arrange it to the bottom as shown.

Open WA2 from kit.
Copy and Paste it as a new layer.
Resize and arrange it to the bottom as shown.

Open WA1 from kit.
Copy and Paste it as a new layer.
Resize and arrange it to the bottom as shown.

Open paper pp6 from kit.
Copy and Paste it at the bottom of the tag.
Add your mask by going to Layer>Load/ Save Mask>Load Mask from Disk.
Apply the mask named Vix_Mask364.
Merge the mask group by right clicking the layer of the finished mask, go to Merge>Merge Group.
Resize and arrange it to fit as shown.

I used the font Ephesis. Set it to a size you like and a stroke width of 3.
Foreground color to white and background color to #4f7b7b.
Duplicate the layer and select the second font layer with the font tool.
Set the stroke width to 0.
Merge the 2 font layer and convert to a raster layer.

Drop shadow everything except the mask.
Effects>3D Effects>Drop Shadow, set the drop to 3 vertical, 2 horizontal, 75 opacity, 4 blur.

Add your copyright info and your tag.

Merge everything in Layers>Merge>Merge Visible

Crop and resize as needed!


All Finished!

Come On Get Happy- PTU

I've used the lovely PTU artwork of Toosh. Get it at his site.
This is PTU kit called Come on Get Happy from Designs by Sarah. Get it at PMTw/S.
I used mask Vix_Mask316 by Vix PSP.
Font used is Tabitha.


Let’s Begin!

Open a new canvas that’s 800x800 pixels.

Open scallop frame2 from kit.
Copy and Paste it as a new layer onto your canvas.

Copy and Paste your tube above the frame.
Resize and arrange your tube as needed to fit the frame the way you’d like.

Open paper pp14 from kit.
Copy and Paste it below the frame layer.
Resize it to fit the frame slightly so that most of the circles show through.
Erase any portion of the paper hanging outside the frame.

Open the following elements from the kit.
Copy and Paste them above the frame layer in this order.
Resize and arrange them on the tag as shown.

string cloud
string sun
branch
ribbon with buttons
hearts1
beads2
string with leaves

Open paper pp11 from kit.
Copy and Paste it at the bottom of the tag.
Add your mask by going to Layer>Load/ Save Mask>Load Mask from Disk.
Apply the mask named Vix_Mask316.
Merge the mask group by right clicking the layer of the finished mask, go to Merge>Merge Group.
Resize and arrange it to fit as shown.

I used the font Tabitha. Set it to a size you like and a stroke width of 3.
Foreground color to white and background color to #fe7403.
Duplicate the layer and select the second font layer with the font tool.
Set the stroke width to 0.
Merge the 2 font layer and convert to a raster layer.

Drop shadow everything except the mask.
Effects>3D Effects>Drop Shadow, set the drop to 3 vertical, 2 horizontal, 75 opacity, 4 blur.

Add your copyright info and your tag.

Merge everything in Layers>Merge>Merge Visible

Crop and resize as needed!


All Finished!

Dr Feel Good- PTU


Download this tutorial in a PDF file.

I've used the lovely PTU artwork of Shawli. Get it at MPT.
This is a PTU kit called Dr. Feel Good from TammyKat Dezigns. Get it at PMTw/S.
The mask is Vix_Mask218, by Vix PSP.
Font used is A Dripping Marker.


Let’s Begin!

Open a new canvas that’s 800x800 pixels.

Open frame2 from kit.
Copy and Paste it as a new layer on your canvas.

Copy and Paste your tube above the frame.
Resize the tube as needed to be as you like it.
Layers>Duplicate your frame layer and move one above your tube.
Using your eraser tool, erase any portion of the tube hanging out the bottom of the frame.
On the upper frame layer, erase any portion of the frame at the top that’s covering your tube.

Open heartbeat-paper from kit.
Copy and Paste it below the bottom frame layer.
Resize it to fit the frame slightly so that the pattern shows through.
Erase any portion of the paper hanging outside the frame.

Open prescription from kit.
Copy and Paste it behind the paper.
Resize and arrange it to left of the frame.

Open hospital from kit.
Copy and Paste it as a new layer.
Resize and arrange it to the right as shown.

Open checkeredheart from kit.
Copy and Paste it above the upper frame.
Resize and arrange it at the right as shown.

Open bandaid from kit.
Copy and Paste it as a new layer.
Resize and arrange it to the left as shown.

Open blackstring-tagged from kit.
Copy and Paste it as a new layer.
Resize and arrange it to the bottom as shown.

Open blkwhite-pill from kit.
Copy and Paste it as a new layer.
Resize and arrange it to the bottom right as shown.

Open syringe from kit.
Copy and Paste it as a new layer.
Resize and arrange it to the right as shown.

Open redbeat from kit.
Copy and Paste it as a new layer.
Resize and arrange it to the bottom as shown.

Open blackpaper from kit.
Copy and Paste it at the bottom of the tag.
Add your mask by going to Layer>Load/ Save Mask>Load Mask from Disk.
Apply the mask named Vix_Mask218.
Merge the mask group by right clicking the layer of the finished mask, go to Merge>Merge Group.
Resize and arrange it to fit as shown.

I used the font Aquarelle. Set it to a size you like and a stroke width of 4.
Foreground color to white and background color to #800000.
Duplicate the layer and select the second font layer with the font tool.
Set the stroke width to 0.
Merge the 2 font layer and convert to a raster layer.

Drop shadow everything except the mask.
Effects>3D Effects>Drop Shadow, set the drop to 3 vertical, 2 horizontal, 75 opacity, 4 blur.

Add your copyright info and your tag.

Merge everything in Layers>Merge>Merge Visible

Crop and resize as needed!


All Finished!

Breaking Twilight- PTU


Download this tutorial in a PDF file.

I've used the lovely PTU artwork of Rafater. Get it at PTE.
This is PTU kit called Breaking Twilight from Designs by Sarah. Get it at PMTw/S.
I used mask WSL_Mask98 by Wee Scot Lass.
Font used is Twilight.


Let’s Begin!

Open a new canvas that’s 800x800 pixels.

Open frame6 from kit.
Copy and Paste it as a new layer onto your canvas.

Copy and Paste your tube above the frame.
Resize and arrange your tube as needed to fit the frame the way you’d like.
Select your frame layer and duplicate it.
Move your duplicated frame above your tube layer.
Use your eraser tool to erase any portion of the upper frame that’s covering your tube.
Erase any portion of your tube that’s hanging out the bottom of the frame.

Open paper pp8 from kit.
Copy and Paste it below the bottom frame layer.
Resize it to fit the frame slightly so that most of the splats show through.
Erase any portion of the paper hanging outside the frame.

Open the following elements from the kit.
Copy and Paste them above the frame in this order.
Resize and arrange them on the tag as shown.

Ribbon_3
Wings
Music and love_glitter
Flower2
Feathers
Family crest_ribbon

Open paper pp1 from kit.
Copy and Paste it at the bottom of the tag.
Add your mask by going to Layer>Load/ Save Mask>Load Mask from Disk.
Apply the mask named WSL_Mask98.
Merge the mask group by right clicking the layer of the finished mask, go to Merge>Merge Group.
Resize and arrange it to fit as shown.

I used the font Twilight. Set it to a size you like and a stroke width of 3.
Foreground color to white and background color to #901616.
Duplicate the layer and select the second font layer with the font tool.
Set the stroke width to 0.
Merge the 2 font layer and convert to a raster layer.

Drop shadow everything except the mask.
Effects>3D Effects>Drop Shadow, set the drop to 3 vertical, 2 horizontal, 75 opacity, 4 blur.

Add your copyright info and your tag.

Merge everything in Layers>Merge>Merge Visible

Crop and resize as needed!


All Finished!

Sunday, February 20, 2011

Bad Girlfriend- PTU


Download this tutorial in a PDF file.

I've used the lovely PTU artwork of Keith Garvey. Get it at PTE.
This is PTU kit called Bad Girlfriend from Scraps With Attitude. Get it at PMTw/S.
I’ve used the template Bad Romance in Tag Temp Pack 002 by Pimp’d Designz.
The mask is Vix_Mask171, by Vix PSP.
Font used is P22 Corinthia.


Let’s Begin!

Open the tag template, and resize the canvas from the center to 800x800 by going to
Image>Canvas Size.
Delete the layers named Raster 6 and 7.

Select layer Raster 3.
Go to Hue & Saturation and use these settings:
Hue: 0, Saturation: 255.
Go to Brightness & Contrast and use these setting:
Brightness: -50, Contrast: 0.
Add noise at 50%.

Open paper4 from the kit.
Copy your paper and go to the template.
On layer Raster 5 (black rectangle), go to
Selections>Select All, Selections>Float, Selections>Defloat.
Paste your paper by going to Edit>Paste As New Layer.
Then go to Selections>Invert and press the Delete button on your keyboard to delete the extra paper.
Be sure to delete the original layer of the template.

Open pen1 from kit.
Copy and Paste as a new layer above the rectangle.
Resize and arrange it to fit the bottom of the rectangle.

Copy and Paste your tube as a new layer.
Resize and arrange it as shown.
Duplicate your tube and move the bottom tube below the layer Raster 4 (white rectangle).
On the upper tube erase the left leg covering the rectangles.
Now it should look like she is straddling the rectangles.

Open button5 from kit.
Copy and Paste it above the pen.
Resize and arrange it to the left as shown.

Open bow and star1 from kit.
Copy and Paste it as a new layer.
Resize and arrange it to the bottom as shown.

Open word1 from kit.
Copy and Paste it above the upper tube layer.
Resize and arrange it to the left as shown.

Open bead heart string1 from kit.
Copy and Paste it as a new layer.
Resize and arrange it to the center as shown.

Open dbl bow3 from kit.
Copy and Paste it below the lower tube.
Resize and arrange it to the right as shown.

Open paper5 from kit.
Copy and Paste it at the bottom of the tag.
Add your mask by going to Layer>Load/ Save Mask>Load Mask from Disk.
Apply the mask named Vix_Mask171.
Merge the mask group by right clicking the layer of the finished mask, go to Merge>Merge Group.
Resize and arrange it to fit as shown.

I used the font P22 Corinthia. Set it to a size you like and a stroke width of 3.
Foreground color to white and background color to #2f2f2f.
Duplicate the layer and select the second font layer with the font tool.
Set the stroke width to 0.
Merge the 2 font layer and convert to a raster layer.

Drop shadow everything except the mask.
Effects>3D Effects>Drop Shadow, set the drop to 3 vertical, 2 horizontal, 75 opacity, 4 blur.

Add your copyright info and your tag.

Merge everything in Layers>Merge>Merge Visible

Crop and resize as needed!


All Finished!

Cool Treats- PTU


Download this tutorial in a PDF file.

I've used the lovely PTU artwork of Elias Chatzoudis. Get it at PTE.
This is PTU kit called Cool Treats from TammyKat Dezigns. Get it at PMTw/S.
The mask is Vix_Mask363, by Vix PSP.
Font used is Toonish.


Let’s Begin!

Open a new canvas that’s 800x800 pixels.

Open blueframe from kit.
Copy and Paste as a new layer.
Resize slightly to give yourself room and center.

Copy and Paste your tube as a new layer.
Resize the tube as needed and center on top of frame as shown.

Open icecreampaper from kit.
Copy and Paste it below the frame.
Resize it to fit inside the frame and erase any portion hanging out.

Open coolnsweettile from kit.
Copy and Paste it above the frame.
Resize and arrange it to the left as shown.

Open topingborder from kit.
Copy and Paste it as a new layer.
Resize and arrange it to the bottom as shown.

Open greenribbon from kit.
Copy and Paste it as a new layer.
Resize and arrange it to the bottom as shown.

Open pinkcart-shadows from kit.
Copy and Paste it as a new layer.
Resize and arrange it to the right as shown.

Open acrylicgreenpopsicle from kit.
Copy and Paste it as a new layer.
Resize and arrange it to the right as shown.

Open popsiclebutton from kit.
Copy and Paste them as new layer.
Resize and arrange it to the bottom right as shown.

Open cherry from kit.
Copy and Paste it as a new layer.
Resize and arrange it to the bottom right as shown.

Open pinkpaper from kit.
Copy and Paste it at the bottom of the tag.
Add your mask by going to Layer>Load/ Save Mask>Load Mask from Disk.
Apply the mask named Vix_Mask363.
Merge the mask group by right clicking the layer of the finished mask, go to Merge>Merge Group.
Resize and arrange it to fit as shown.

I used the font Toonish. Set it to a size you like and a stroke width of 3.
Foreground color to white and background color to #71b9e3.
Duplicate the layer and select the second font layer with the font tool.
Set the stroke width to 0.
Merge the 2 font layer and convert to a raster layer.

Drop shadow everything except the mask.
Effects>3D Effects>Drop Shadow, set the drop to 3 vertical, 2 horizontal, 75 opacity, 4 blur.

Add your copyright info and your tag.

Merge everything in Layers>Merge>Merge Visible

Crop and resize as needed!


All Finished!

Don't Bug Me- PTU


Download this tutorial in a PDF file.
I've used the lovely PTU artwork of Toosh Toosh. Get it at his site.
This is PTU kit called Don’t Bug Me from TammyKat Dezigns. Get it at PMTw/S.
The mask is Vix_Mask17, by Vix PSP.
Font used is Cartoon.


Let’s Begin!


Open a new canvas that’s 800x800 pixels.

Copy and Paste your tube as a new layer.
Resize the tube as needed to be as you like it.
For this tube I arranged the pieces together on separate layers.

Open grass72 from kit.
Copy and Paste it as a new layer.
Resize it to fit along the left as shown.
Duplicate as needed to cover the bottom of the tag as shown.

Open notebook-ladybug72 from kit.
Copy and Paste it behind the tube layer.
Resize and arrange it to the left as shown.

Open ncloud72 from kit.
Copy and Paste it as a new layer.
Resize and arrange it to the right as shown.

Open ladybug-ribbon72 from kit.
Copy and Paste it above the grass layers.
Resize and arrange it to the bottom as shown.

Open stripedfolderibbon72 from kit.
Copy and Paste it as a new layer.
Resize and arrange it to the bottom as shown.

Open sequinstitches72 from kit.
Copy and Paste it as a new layer.
Resize and arrange it to the bottom as shown.

Open 5 different sequin from kit.
Copy and Paste them as new layers.
Resize and arrange them in a cluster at the bottom as shown.

Open greenleaf72 from kit.
Copy and Paste it as a new layer.
Resize and arrange it to the bottom left as shown.

Open pinkbow72 from kit.
Copy and Paste it as a new layer.
Resize and arrange it to the bottom as shown.

Open redladybug72 from kit.
Copy and Paste it as a new layer.
Resize and arrange it to the bottom left as shown.

Open bugginworld72 from kit.
Copy and Paste it as a new layer.
Resize and arrange it to the top as shown.

Open paper cloudpaper72 from kit.
Copy and Paste it at the bottom of the tag.
Add your mask by going to Layer>Load/ Save Mask>Load Mask from Disk.
Apply the mask named Vix_Mask17.
Merge the mask group by right clicking the layer of the finished mask, go to Merge>Merge Group.
Resize and arrange it to fit as shown.

I used the font Cartoon. Set it to a size you like and a stroke width of 3.
Foreground color to white and background color to #be0a0c.
Duplicate the layer and select the second font layer with the font tool.
Set the stroke width to 0.
Merge the 2 font layer and convert to a raster layer.

Drop shadow everything except the mask.
Effects>3D Effects>Drop Shadow, set the drop to 3 vertical, 2 horizontal, 75 opacity, 4 blur.

Add your copyright info and your tag.

Merge everything in Layers>Merge>Merge Visible

Crop and resize as needed!


All Finished!

Tuesday, February 15, 2011

True Blood Sam- PTU


Download this tutorial in a PDF file.

I've used the lovely PTU artwork of Elias Chatzoudis. You can purchase it at PTE.
This is a PTU kit called True Blood: Sam by Pimp’d Designz. Visit her blog for links to her store HERE.
The mask is WSL_Mask254, by Wee Scot Lass.
Font used is Trueblood.


Let’s Begin!

Open a new canvas that’s 800x800 pixels.

Open frame-01 from kit.
Copy and Paste it as a new layer.

Copy and Paste your tube under your frame.
Resize and arrange it to fit the frame as shown.

Layers>Duplicate your frame.
Move your second frame below your tube layer.
Select the upper frame and use your eraser tool to erase portions of the frame covering the tube’s upper body.
Erase any portion of the tube hanging out of the bottom of the frame.

Open paper pp-01 from kit.
Copy and Paste it below your bottom frame.
Resize it slightly so that the right side of the paper is showing through the frame as shown.
Erase any portion of the paper hanging out.

Open stitches from kit.
Copy and Paste it below the paper.
Resize and arrange it as shown.

Open tree from kit.
Copy and Paste it as a new layer.
Resize and arrange it to the right as shown.

Open sand from kit.
Copy and Paste it above the upper frame.
Resize and arrange it to the bottom as shown.

Open thread from kit.
Copy and Paste it as a new layer.
Resize and arrange it to the bottom right as shown.

Open greens-02 from kit.
Copy and Paste it as a new layer.
Resize and arrange it to the bottom as shown.

Open ribbon-03 from kit.
Copy and Paste it as a new layer.
Resize and arrange it to the bottom right as shown.

Open ribbon-05 from kit.
Copy and Paste it as a new layer.
Resize and arrange it to the bottom as shown.

Open flower-02 from kit.
Copy and Paste it as a new layer.
Resize and arrange it to the bottom right as shown.

Open ribbon-01 from kit.
Copy and Paste it as a new layer.
Resize and arrange it as shown.

Open paper pp-10 from kit.
Copy and Paste it at the bottom of the tag.
Add your mask by going to Layer>Load/ Save Mask>Load Mask from Disk.
Apply the mask named WSL_Mask254.
Merge the mask group by right clicking the layer of the finished mask, go to Merge>Merge Group.
Resize and arrange it to fit as shown.

I used the font Trueblood. Use a size you like and a stroke width of 3.
Foreground color to white and background color to #201d1e.
Duplicate the layer and select the second font layer with the font tool.
Set the stroke width to 0.
Merge the 2 font layers and convert to a raster layer.

Drop shadow your elements by going to
Effects>3D Effects>Drop Shadow, set the drop to 3 vertical, 2 horizontal, 75 opacity, 4 blur.

Add your copyright info and your tag.

Merge everything in Layers>Merge>Merge Visible

Crop and resize as needed!


All Finished!

True Blood Jessica- PTU


Download this tutorial in a PDF file.
I've used the lovely PTU artwork of Jamie Kidd. You can purchase it at CDO.
This is a PTU kit called True Blood: Jessica by Pimp’d Designz. Visit her blog for links to her store HERE.
I’ve used masks Vix_Mask11 and 112 by Vix PSP.
Font used is Callie Hand.


Let’s Begin!

Open a new canvas that’s 800x800 pixels.

Open frame-02 from kit.
Copy and Paste it as a new layer.

Copy and Paste your tube under your frame.
Resize and arrange it to fit the frame as shown.

Layers>Duplicate your frame.
Move your second frame below your tube layer.
Select the upper frame and use your eraser tool to erase portions of the frame covering the tube’s head.
Erase any portion of the tube hanging out of the bottom of the frame.

Open paper pp-11 from kit.
Copy and Paste it below your bottom frame.
Erase any portion of the paper hanging out.

Open sparkle-01 from kit.
Copy and Paste it below the paper.
Resize and arrange it as shown.

Open flower-01 and flower-02 from kit.
Copy and Paste them above the upper frame.
Resize and arrange it to the bottom as shown.
Layers>Duplicate as needed to cover the bottom as shown.

Open butterfly from kit.
Copy and Paste it above all the flowers.
Resize and arrange it to the left as shown.

Open heart-01 from kit.
Copy and Paste it as a new layer.
Resize and arrange it to the bottom as shown.

Open string-01 from kit.
Copy and Paste it as a new layer.
Resize and arrange it to the bottom right as shown.

Open paper pp-08 from kit.
Copy and Paste it at the bottom of the tag.
Add your mask by going to Layer>Load/ Save Mask>Load Mask from Disk.
Apply the mask named Vix_Mask11.
Merge the mask group by right clicking the layer of the finished mask, go to Merge>Merge Group.
Resize and arrange it to fit as shown.
Copy and Paste paper pp-07 as a new layer.
Repeat this procedure and apply the mask named Vix_Mask112.

I used the font Callie Hand. Use a size you like and a stroke width of 3.
Foreground color to white and background color to #262458.
Duplicate the layer and select the second font layer with the font tool.
Set the stroke width to 0.
Merge the 2 font layers and convert to a raster layer.

Drop shadow your elements by going to
Effects>3D Effects>Drop Shadow, set the drop to 3 vertical, 2 horizontal, 75 opacity, 4 blur.

Add your copyright info and your tag.

Merge everything in Layers>Merge>Merge Visible

Crop and resize as needed!


All Finished!


True Blood Jason- PTU


Download this tutorial in a PDF file.
I've used the lovely PTU artwork of Simon Han. You can purchase it at PTE.
This is a PTU kit called True Blood: Jason by Pimp’d Designz. Visit her blog for links to her store HERE.
The mask is WSL_Mask25, by Wee Scot Lass.
Font used is Good Vibrations ROB.


Let’s Begin!

Open a new canvas that’s 800x800 pixels.

Open frame-02 from kit.
Copy and Paste it as a new layer.
Resize it smaller a little to give yourself more room to work, and center.

Copy and Paste your tube under your frame.
Resize and arrange it to fit the frame as shown.

Layers>Duplicate your frame.
Move your second frame below your tube layer.
Select the upper frame and use your eraser tool to erase portions of the frame covering the tube’s head.

Open paper pp-01 from kit.
Copy and Paste it below your bottom frame.
Erase any portion of the paper hanging out.

Open print-01 from kit.
Copy and Paste it above the upper frame.
Resize and arrange it to the bottom right as shown.

Open ribbon-01 from kit.
Copy and Paste it as a new layer.
Resize and arrange it to the bottom as shown.

Open jean-02 from kit.
Copy and Paste it as a new layer.
Resize and arrange it to the bottom as shown.

Open journal from kit.
Copy and Paste it as a new layer.
Resize and arrange it to the bottom as shown.

Open greens-01 from kit.
Copy and Paste it as a new layer.
Resize and arrange it to the right as shown.

Open ribbon-02 from kit.
Copy and Paste it as a new layer.
Resize and arrange it to the right as shown.

Open flower-01 from kit.
Copy and Paste it as a new layer.
Resize and arrange it to the bottom right as shown.

Open paper pp-06 from kit.
Copy and Paste it at the bottom of the tag.
Add your mask by going to Layer>Load/ Save Mask>Load Mask from Disk.
Apply the mask named WSL_Mask25.
Merge the mask group by right clicking the layer of the finished mask, go to Merge>Merge Group.
Resize and arrange it to fit as shown.

I used the font Good Vibrations ROB. Use a size you like and a stroke width of 3.
Foreground color to white and background color to #91ab1f.
Duplicate the layer and select the second font layer with the font tool.
Set the stroke width to 0.
Merge the 2 font layers and convert to a raster layer.

Drop shadow your elements by going to
Effects>3D Effects>Drop Shadow, set the drop to 3 vertical, 2 horizontal, 75 opacity, 4 blur.

Add your copyright info and your tag.

Merge everything in Layers>Merge>Merge Visible

Crop and resize as needed!


All Finished!


Monday, February 14, 2011

True Blood Tara- PTU


Download this tutorial in a PDF file.
I've used the lovely PTU artwork of Elias Chatzoudis. You can purchase it at PTE.
This is a PTU kit called True Blood: Tara by Pimp’d Designz. Visit her blog for links to her store HERE.
The mask is WSL_Mask62, by Wee Scot Lass.
Font used is Romance Fatal Serif.


Let’s Begin!


Open a new canvas that’s 800x800 pixels.

Open frame-03 from kit.
Copy and Paste it as a new layer.
Resize it smaller a little to give yourself more room to work, and center.

Copy and Paste your tube under your frame.
Image>Mirror
Resize and arrange it to fit the frame as shown.
Layers>Duplicate the tube.
On the bottom tube layer, change it to black and white by going to
Effects>Photo Effects>Black and White Film
Set the Brightness and Clarify to 0
On the upper tube layer, change the blend mode to soft light by going to
Layers>Properties and change the Blend Mode to Soft Light.

Layers>Duplicate your frame.
Move your second frame below your tube layer.
Select the upper frame and use your eraser tool to erase portions of the frame covering the tube’s head and feet.

Open paper pp-09 from kit.
Copy and Paste it below your bottom frame.
Resize it to fit behind the frame and erase any portion hanging out.

Open bricks from kit.
Copy and Paste it as a new layer.
Resize and arrange it to the left as shown.
Layers>Duplicate and move it to the right and up some.
Erase any portion of the bricks hanging outside of the frame.

Open circles from kit.
Copy and Paste it above the upper frame layer.
Resize and arrange it to the left as shown.

Open ribbon-02 from kit.
Copy and Paste it as a new layer.
Resize and arrange it to the bottom as shown.

Open swirl-02 from kit.
Copy and Paste it as a new layer.
Resize and arrange it to the left as shown.

Open string-01 from kit.
Copy and Paste it as a new layer.
Resize and arrange it to the bottom as shown.

Open dragonfly from kit.
Copy and Paste it as a new layer.
Resize, rotate and arrange it to the bottom as shown.

Open paper pp-09 from kit.
Copy and Paste it at the bottom of the tag.
Add your mask by going to Layer>Load/ Save Mask>Load Mask from Disk.
Apply the mask named WSL_Mask62.
Merge the mask group by right clicking the layer of the finished mask, go to Merge>Merge Group.
Resize and arrange it to fit as shown.

I used the font Romance Fatal Serif. Use a size you like and a stroke width of 4.
Foreground color to white and background color to #187d80.
Duplicate the layer and select the second font layer with the font tool.
Set the stroke width to 0.
Merge the 2 font layers and convert to a raster layer.

Drop shadow everything except the duplicated tube and the mask.
Effects>3D Effects>Drop Shadow, set the drop to 3 vertical, 2 horizontal, 75 opacity, 4 blur.

Add your copyright info and your tag.

Merge everything in Layers>Merge>Merge Visible

Crop and resize as needed!


All Finished!


True Blood Lafayette- PTU


Download this tutorials in a PDF file.
I've used the lovely PTU artwork of PinUp Toons. You can purchase it at CDO.
This is a PTU kit called True Blood: Lafayette by Pimp’d Designz. Visit her blog for links to her store HERE.
The mask is WSL_Mask65, by Wee Scot Lass.
Font used is The King & Queen.


Let’s Begin!


Open a new canvas that’s 800x800 pixels.

Open frame-04 from kit.
Copy and Paste it as a new layer.
Resize it smaller a little to give yourself more room to work, and center.

Copy and Paste your tube under your frame.
Resize and arrange it to fit the frame as shown.

Layers>Duplicate your frame.
Move your second frame below your tube layer.
Select the upper frame and use your eraser tool to erase portions of the frame covering the tube’s head and feet.

Open paper pp-08 from kit.
Copy and Paste it below your bottom frame.
Resize it to fit behind the frame and erase any portion hanging out.

Open mat from kit.
Copy and Paste it behind the paper layer.
Resize and arrange it as shown.

Open glitter-01 from kit.
Copy and Paste it above the upper frame layer.
Resize and arrange it to the bottom as shown.

Open print-01 from kit.
Copy and Paste it as a new layer.
Resize and arrange it to the bottom as shown.

Open belt from kit.
Copy and Paste it as a new layer.
Resize and arrange it to the bottom as shown.

Open stars-02 from kit.
Copy and Paste it as a new layer.
Resize and arrange it to the right as shown.

Open ribbon-02 from kit.
Copy and Paste it as a new layer.
Resize and arrange it as shown.

Open swirl-01 from kit.
Copy and Paste it as a new layer.
Resize and arrange it to the right as shown.

Open stars-01 from kit.
Copy and Paste it as a new layer.
Resize and arrange it to the right as shown.

Open lights from kit.
Copy and Paste it as a new layer.
Resize and arrange it to the left as shown.
Erase the upper portion of the strings that are hanging above the frame.

Open paper pp-07 from kit.
Copy and Paste it at the bottom of the tag.
Add your mask by going to Layer>Load/ Save Mask>Load Mask from Disk.
Apply the mask named WSL_Mask65.
Merge the mask group by right clicking the layer of the finished mask, go to Merge>Merge Group.
Resize and arrange it to fit as shown.

I used the font The King & Queen. Use a size you like and a stroke width of 4.
Foreground color to white and background color to black.
Duplicate the layer and select the second font layer with the font tool.
Set the stroke width to 0.
Merge the 2 font layers and convert to a raster layer.

Drop shadow everything except the duplicated tube and the mask.
Effects>3D Effects>Drop Shadow, set the drop to 3 vertical, 2 horizontal, 75 opacity, 4 blur.

Add your copyright info and your tag.

Merge everything in Layers>Merge>Merge Visible

Crop and resize as needed!


All Finished!