Showing posts with label Template. Show all posts

Wednesday, March 5, 2014

Kiss Me- PTU


:: What You’ll Need ::

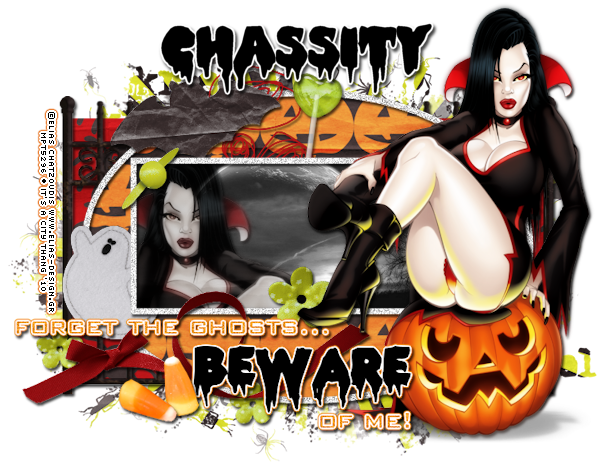
I've used the lovely PTU artwork called 2013MyHeart by Ismael Rac.
This is a PTU kit called Kiss Me by Digital Indulgence. Get it at PMTw/S.
Template001 (Lovely) by Me, at PolkaDot Scraps.
The mask is WSL_Mask362, by Wee Scott Lass. It’s the last one in this post.
Font used is Send Flowers.


:: Let’s Begin ::

Open the Lovely Template001, either the PSPIMAGE or PSD layered ones.
Delete the Copyright layer.
Go to Image>Resize and type in 600 pixels for the width to resize.
Go to Image>Canvas Size and resize it 800x800 from the center.

Open Paper12 from the kit.
Copy your paper and go to the template.
On the layer named square, go to
Selections>Select All, Selections>Float, Selections>Defloat.
Go to Layers>New Raster Layer (hit ok)
Paste your paper into this selection by going to Edit>Paste Into Selection (or right clicking and click Paste>Paste Into Selection).
Turn off your selection by going to Selection>Select None.
Be sure to delete the original square layer from your template.
(Do this with every layer you add a paper to.)

Open Paper14 from the kit.
Copy your paper paste it to the circle by going to
Selections>Select All, Selections>Float, Selections>Defloat.
Paste your paper by going to Edit>Paste As New Layer (or right clicking and click Paste>Paste As New Layer).
Then go to Selections>Invert and press the Delete button on your keyboard to delete the extra paper.
Selections>Select None

Use this same process to add the following papers to the layers named.
Paper3 to layers named left top circle & right bottom circle.
Paper13 to layer named rectangle.
Paper15 to layers named left circle and right circle.

Add Paper6 to layer to the oval with the “Paste Into Selection” process above.

Open element named Heart from kit.
Copy and Paste as a new layer above the two heart layers in the template.
Resize and cover the original hearts, replacing them and deleting the layers.

Copy and Paste your tube as a new layer above your circle layer.
Resize the tube as needed and center over the template.
If using the same tube as me, line up the bottom of the tube with the bottom of the square paper layer.

Open Wired Words1 from kit.
Copy and Paste it as a new layer above the top layer.
Resize and arrange it at the bottom of the tag as shown.

Open Charm2 from kit.
Copy and Paste it as a new layer above the wired word.
Resize and rotate it to the left a little and arrange it at the bottom of the O.

Open Heart Candy from kit.
Copy and Paste it as a new layer above the square layer.
Resize and arrange it the bottom right above that circle layer.
Layer>Duplicate (or right click and hit Duplicate)
Arrange this one above the top left circle and rotate it a little to the right to show more.

Open Ribbon Flower from kit.
Copy and Paste it as a new layer above the circle layer.
Resize and arrange it to the bottom left as shown.

Open Button3 from kit.
Copy and Paste it as a new layer.
Resize and arrange it to the left as shown.

Open Flower Button from kit.
Copy and Paste it as a new layer.
Resize and arrange it to the bottom left as shown.

Open Ribbon Flower from kit again.
Copy and Paste it as a new layer above the tube layer.
Resize and arrange it to the bottom right of the tube as shown.

Open Winged Heart from kit.
Copy and Paste it as a new layer.
Resize and arrange it to the bottom of the tube as shown.

Open Boarder2 from kit.
Copy and Paste it as a new layer.
Resize and arrange it to the bottom as shown.

Open Bead1 from kit.
Copy and Paste it as a new layer.
Resize and arrange it to the bottom as shown.

Add noise to all the white mat layers by clicking each layer and going to
Adjust>Add/Remove Noise>Add Noise
Check Uniform and Monochrome
Set noise to 50%

Open Paper3 from kit.
Copy and Paste it at the bottom layer of the tag.
Add your mask by going to Layer>Load/ Save Mask>Load Mask from Disk.
Apply the mask named WSL_Mask362.
Merge the mask group by right clicking the layer of the finished mask, go to Merge>Merge Group.
Resize and arrange it to fit as shown.

I like to crop and resize here before adding my text!

I used the font Send Flowers. Set it to a size you like and a stroke width of 4.
Foreground color to white and background color to #f42c88.
Duplicate the layer and select the second font layer with the font tool.
Set the stroke width to 0.
Merge the 2 font layer and convert to a raster layer.

Drop shadow everything except the mask.
Effects>3D Effects>Drop Shadow, set the drop to 3 vertical, 2 horizontal, 75 opacity, 4 blur.

Add your copyright info and your tagged by stuff.

Merge everything in Layers>Merge>Merge Visible


All Finished!

Sunday, March 6, 2011

Inspiration- PTU


Download this tutorial in a PDF file.

I've used the lovely PTU artwork of Keith Garvey. Get it at PTE.
This is PTU kit called Come on Get Happy from Designs by Sarah. Get it at PMTw/S.
I used template 351 by Missy at Divine Intentionz.
I used mask Vix_Mask364 by Vix PSP.
Font used is Ephesis.


Let’s Begin!

Open the tag template, and resize the canvas from the center to 800x800 by going to
Image>Canvas Size.
Delete the copyright, wordart, dotted line, thin rectangle, and thin rectangle 2 layers.

Open paper pp4 from the kit.
Copy your paper and go to the template.
On your circle left layer, go to Selections>Select All, Selections>Float, Selections>Defloat.
Paste your paper by going to Edit>Paste As New Layer.
Then go to Selections>Invert and press the Delete button on your keyboard to delete the extra paper.
Be sure to delete the original layer of the template.
(Follow this procedure when asked to Copy and Paste a paper to a layer of the template.)

Copy and Paste the following papers to their respective template layers.
Paper pp10 to rectangle shape.
Paper pp2 to thin rectangle (xero)
Paper pp7 to circle right
Paper pp12 to heart

On the Polaroid layers, use your magic wand tool and select the black area of each pic.
Go to Selections>Modify>Expand by 1.
Hit the Delete button on your keyboard to delete the black space.

Open paper pp9 from kit.
Copy and Paste it behind each Polaroid and erase any portion of the paper hanging outside.

Copy and Paste your tubes above each of the papers behind the Polaroids.
Mirror the tube on the left and use a close up if you like for the middle.
Erase any portion of the tubes hanging outside of the polaroids.
On the tubes on the left and right, duplicate the tubes.
On the bottom tubes, change the blend mode to Luminance (Legacy).
On the upper tubes, change the blend mode to Soft Light.

Open watercolor smear1 from kit.
Copy and Paste it above the circles.
Resize and arrange it behind the left Polaroid as shown.

Open bead spill1 from kit.
Copy and Paste it as a new layer.
Resize and arrange it to the top as shown.

Open tag2 from kit.
Copy and Paste it above the Polaroid frames as shown.
Resize and arrange it to the right as shown.

Open ribbon4 from kit.
Copy and Paste it as a new layer.
Resize and arrange it to the bottom as shown.

Open littleflower3 from kit.
Copy and Paste it above the heart layer.
Resize and arrange it at the bottom.

Open button2 from kit.
Copy and Paste it as a new layer.
Resize and arrange it to the bottom as shown.

Open keys from kit.
Copy and Paste it as a new layer.
Resize and arrange it above the Polaroids from kit.

Open sequins staple1 from kit.
Copy and paste it as a new layer.
Resize and arrange it over the Polaroids as shown.

Open sequins staple2 from kit.
Copy and paste it as a new layer.
Resize and arrange it over the Polaroids as shown.

Open beadspill1 from kit.
Copy and Paste it as a new layer.
Resize and arrange it to the bottom as shown.

Open WA2 from kit.
Copy and Paste it as a new layer.
Resize and arrange it to the bottom as shown.

Open WA1 from kit.
Copy and Paste it as a new layer.
Resize and arrange it to the bottom as shown.

Open paper pp6 from kit.
Copy and Paste it at the bottom of the tag.
Add your mask by going to Layer>Load/ Save Mask>Load Mask from Disk.
Apply the mask named Vix_Mask364.
Merge the mask group by right clicking the layer of the finished mask, go to Merge>Merge Group.
Resize and arrange it to fit as shown.

I used the font Ephesis. Set it to a size you like and a stroke width of 3.
Foreground color to white and background color to #4f7b7b.
Duplicate the layer and select the second font layer with the font tool.
Set the stroke width to 0.
Merge the 2 font layer and convert to a raster layer.

Drop shadow everything except the mask.
Effects>3D Effects>Drop Shadow, set the drop to 3 vertical, 2 horizontal, 75 opacity, 4 blur.

Add your copyright info and your tag.

Merge everything in Layers>Merge>Merge Visible

Crop and resize as needed!


All Finished!

Sunday, February 20, 2011

Bad Girlfriend- PTU


Download this tutorial in a PDF file.

I've used the lovely PTU artwork of Keith Garvey. Get it at PTE.
This is PTU kit called Bad Girlfriend from Scraps With Attitude. Get it at PMTw/S.
I’ve used the template Bad Romance in Tag Temp Pack 002 by Pimp’d Designz.
The mask is Vix_Mask171, by Vix PSP.
Font used is P22 Corinthia.


Let’s Begin!

Open the tag template, and resize the canvas from the center to 800x800 by going to
Image>Canvas Size.
Delete the layers named Raster 6 and 7.

Select layer Raster 3.
Go to Hue & Saturation and use these settings:
Hue: 0, Saturation: 255.
Go to Brightness & Contrast and use these setting:
Brightness: -50, Contrast: 0.
Add noise at 50%.

Open paper4 from the kit.
Copy your paper and go to the template.
On layer Raster 5 (black rectangle), go to
Selections>Select All, Selections>Float, Selections>Defloat.
Paste your paper by going to Edit>Paste As New Layer.
Then go to Selections>Invert and press the Delete button on your keyboard to delete the extra paper.
Be sure to delete the original layer of the template.

Open pen1 from kit.
Copy and Paste as a new layer above the rectangle.
Resize and arrange it to fit the bottom of the rectangle.

Copy and Paste your tube as a new layer.
Resize and arrange it as shown.
Duplicate your tube and move the bottom tube below the layer Raster 4 (white rectangle).
On the upper tube erase the left leg covering the rectangles.
Now it should look like she is straddling the rectangles.

Open button5 from kit.
Copy and Paste it above the pen.
Resize and arrange it to the left as shown.

Open bow and star1 from kit.
Copy and Paste it as a new layer.
Resize and arrange it to the bottom as shown.

Open word1 from kit.
Copy and Paste it above the upper tube layer.
Resize and arrange it to the left as shown.

Open bead heart string1 from kit.
Copy and Paste it as a new layer.
Resize and arrange it to the center as shown.

Open dbl bow3 from kit.
Copy and Paste it below the lower tube.
Resize and arrange it to the right as shown.

Open paper5 from kit.
Copy and Paste it at the bottom of the tag.
Add your mask by going to Layer>Load/ Save Mask>Load Mask from Disk.
Apply the mask named Vix_Mask171.
Merge the mask group by right clicking the layer of the finished mask, go to Merge>Merge Group.
Resize and arrange it to fit as shown.

I used the font P22 Corinthia. Set it to a size you like and a stroke width of 3.
Foreground color to white and background color to #2f2f2f.
Duplicate the layer and select the second font layer with the font tool.
Set the stroke width to 0.
Merge the 2 font layer and convert to a raster layer.

Drop shadow everything except the mask.
Effects>3D Effects>Drop Shadow, set the drop to 3 vertical, 2 horizontal, 75 opacity, 4 blur.

Add your copyright info and your tag.

Merge everything in Layers>Merge>Merge Visible

Crop and resize as needed!


All Finished!

Tuesday, October 12, 2010

Beware- PTU


Now you can download a PDF Copy of this tutorial to do without using your internet browser.
I've used the PTU artwork of Elias Chatzoudis. You can purchase is art at MPT.
This is a PTU tagger kit called Halloween Town by Pimp’d Designz. You can visit her blog for links to her stores HERE.
I've used a Template #273 by Divine Intentionz. It can be found in the right column on her blog HERE.
The mask and moonlight image are provided in my tut supplies. They are for personal use only and can be downloaded HERE.
Font used is Double Feature.


Let’s Begin!

Open the tag template, and resize the canvas from the center to 800x800 by going to
Image>Canvas Size.
Delete the credits layer.

Open paper pp-07 from the kit.
Copy your paper and go to the template.
On the layer named rectangles, go to Selections>Select All, Selections>Float, Selections>Defloat.
Paste your paper by going to Edit>Paste As New Layer.
Then go to Selections>Invert and press the Delete button on your keyboard to delete the extra paper. Then Selections>Select None
Be sure to delete the original layer of the template.
(Follow this procedure when asked to Copy and Paste a paper to a layer of the template.)

Open fence from kit.
Copy and Paste it as a new layer.
Resize and arrange it to fit around the rectangles as shown.

Open paper pp-01.
Copy and Paste this paper to oval layer of the template.

On frame background layer, use your flood fill tool to fill with color #222222.

Open the moonlight image from my supplies.
Copy and Paste this as a new layer.
Arrange it above the rectangle to fit as best as you can without resizing.
Select the frame background layer do the Select All/Float/Defloat method.
Select the image and then Selections>Invert.
Hit the Delete button on your keyboard.
Selections>Select None

Copy and Paste your tube as a new layer.
Image>Mirror
Arrange it to the left as shown.
Do the Select All/Float/Defloat method to delete the extra.
Layer>Duplicate
On this upper layer go to Adjust>Blur>Gaussian Blur and set to 3.
Change the Layer Properties (by going to Layer>Properties)
and change the blend mode to Soft Light.
On the lower tube change the blend mode to luminance (legacy).

On the frame layer go to
Adjust>Add/Remove Noise>Add Noise and set it to
70%, Uniform, Monochrome.

On the oval layer do Select All/Float/Defloat,
Then go to Selections>Modify>Expand and set to 3.
Go to Selections>Modify>Select Selection Borders
Set it to 8, Inside, and Anti-alias.
Create a new Raster Layer and flood fill with white.
Add Noise at 90%.

Copy and Paste your tube above the rectangle frame layer.
Arrange it to the right as shown.
Layer>Duplicate
On this upper layer go to Adjust>Blur>Gaussian Blur and set to 3.
Change the Layer Properties (by going to Layer>Properties)
and change the blend mode to Soft Light.

Move the words layer above the tube layer.
Arrange the words layer and the beware layer to the left slightly as shown.

Open scribble-01 from kit.
Copy and Paste it above the oval frame you created.
Resize and arrange it as shown.

Open the following elements and Copy and Paste them as new layers in this order:

Bat
Ghost
Sucker-01

Open brad from kit.
Copy and Paste it above the rectangle frame.
Resize and arrange it to the left as shown.

Open flower-01 from kit.
Copy and Paste it as a new layer.
Resize and arrange it by the tube’s foot as shown.
Layer>Duplicate twice and arrange these two as shown, resizing slightly.

Open ribbon-03 from kit.
Copy and Paste it as a new layer.
Resize and arrange it to the bottom as shown.

Open candy-02 from kit.
Copy and Paste it above the wordart.
Resize and arrange it to the bottom as shown.

Open candy-01 from kit.
Copy and Paste it as a new layer.
Resize and arrange it to the bottom as shown.

Open paper pp-12 from kit.
Copy and Paste it as the bottom most layer.
Add your mask by going to Layer>Load/ Save Mask>Load Mask from Disk.
Apply the mask named photomask allenaal beestjes.
Merge the mask group by right clicking the layer of the finished mask, go to Merge>Merge Group.
Resize and arrange mask to fit as shown in the tag.

I used the font Double Feature. Set it to a size you like and a stroke width of 4.
Foreground color to white and background color to black.
Duplicate the layer and select the second font layer with the font tool.
Set the stroke width to 0.
Merge the 2 font layer and convert to a raster layer.

Drop shadow everything except the mask.
Effects>3D Effects>Drop Shadow, set the drop to 3 vertical, 2 horizontal, 75 opacity, 4 blur.

Add your copyright info and your tag.

Merge everything in Layers>Merge>Merge Visible

Crop and Resize as needed.


All Finished!

Monday, September 27, 2010

Kiss My Attitude- PTU


Now you can download a PDF Copy of this tutorial to do without using your internet browser.
I've used the PTU artwork of Elias Chatzoudis. You can buy his tubes at MPT.
This is a PTU kit called Rock-a-Billie by Pimp’d Designz. Visit her blog for links to her stores HERE.
I used the template called Kiss My Attitude by Crazy Cakes Scraps. You can get it HERE.
The mask is WSL_Mask9, by Wee Scot Lass. You can get it HERE.
Font used is Shalimar Swash ROB.


Let’s Begin!


Open the tag template. It’s a little large for my tubes so I resized it to 600x600 and then changed the canvas size from the center to 800x800.
Delete the credits layer, and the layers named sqcenter, dotline and dotline2.

Open paper pp-11 from the kit.
Copy your paper and go to the template.
On your lilrectangle layer, go to Selections>Select All, Selections>Float, Selections>Defloat.
Paste your paper as a new layer.
Then go to Selections>Invert and press the Delete button on your keyboard to delete the extra paper.
Selections>Select None
Be sure to delete the original layer of the template.
(Follow this procedure when asked to Copy and Paste a paper to a layer of the template.)

Copy and Paste the following papers to the following layers of the template:

Paper pp-09 to layers lilsqleft and lilsqright
Paper pp-02 to layers oval, dots (merge the 4 dot layers together first)
Paper pp-10 to layer frame2
Paper pp-01 to layer rectangle

On layers named lilframe and lilframe2, and rectangle3, add noise by going to
Adjust>Add/Remove Noise>Add Noise- 70%.

Copy and paste your tube under the wordart layer.
Arrange it up slightly in the center of tag.

Move the layers named gradient below their lilframes layers.
Paste tube above the gradient layer of one of the frames.
Arrange it in your frame then select the frame layer and go to
Selections>Select All, Selections>Float, Selections>Defloat
Select your tube layer then go to
Selections>Invert and press the Delete button on your keyboard to delete the extra.
Selections>Select None
Duplicate your tube by going to Layer>Duplicate.
On that duplicated tube layer go to Adjust>Blur>Gaussian Blur- 3
On the top layer change the blend mode to Soft Light
and the bottom layer to Luminance (Legacy).
Then change the opacity of the bottom layer to 65%.

Repeat this process for the other frame but Mirror the tube to fit.

Copy and Paste a second tube above the oval layer.
Layer>Duplicate, Image>Mirror
Merge the two layers together.
Do the Select All/Float/Defloat to remove the extra of the tubes hanging out.
Duplicate the tube layer, blur this layer with Gaussian Blur to 3 and blend mode to Soft Light.
Set the bottom tube layer’s blend mode to Luminance (Legacy) and opacity to 65%.

Open frame-05 from kit.
Copy and Paste it below the bottom layer.
Resize and arrange it in the center.

Open glitter-02 from kit.
Copy and Paste it as a new layer.
Resize and arrange it at the bottom.
Layer>Duplicate, Image>Flip and Mirror

Open banner-01 from kit.
Copy and Paste it above the rectangle.
Resize and arrange it as shown.
With the rectangle selected, do the SelectAll/Float/Defloat
Select the banner and hit Delete.
Select None

Open sequins from kit.
Copy and Paste it as a new layer.
Resize and arrange it to the top or bottom of the rectangle.
Layer>Duplicate and move it to the other side as shown.

Open sparrow from kit.
Copy and Paste it as a new layer.
Resize and arrange as shown.

Open flower-01 from kit.
Copy and Paste it as a new layer.
Resize and arrange it as shown.
Duplicate it 3 times and arrange them around the tag.

Open skull from kit.
Copy and Paste it as a new layer.
Resize and arrange it as shown.

Open heart-01 from kit.
Copy and Paste is as a new layer.
Resize and arrange it as shown.

Open flower-02 from kit.
Copy and Paste it above the wordart layer.
Resize and arrange it as shown.

On the wordart layer, Select All/Float/Defloat
Selections>Modify>Expand by 2
Layer>New Raster Layer
Flood fill the selection with white.
Select None
Move the white layer below the wordart and merge the two together.

Open paper pp-02 from kit.
Copy and Paste it at the bottom of the tag.
Add your mask by going to Layer>Load/ Save Mask>Load Mask from Disk.
Apply the mask named WSL_Mask9.
Merge the mask group by right clicking the layer of the finished mask, go to Merge>Merge Group.
Resize and arrange it to fit as shown.

I used the font Shalimar Swash ROB. Use a size you like and a stroke width of 3.
Foreground color to white and background color to #ab1a26.
Duplicate the layer and select the second font layer with the font tool.
Set the stroke width to 0.
Merge the 2 font layers and convert to a raster layer.

Drop shadow everything except the duplicated tube and the mask.
Effects>3D Effects>Drop Shadow, set the drop to 3 vertical, 2 horizontal, 75 opacity, 4 blur.

Add your copyright info and your tag.
Crop and Resize the tag to your liking.

Merge everything in Layers>Merge>Merge Visible


All Finished!

Saturday, August 14, 2010

The Girl- FTU


Now you can download a PDF copy of this tutorial to do without using your internet browser.
Download Here
I've used the FTU artwork of Psyco Jimi. You still need a license through MtA to use his work, which you can get for free HERE.
You'll need your license number to join the group HERE.
This is a FTU kit called Toxic Candyland by Cinnamon Scraps. You can get it HERE.
I've used Template “I’m the Girl You Will Never Be” by Crazy Cakes Scraps. You can get it HERE.
The diamond doesn’t have a home and the fairy dust was created by me. These items are in my supplies which are for personal use only. You can download HERE.
I used mask Vix_Mask362 by Vixen. Download it on her blog HERE.
Font used is WaterBrush ROB.


Let’s Begin!


Open the tag template. I’ve resized the template to 700x700 by going to Image>Resize and then resize the canvas from the center to 800x800 by going to Image>Canvas Size.
Delete the credits layer.

Open paper11 from the kit.
Copy your paper and go to the template.
On the layer named halfcircle, go to Selections>Select All, Selections>Float, Selections>Defloat.
Paste your paper by going to Edit>Paste As New Layer.
Then go to Selections>Invert and press the Delete button on your keyboard to delete the extra paper.
Go to Selections>None
Be sure to delete the original layer of the template.
(Follow this procedure when asked to Copy and Paste a paper to a layer of the template.)

Copy and Paste the following papers to the layers stated:

Paper14 to blackcircle
Paper15 to rectangle
Paper1 to oval
Paper8 to silverrectangle
Paper3 to circle1 and circle2
Paper4 to smcircle and smcircle2

Move the small circle2 down a little as shown in the tag.

Copy and Paste your tube of choice above the glitterframe layer.
Resize and arrange it to fit in the center as shown.

Copy and paste the same tube above circle1 (black circle).
Resize and arrange it so the face of the tube is above the circle.
On the circle layer go to Selections>Select All, Selections>Float, Selections>Defloat.
Select the tube layer and go to Selections>Invert and press the Delete button on your keyboard.
Selections>None
Duplicate the tube layer by going to Layers>Duplicate
On the bottom tube layer change the blend mode by going to
Layers>Properties and change the Blend Mode to Luminance (Legacy)
On the upper tube layer go to Adjust>Blur>Gaussian Blur and set the radius to 3.
Change its blend mode to Soft Light.

Repeat this entire procedure for the other circle.
Mirror the tube by going to Image>Mirror before arranging the way you want.

I’ve used a second tube for the oval behind the main tube.
Copy and Paste your tube of choice above the oval.
Resize and arrange to the side so it is facing outward.
Use the Select All/Float/Defloat method to delete the extra portion of the tube.
Layers>Duplicate the tube.
On the bottom tube change the blend mode to Luminance (Legacy).
Change its opacity to 50% in the Layer Properties as well.
On the upper tube change the blend mode to Soft Light.

Repeat this entire procedure for the other side of the oval.
Mirror the tube by going to Image>Mirror before arranging the way you want.

Open diamond from my supplies.
Copy and Paste it above the glitter frame.
Arrange it to the left where the oval meets the rectangles.
Layer>Duplicate it 5 times and arrange them around the oval as shown.

Open flower3 from kit.
Copy and Paste it as a new layer.
Resize and arrange it behind the elbow on the right as shown.
Layer>Duplicate, Image>Mirror

Open flower1 from kit.
Copy and Paste it above the last skinny rectangle before the circles.
Resize and arrange it as shown in the tag.

Open flower6 from kit.
Copy and Paste it as a new layer.
Image>Mirror
Resize and arrange it as shown in the tag.

Open bow9 from kit.
Copy and Paste it above the 2 small circles.
Resize and arrange it above the circle as shown.

Open string2 from kit.
Copy and Paste it as a new layer.
Resize and arrange it to the bottom as shown.

Open fairy dust from my supplies.
Copy and Paste it as a new layer.

Open paper1 from kit.
Copy and Paste it at the bottom layer of the tag.
Add your mask by going to Layer>Load/ Save Mask>Load Mask from Disk.
Apply the mask named Vix_Mask362.
Merge the mask group by right clicking the layer of the finished mask,
go to Merge>Merge Group.

I used the font WaterBrush ROB. Set it to a size you like, and a stroke width of 3.
Foreground color to white and background color to black.
Duplicate the layer and select the second font layer with the font tool.
Set the stroke width to 0.
Merge the 2 font layer and convert to a raster layer.

Drop shadow everything by going to
Effects>3D Effects>Drop Shadow, set the drop to 3 vertical, 2 horizontal, 75 opacity, 4 blur.

Add your copyright info and your tag.

Merge everything in Layers>Merge>Merge Visible

You can crop and resize your image as desired.


All Finished!

Saturday, August 7, 2010

California Girl- PTU


Now you can download a PDF copy of this tutorial to do without using your internet browser.
Download Here
I've used the lovely PTU artwork of Elias Chatzoudis. You can purchase the art HERE.
This is a PTU kit called California Girls from Cora’s Creations (Pimp'd Designz). Visit her blog for links to her store HERE.
I used Template 327 by Missy at Divine Intentionz. You can get it HERE.
The mask is WSL_Mask192, by Wee Scot Lass. You can get it HERE.
Font used is Carpenter.


Let’s Begin!

Open the tag template, and resize the canvas from the center to 800x800 by going to
Image>Canvas Size.
Delete the credit layers, the wordart layer, hearts layer, and dotted lines.

Open paper pp06 from the kit.
Copy your paper and go to the template.
On your layer named frame background 1, go to Selections>Select All, Selections>Float, Selections>Defloat.
Paste your paper by going to Edit>Paste As New Layer.
Then go to Selections>Invert and press the Delete button on your keyboard to delete the extra paper.Selections>Select None
Be sure to delete the original layer of the template.

Follow the procedure for the following papers and their layer:

Paper pp06 to frame background 2
Paper pp08 to circle 1
Paper pp12 to circle 2
Paper pp01 to circle 03
Paper pp10 to raster 1 (black rectangle)

On layers named frame1 and frame2, add noise.
Go to Adjust>Add/Remove Noise>Add Noise
Select Uniform and Monochrome, and set the noise to 75%.

Copy and Paste your close-up tube (if you have one) above the top circle.
I’ve mirrored the tube by going to Image>Mirror.
Once you have it where you like it, select the circle layer.
Go to Selections>Select All, Selections>Float, Selections>Defloat.
Select the tube layer and go to Selections>Invert.
Hit the Delete key on the keyboard.
Selections>Select None
Image>Duplicate the tube.
On the bottom tube change the Layer Properties to Luminance by going to
Layers>Properties and change the blend mode to Luminance (Legacy).
On the top tube layer change the Layer Properties to Soft Light.

Open glitter01 from kit.
Copy and Paste it above the green rectangle layer.
Resize and arrange it as shown.

Open flower02 from kit.
Copy and Paste it above the orange circle layer.
Resize and arrange it to the left as shown.

Open sun from kit.
Copy and Paste it above the pink circle layer.
Resize and arrange it to the right as shown.

Open surfboard from kit.
Copy and Paste it above the close-up tube.
Resize and arrange it to the left as shown.

Open ribbon04 from kit.
Copy and Paste it as a new layer.
Resize and arrange it as shown.

Open swirl01 from kit.
Copy and Paste it as a new layer.
Resize and arrange it as shown.

Open hearts01 from kit.
Copy and Paste it as a new layer.
Resize and arrange it as shown.

Open ribbon03 from kit.
Copy and Paste it as a new layer.
Resize and arrange it as shown.

Open starfish from kit.
Copy and Paste it as a new layer.
Resize and arrange as shown.

Open wordart02 from kit.
Copy and Paste it as a new layer.
Resize and arrange it as shown.

Open flower01 from kit.
Copy and Paste it as a new layer.
Resize and arrange it as shown.

Open paper pp09 from kit.
Copy and Paste it at the bottom of the tag.
Add your mask by going to Layer>Load/ Save Mask>Load Mask from Disk.
Apply the mask named WSL_Mask192.
Merge the mask group by right clicking the layer of the finished mask, go to Merge>Merge Group.
Resize and arrange it to fit as shown.

I used the font Carpenter. Use a size you like and a stroke width of 3.
Foreground color to white and background color to #eb6789.
Duplicate the layer and select the second font layer with the font tool.
Set the stroke width to 0.
Merge the 2 font layers and convert to a raster layer.

Drop shadow everything except the duplicated tube and the mask.
Effects>3D Effects>Drop Shadow, set the drop to 3 vertical, 2 horizontal, 75 opacity, 4 blur.

Add your copyright info and your tag.

Merge everything in Layers>Merge>Merge Visible


All Finished!

Tuesday, April 13, 2010

Fan Club- PTU


Now you can download a PDF copy of this tutorial to do without using your internet browser.
I've used the lovely FTU artwork of Psyco Jimi. It’s free but you have to apply for a MtA license and join the Yahoo group. Start the process HERE.
This is PTU kit called Flashback from Cora’s Creations Pimp'd Designz). Visit her blog for links to her store HERE.
I used Template 340 by Missy at Divine Intentionz. You can get it HERE.
The mask is WSL_Mask44, by Wee Scot Lass. You can get it HERE.
Font used is Pussycat.


Let’s Begin!

Open the tag template, and resize the canvas from the center to 800x800 by going to
Image>Canvas Size.
Delete the credits layer.

Open paper pp04 from the kit.
Copy your paper and go to the template.
On your black circle2 layer, go to Selections>Select All, Selections>Float, Selections>Defloat.
Paste your paper by going to Edit>Paste As New Layer.
Then go to Selections>Invert and press the Delete button on your keyboard to delete the extra paper.
Be sure to delete the original layer of the template.
(Follow this procedure when asked to Copy and Paste a paper to a layer of the template.)

Copy and Paste the following papers to the following layers of the template:

Paper pp-01 to layers shape 3 and 4
Paper pp-03 to layers shape 1 and 2
Paper pp-11 to layer circle1

On layers named thin rectangle 1 and 2, and glittered circle, add noise by going to
Adjust>Add/Remove Noise>Add Noise- 90%.

Copy and paste your tube above layer frame1.
Resize and arrange to the right of tag.
Paste tube above framebackground1 and
Image>Mirror
Arrange it in your frame then on the frame layer,
Selections>Select All, Selections>Float, Selections>Defloat
Select your tube layer then go to
Selections>Invert and press the Delete button on your keyboard to delete the extra.
Duplicate your tube by going to Layer>Duplicate.
On that duplicated tube layer go to Adjust>Blur>Gaussian Blur- 3
Go to Layers>Properties>Blend Mode to Soft Light
On the bottom tube change the blend mode to Luminance (Legacy)

Open epoxy-spill from kit.
Copy and Paste it above the thin rectangles.
Resize and arrange it to the left.
Layer>Duplicate, Image>Mirror, Image>Flip

Open beads-03 from kit.
Copy and Paste it above the circles.
Resize and arrange it as shown.

Open ribbon-02 from kit.
Copy and Paste it as a new layer.
Resize and arrange it as shown.

Open heart-01 from kit.
Copy and Paste it as a new layer.
Resize and arrange it as shown.

Open bff bracelet from kit.
Copy and Paste it under the main tube.
Resize and arrange as shown.

Open star-02 from kit.
Copy and Paste it as a new layer.
Resize and arrange it as shown.

Open paper pp10 from kit.
Copy and Paste it at the bottom of the tag.
Add your mask by going to Layer>Load/ Save Mask>Load Mask from Disk.
Apply the mask named WSL_Mask44.
Merge the mask group by right clicking the layer of the finished mask, go to Merge>Merge Group.
Resize and arrange it to fit as shown.

I used the font Pussycat. Use a size you like and a stroke width of 3.
Foreground color to white and background color to black.
Duplicate the layer and select the second font layer with the font tool.
Set the stroke width to 0.
Merge the 2 font layers and convert to a raster layer.

Drop shadow everything except the duplicated tube and the mask.
Effects>3D Effects>Drop Shadow, set the drop to 3 vertical, 2 horizontal, 75 opacity, 4 blur.

Add your copyright info and your tag.

Merge everything in Layers>Merge>Merge Visible


All Finished!

Friday, March 5, 2010

Carefree- FTU


Now you can download a PDF copy of this tutorial to do without using your internet browser.
Download Here
I've used the lovely PTU artwork of Mashi. You can purchase the art HERE.
This is FTU kit called Carefree from Cora’s Creations (Pimp'd Designz). Get it on her blog HERE.
I used Template 99 by Yvette at Essence of Creativity. Her site has closed down so it's uploaded HERE.
Unfortunately I didn’t write down the mask and can’t remember which one I used so use a mask of choice!
Font used is Aquarelle.


Let’s Begin!


Open the tag template, and resize the canvas from the center to 800x800 by going to
Image>Canvas Size.
Delete the credits layer.

Open paper pp10 from the kit.
Copy your paper and go to the template.
On your black circle cutout, go to Selections>Select All, Selections>Float, Selections>Defloat.
Paste your paper by going to Edit>Paste As New Layer.
Then go to Selections>Invert and press the Delete button on your keyboard to delete the extra paper.
Be sure to delete the original layer of the template.
(Follow this procedure when asked to Copy and Paste a paper to a layer of the template.)

Open paper pp4 from kit.
Copy and Paste it to large black circle layer.

Open paper pp11 from kit.
Copy and Paste it to frame background.

Open paper pp6 from kit.
Resize it to 800x800 pixels.
Copy and Paste it to layers named large pink circle and thin rectangle.

Open paper pp9 from kit.
Resize it to 800x800 pixels.
Copy and Paste it to black thin rectangle layer.

On layers names large white circle and white frame, add noise by going to
Adjust>Add/Remove Noise>Add Noise- 40%.

Open beads from kit.
Copy and Paste it as a new layer.
Resize and arrange it as shown.

Open doodle-01 from kit.
Copy and Paste it above large circles.
Image>Mirror
Resize and arrange it as shown.

Open flower-01 from kit.
Copy and Paste it as a new layer.
Image>Mirror
Resize and arrange it as shown.

Open flower-05 from kit.
Copy and Paste it as a new layer.
Layer>Duplicate, Image>Mirror
Resize and arrange it as shown.

Open flower-02 from kit.
Copy and Paste it as a new layer.
Resize and arrange as shown.

Open cloud from kit.
Copy and Paste it above the circle layers.
Resize and arrange it as shown.

Open greens-05 from kit.
Copy and Paste it as a new layer.
Image>Mirror
Resize and arrange it as shown.

Open flower-04 from kit.
Copy and Paste it as a new layer.
Image>Mirror
Resize and arrange it as shown.

Open wind from kit.
Copy and Paste it behind the thin rectangle layers.
Resize and arrange it as shown.

Open butterfly from kit.
Copy and Paste it as a new layer.
Resize and arrange it as shown.

Open grass from kit.
Copy and Paste it as a new layer.
Image>Flip
Resize and arrange it as shown.

Open ribbon-02 from kit.
Copy and Paste above thin rectangles.
Resize and arrange as shown.

Open star from kit.
Copy and Paste as a new layer.
Resize and arrange it as shown.

Copy and Paste your tube above the frame layer.
Using your eraser tool, erase portions of the tube that is hanging out below the thin rectangle.

Open paper pp04 from kit.
Copy and Paste it at the bottom of the tag.
Add your mask by going to Layer>Load/ Save Mask>Load Mask from Disk.
Apply your mask of choice.
Merge the mask group by right clicking the layer of the finished mask, go to Merge>Merge Group.
Resize and arrange it to fit as shown.

I used the font Aquarelle. Use a size you like and a stroke width of 4.
Foreground color to white and background color to #798c3f.
Duplicate the layer and select the second font layer with the font tool.
Set the stroke width to 0.
Merge the 2 font layers and convert to a raster layer.

Drop shadow everything except the duplicated tube and the mask.
Effects>3D Effects>Drop Shadow, set the drop to 3 vertical, 2 horizontal, 75 opacity, 4 blur.

Add your copyright info and your tag.

Merge everything in Layers>Merge>Merge Visible


All Finished!

Monday, February 1, 2010

Lovely Girl- PTU


Now you can download a PDF copy of this tutorial to do without using your internet browser.
Download Here
I've used the lovely PTU artwork of Mashi. You can purchase the art HERE.
This is PTU kit called So Loved from Cora’s Creations (Pimp'd Designz). Visit her blog for links to her stores HERE.
I used Template 011 by Cin. You can get it HERE.
The mask is WSL_Mask9, by Wee Scot Lass. You can get it HERE.
Font used is Shadowed Black Wide.


Let’s Begin!


Open the tag template, and resize the canvas from the center to 800x800 by going to
Image>Canvas Size.
Delete the credits layer and the layer named material.

Using Arial Narrow font in color #5e1853, type out the word LOVELY (in all caps) in place of material.
Add noise by going to Adjust>Add/Remove Noise>Add noise.
Set it to Uniform and Monochromatic checked, noise to 50%.
Move the words to the right some more as shown.

Colorize Layers 4, 3, and 1 by going to
Adjust>Hue and Saturation>Colorize
Hue: 192, Saturation: 63

Copy and Paste your tube above layer 1.
Layer>Duplicate the tube, Adjust>Blur>Gaussian Blur to 3.
Change the Blend Mode to Soft Light by going to
Layer>Properties and change the Blend Mode to Soft Light.

Open beads-01 from kit.
Copy and Paste it above layer 1.
Layer>Duplicate, Image>Mirror the beads.
Move the mirrored beads up slightly as shown.

Open ribbon-09 from kit.
Copy and Paste it as a new layer.
Resize and arrange it as shown.

Open heart-05 from kit.
Copy and Paste it as a new layer.
Resize and arrange it to the right as shown.

Open gems-01 from kit.
Copy and Paste it as a new layer.
Resize and arrange it to the right as shown.

Open flower-03 from kit.
Copy and Paste it as a new layer.
Resize and arrange it to the right as shown.

Open sucker-01 from kit.
Copy and Paste it as a new layer.
Resize and arrange it to the left as shown.

Open heart-08 from kit.
Copy and Paste it as a new layer.
Resize and arrange it to the left as shown.

Open paper pp09 from kit.
Copy and Paste it at the bottom of the tag.
Add your mask by going to Layer>Load/ Save Mask>Load Mask from Disk.
Apply the mask named WSL_Mask350.
Merge the mask group by right clicking the layer of the finished mask, go to Merge>Merge Group.
Resize and arrange it to fit as shown.

I used the font Arial Narrow. Use a size you like and set to color #5e1853.

Drop shadow everything except the duplicated tube and the mask.
Effects>3D Effects>Drop Shadow, set the drop to 3 vertical, 2 horizontal, 75 opacity, 4 blur.

Add your copyright info and your tag.

Merge everything in Layers>Merge>Merge Visible


All Finished!

Thursday, January 28, 2010

Angel- PTU


Now you can download a PDF copy of this tutorial to do without using your internet browser.
I've used a PTU artwork of Zindy S. D. Nielsen. You can buy it at her site HERE.
This is a PTU kit called Half Way to Heaven by Cazie Designs. You can visit her blog for links HERE.
I've used Template #7 by Tamie of Addictive Pleasures. It can be downloaded on her blog HERE.
The mask is by Vixen, #362. Download it on her blog HERE.
Font used is Carpenter.


Let’s Begin!


Open the tag template, and resize the canvas from the center to 800x800 by going to
Image>Canvas Size.
Delete the credits layer, layer named misfit, and both layers named text.

Colorize both of the layers named strip and oval and circle to match.
Adjust>Hue and Saturation>Colorize, Hue=141, Saturation=119.

Open clear flower from kit.
Copy and Paste it above the stars layer.
Resize and arrange over stars and Layer>Duplicate to cover all stars.

Open wings from kit.
Copy and Paste it behind the angel background layer.
Resize and arrange it as shown.

Open diamondrain2 from kit.
Copy and Paste it below the circle frame layer.
Arrange it over the circle.
On the circle layer, go to Selections>Select All, Selections>Float, Selections>Defloat.
Select the diamond rain layer and go to Selections>Invert and press the Delete button on your keyboard to delete the extra diamonds.

Open doodle1 from kit.
Copy and Paste it behind the angel background layer.
Resize and arrange it as shown.

Open clod from kit.
Copy and Paste it behind the oval layer.
Resize and arrange it as shown.

Copy and Paste your tube of choice above the oval frame layer.
Duplicate your frame by going to Layer>Duplicate.
Move the upper oval frame above your tube.
Using your eraser tool, erase portions of the upper frame at the top covering up the face or above whatever portions of the tube you want to stick out of the frame.
On the tube layer, erase the portions of the tube on the bottom that are hanging outside the frame.

Open feather from kit.
Copy and Paste it above the duplicated oval frame layer.
Resize and arrange it as shown.

Open candle from kit.
Copy and Paste it behind the angel background layer.
Resize and arrange it as shown.

Open paper4 from kit.
Copy and Paste it at the bottom layer of the tag.
Add your mask by going to Layer>Load/ Save Mask>Load Mask from Disk.
Apply the mask named Vix_Mask362.
Merge the mask group by right clicking the layer of the finished mask,
go to Merge>Merge Group.

I used the font Carpenter. Set it to a size you like, and a stroke width of 3.
Foreground color to white and background color to #7aa7c7.
Duplicate the layer and select the second font layer with the font tool.
Set the stroke width to 0.
Merge the 2 font layer and convert to a raster layer.

Drop shadow everything by going to
Effects>3D Effects>Drop Shadow, set the drop to 3 vertical, 2 horizontal, 75 opacity, 4 blur.

Add your copyright info and your tag.

Merge everything in Layers>Merge>Merge Visible


All Finished!

Sunday, January 17, 2010

Naughty Nurse- PTU


Now you can download a PDF copy of this tutorial to do without using your internet browser.
I've used the lovely PTU artwork of Elias Chatzoudis. You can purchase his art HERE.
This is PTU kit called Nurse Betty from Cora’s Creations (Pimp'd Designz). You can buy it HERE.
I've used Template 14 by Cin at Elegantly Wasted. It's no longer available for download and I don't know where to find it.
The mask is WSL_Mask252, by Wee Scot Lass. You can get it HERE.
Font used is Glider Girls by Kevin and Amanda. You can download it HERE.


Let’s Begin!


Open the tag template, and resize the canvas from the center to 800x800 by going to
Image>Canvas Size.
Delete the credits layer.

Move the layers named 1, Everytime We Touch, I Get This Feeling, Heart 1, Heart 2, Heart3 down as shown in the tag.

Open pp05 from the kit.
Copy your paper and go to the template.
On the layer named 8 and 1, go to Selections>Select All, Selections>Float, Selections>Defloat.
Paste your paper by going to Edit>Paste As New Layer.
Then go to Selections>Invert and press the Delete button on your keyboard to delete the extra paper.
Be sure to delete the original layer of the template.
(Follow this procedure when asked to Copy and Paste a paper to a layer of the template.)

Open pp09 from kit.
Copy and Paste it to layer 7.

Open pp01 from kit.
Copy and Paste it above layer 6.
Move it so that it is covering the circle.
Float and Defloat the circle and then select the paper layer and invert and delete.
Repeat this for layer 5.

Open pp02 from kit.
Copy and Paste it to layer 3.

Open pp03 from kit.
Copy and Paste it to layer 4.

Open pp04 from kit.
Copy and Paste it to layer 2.

Open tube and use a close up if possible.
Copy and Paste above the black oval.
Arrange it to the right as shown.
Select All>Float>Defloat the black oval, select the tube and invert and delete the extra.
Layer>Duplicate the tube, Adjust>Blur>Gaussian Blur- 3.
Set the blend mode to Soft Light by going to
Layers>Properties>Blend Mode to Soft Light.

Copy and Paste your tube as a new layer.
Arrange it as shown.
Layer>Duplicate the tube, Adjust>Blur>Gaussian Blur- 3.
Set the blend mode to Soft Light by going to
Layers>Properties>Blend Mode to Soft Light.

Open beads from kit.
Copy and Paste it above the black rectangles.
Resize and arrange it as shown.

Open pill bottle from kit.
Copy and Paste it above the tube.
Resize and arrange it as shown.

Open pill from kit.
Copy and Paste above the wordart.
Resize and arrange it as shown.

Open flower03 from kit.
Copy and Paste it below the red oval.
Resize and arrange it as shown.

Open button from kit.
Copy and Paste it below the main tube.
Resize and arrange it as shown.

Open paper pp06 from kit.
Copy and Paste it at the bottom of the tag.
Add your mask by going to Layer>Load/ Save Mask>Load Mask from Disk.
Apply the mask named WSL_Mask252.
Merge the mask group by right clicking the layer of the finished mask, go to Merge>Merge Group.
Resize and arrange it to fit as shown.

I used the font Glider Girls. I set it to 72 pixels and a stroke width of 5.
Foreground color to white and background color to black.
Duplicate the layer and select the second font layer with the font tool.
Set the stroke width to 0.
Merge the 2 font layer and convert to a raster layer.

Drop shadow everything except the mask.
Effects>3D Effects>Drop Shadow, set the drop to 3 vertical, 2 horizontal, 75 opacity, 4 blur.

Add your copyright info and your tag.

Merge everything in Layers>Merge>Merge Visible


All Finished!

Saturday, December 5, 2009

Lights Camera Action- PTU


I've used the lovely PTU artwork of Keith Garvey. You can purchase his art HERE.
This is an PTU kit called Cinema, by Cora’s Creations (Pimp'd Designz). Visit her blog for links to her store HERE.
Template 96 by Essence of Creativity. Visit her blog to download HERE.
The mask is WSL_Mask35 by Wee Scott Lass Creations. Download it on her blog HERE.
The wordart is in my supplies, which are for personal use only! You can download it HERE.
Font used is Just One More Picture.


Let’s Begin!


Open the tag template, and resize the canvas from the center to 800x800 by going to
Image>Canvas Size.
Delete the credits layer and sexy angel text layer.

Open paper pp05 from the kit.
Copy your paper and go to the template.
On your pink rectangle layer, go to Selections>Select All, Selections>Float, Selections>Defloat.
Paste your paper by going to Edit>Paste As New Layer.
Then go to Selections>Invert and press the Delete button on your keyboard to delete the extra paper.
Be sure to delete the original layer of the template.
(Follow this procedure when asked to Copy and Paste a paper to a layer of the template.)

Using paper pp05 from kit again,
Copy and Paste it to the pink circle layer as well.

Open frame03 from kit.
Copy and Paste it to the top of the template.

Open paper pp03 from kit.
Using the magic wand tool, select the negative space within the circles of the frame.
Expand your selection by going to
Selections>Modify>Expand by 3
Copy and Paste your paper as a new layer.
Selections>Invert, hit the Delete button on your keyboard
Selections>None
Move the paper layer below the frame layer.

Open star03 from kit.
Copy and Paste it above the stars.
Resize and arrange it to cover the template stars.
Duplicate it 3 times, mirroring and flipping as needed to cover all the stars.

Open camera from kit.
Copy and Paste above the rectangle layers.
Resize and arrange it in the center as shown.

Open star04 from kit.
Copy and Paste it as a new layer.
Resize and arrange it to the bottom of the tag as shown.

Open 4 tubes of choice.
Copy and Paste them below your circled frame.
Resize and arrange them so their faces show through the circles.
Erase extra portions of the tubes by using your magic wand tool and selecting inside the circle of the frame and then expanding as before by 3, then selecting the appropriate tube and inverting then deleting.

Open flash_lights from kit.
Copy and Paste it to your tag.
Resize and arrange it by one of your tubes.

Open Lights Camera Action Wordart from my supplies.
Copy and Paste it below the template.
Resize and arrange if needed.

Open paper pp01 from kit.
Copy and Paste it at the bottom of the template.
Add your mask by going to Layer>Load/ Save Mask>Load Mask from Disk.
Apply the mask named WSL_Mask35.
Merge the mask group by right clicking the layer of the finished mask, go to Merge>Merge Group.
Resize and arrange it to fit as shown.

I used the font Just One More Pitcure. I set it to 72 pixels and a stroke width of 6.
Foreground color to white and background color to black.
Duplicate the layer and select the second font layer with the font tool.
Set the stroke width to 0.
Merge the 2 font layer and convert to a raster layer.

Drop shadow everything except the mask.
Effects>3D Effects>Drop Shadow, set the drop to 3 vertical, 2 horizontal, 75 opacity, 4 blur.

Add your copyright info and your tag.

Merge everything in Layers>Merge>Merge Visible


All Finished!

Friday, November 27, 2009

Cowgirl Tease- PTU


I've used the lovely PTU artwork of Elias Chatzoudis. You can purchase his art HERE.
This is PTU kit called Cowgirl from Cora’s Creations (Pimp'd Designz). Visit her blog for links to her stores HERE.
I used Template282 by Divine Intentionz. You can get it HERE.
The mask is WSL_Mask350, by Wee Scot Lass. You can get it HERE.
Font used is Shadowed Black Wide.


Let’s Begin!


Open the tag template, and resize the canvas from the center to 800x800 by going to
Image>Canvas Size.
Delete the credits layer and wordart layer.

Open paper pp10 from the kit.
Copy your paper and go to the template.
On your gray circle cutout, go to Selections>Select All, Selections>Float, Selections>Defloat.
Paste your paper by going to Edit>Paste As New Layer.
Then go to Selections>Invert and press the Delete button on your keyboard to delete the extra paper.
Be sure to delete the original layer of the template.
(Follow this procedure when asked to Copy and Paste a paper to a layer of the template.)

Without unselecting the selection, go to Selections>Modify>Expand by 3.
Paste paper pp03 by going to Edit>Paste As New Layer.
Then go to Selections>Invert and press the Delete button on your keyboard to delete the extra paper.
Move this layer below the pink paper.

Open paper pp08 from kit.
Copy and Paste it to frame background and the TEASE layers.

Copy and Paste your tube above the frame background.
Image>Duplicate your tube.
Go to the frame background layer.
Selections>Select All, Selections>Float, Selections>Defloat
Go to the lower tube, Selections>Invert and press the Delete button.
On the upper tube use the eraser tool to erase parts of the tube hanging over the bottom of the frame background. Merge the two tubes together.

Duplicate the layer called frame.
Move the second frame above the tube.
Use the eraser tool to erase the upper portions of the frame so the tube hangs out.

Colorize the frame layer, heart layer, and glittered circles to match.

Open flower03 from kit.
Copy and Paste it above the circle layer.
Resize and arrange it to the bottom of the tag.
Duplicate it twice and arrange them around the tag as shown.

Open swirl from kit.
Copy and Paste it in the back of the tag.
Resize and arrange it to the right as shown.

Open rope from kit.
Copy and Paste it above the circle layer.
Resize and arrange it as shown.

Open horse from kit.
Copy and Paste it to the top of the tag.
Resize and arrange it as shown.

Open sheriff from kit.
Copy and Paste it to the top of the tag.
Resize and arrange it as shown.

Open glitter dots from kit.
Copy and Paste it above the swirl.
Resize and arrange it as shown.

Open glitter from kit.
Copy and Paste it behind the TEASE wordart.
Resize and arrange it as shown.

Open ribbon09 from kit.
Copy and Paste it above the circle.
Resize and arrange it as shown.

Open paper pp09 from kit.
Copy and Paste it at the bottom of the tag.
Add your mask by going to Layer>Load/ Save Mask>Load Mask from Disk.
Apply the mask named WSL_Mask350.
Merge the mask group by right clicking the layer of the finished mask, go to Merge>Merge Group.
Resize and arrange it to fit as shown.

I used the font Shadowed Black Wide. I set it to 72 pixels and a stroke width of 4.
Foreground color to white and background color to #2e241f.
Duplicate the layer and select the second font layer with the font tool.
Set the stroke width to 0.
Merge the 2 font layers and convert to a raster layer.

Drop shadow everything except the mask.
Effects>3D Effects>Drop Shadow, set the drop to 3 vertical, 2 horizontal, 75 opacity, 4 blur.

Add your copyright info and your tag.

Merge everything in Layers>Merge>Merge Visible


All Finished!

Sunday, November 8, 2009

Winter Kisses- PTU


I've used an FTU artwork of Zindy S. D. Nielsen. You can get it here and more HERE.
If you do not have a Zindy license then please be sure to read how you properly copyright it.
This is a PTU kit called Winter Kisses by Cora’s Creations (Pimp'd Designz). You can visit her blog for links HERE.
I've used Template #98 by Divine Intentionz. It can be downloaded HERE.
The mask is by Vixen, #389 and Christmas Mask6. Download it on her blog HERE.
Font used is Thickhead.


Let’s Begin!


Open the tag template, and resize the canvas from the center to 800x800 by going to
Image>Canvas Size.
Delete the credits layer.

Open paper pp07 from the kit.
Copy your paper and go to the template.
On your rectangle layer, go to Selections>Select All, Selections>Float, Selections>Defloat.
Paste your paper by going to Edit>Paste As New Layer.
Then go to Selections>Invert and press the Delete button on your keyboard to delete the extra paper.
Be sure to delete the original layer of the template.
(Follow this procedure when asked to Copy and Paste a paper to a layer of the template.)

Open paper pp08 from kit.
Copy and Paste it to the thin rectangle3 layer.

Open paper pp01 from kit.
Copy and Paste it to the thin rectangle1 layer.

Open paper pp04 from kit.
Copy and Paste it to the thin rectangle2 layer.

Open paper pp06 from kit.
Copy and Paste it to the square layer.

Open ice element.
Copy and Paste it below the square layer.
Resize and arrange it to the left as shown in the tag.
Layer> Duplicate, Image> Mirror, and arrange to the right.

Open tag element.
Copy and Paste it below the square.
Resize and arrange it as shown in tag.

Open greens01 from kit.
Copy and Paste it above the ice.
Resize and arrange it to the right as shown in the tag.

Open greens02 from kit.
Copy and Paste it above that.
Image>Mirror
Resize and arrange it to the top left as shown in tag.

Open tree from kit.
Copy and Paste it above that.
Resize and arrange it to the left as shown in the tag.

Open reindeer from kit.
Copy and Paste it above the tree.
Resize and arrange it to the left as shown.

Open star from kit.
Copy and Paste it above that.
Resize and arrange it to the right as shown.

Open gingerbread man from kit.
Copy and Paste it above that.
Resize and arrange it to the right as shown.

Open ribbon03 from kit.
Copy and Paste it above the square layer.
Resize and arrange it to the top left corner of the square as shown.

Copy and Paste your tube as a new layer above the square.
Resize and arrange it as shown in the tag.
Drop shadow your tube by going to Effects>3D Effects>Drop Shadow,
set the drop to -5 vertical, -5 horizontal, 50 opacity, 10 blur.

Open snowflake03 and 04 from kit.
Copy and Paste them above all the layers.
Resize and arrange them around the tag as shown.

Open paper pp08 from kit.
Copy and Paste it at the bottom layer of the tag.
Add your mask by going to Layer>Load/ Save Mask>Load Mask from Disk.
Apply the mask named Vix_Mask389.
Merge the mask group by right clicking the layer of the finished mask,
go to Merge>Merge Group.

Open paper pp10 from kit.
Copy and Paste it above the previous mask.
Apply the mask named Vix_Christmas Mask6.

I used the font Thickhead. I set it to 72 pixels, and a stroke width of 6.
Foreground color to white and background color to #db99a1.
Duplicate the layer and select the second font layer with the font tool.
Set the stroke width to 0.
Merge the 2 font layer and convert to a raster layer.

Drop shadow everything except the tube, ice, and the masks.
Effects>3D Effects>Drop Shadow, set the drop to 3 vertical, 2 horizontal, 75 opacity, 4 blur.

Add your copyright info and your tag.

Merge everything in Layers>Merge>Merge Visible

All Finished!