

Download this tutorial in a PDF file.
I used the lovely PTU artwork of Jose Cano. You can purchase it at PTE.
You must have a license to use this work.
This is FTU kit called Sugar Coated by Scraps by Jessica.
The Animation is by Missy at Divine Intentionz.
I used the lovely PTU artwork of Jose Cano. You can purchase it at PTE.
You must have a license to use this work.
This is FTU kit called Sugar Coated by Scraps by Jessica.
The Animation is by Missy at Divine Intentionz.
You will need an animation program, I’m using Animation Shop 3 to animate banner and avatar.
The plugin Eye Candy 4000 is optional to achieve the effect on the copyright info.
Let’s Begin!
The plugin Eye Candy 4000 is optional to achieve the effect on the copyright info.
Let’s Begin!
First things first, I altered the animation slightly.
I used the animation titled circlesparkles_bymissy.Open your animation in AS.
Delete the frames 1-11.Then go to Edit>Select All, File>Save Frames As and save them in the same folder for later.
We’re going to start the banner now.
Open a new canvas that’s 600x250 pixels and a white background.
You can of course use any size you like for different looks.
Now we’re going to cut out the corners.Promote your background layer by going to
Layers>Promote Background to Layer.
Open another canvas that’s sized 75x50 pixels and set it a color you can see on the white.
I used black.
Copy and paste it to your banner canvas.
Rotate it 45 degree to the left by going to
Image>Free Rotate, and set it to Left and 45 degrees.
Move it into the corner so that the center of the rectangle is in the edge of the corner.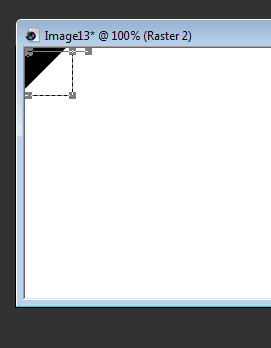
Duplicate and Mirror the rectangle by going to
Layers>Duplicate, Image>Mirror
Merge the two corners together by going to Layers>Merge>Merge Down
Duplicate and Flip the corners by going to
Layers>Duplicate, Image>FlipMerge these corners with the previous corners again by going to
Layers>Merge>Merge Down
Select the corners layers and go to
Selections>Select All, Selections>Float, Selections>Defloat
Then select your white background layer and hit the Delete button on your keyboard.
This should delete the corners of your white background layer and you should be able to delete your black corners layer now.
Open paper5 from kit.
On your background layer repeat the selection process of
Selections>Select All, Selections>Float, Selections>Defloat
Copy and paste your paper as a new layer.
Selections>Invert
Then hit the Delete key on your keyboard.
This will delete the extra paper you don’t need.Selections>Select None
You can delete the white background layer if you like.
On your paper layer do the selections process again
Select All/Float/DefloatOpen a new raster layer by going to
Layers>New Raster Layer and hit Yes.
Go to Selectiosn>Modify>Select Selection Borders
And set it a width of 8 pixels.
Flood fill this selection with the color #f38c8c.
Create another new raster layer and flood fill it with the color #a1cab5.Selections>Select None
Using your Rectangle Selection Tool, draw a rectangle around the upper portion of this border layer. It can be the upper half or a little more like I’ve done.
Hit the Delete button on your keyboard to delete this portion of the green border.
Selections>Select None
Using your Pen Tool, set it to a Line Style of Diamond and a Width of 2, color White.
Draw lines from corner to corner in the center of the border.
When you’re done, convert it a raster layer by going to
Layers>Convert to Raster Layer.
Merge it down with the two border layers to make one border layer.
Draw lines from corner to corner in the center of the border.
When you’re done, convert it a raster layer by going to
Layers>Convert to Raster Layer.
Merge it down with the two border layers to make one border layer.
Copy and paste your close-up tube above your paper layer.
Image>Mirror and move it to the right of the tag.
Resize it as needed.
Do the selection process of Select All/Float/Defloat on the paper layer.
Select the tube layer and go to Selections>Invert
Hit the Delete button on your keyboard to delete the parts of the tube hanging out.
Selections>Select None.
Change the opacity of the tube to 50% by going to
Layers>Properties>Under the General tab change the opacity to 50%.
Then copy and paste your regular sized tube as a new layer above your close-up.
Move it to the left as shown.
Use the selection process to delete any excess hanging out.
From the kit I used the following elements.
Copy and paste them in this order above your close-up tube and behind your regular tube.
Resize and arrange them as shown.
Curlystring1 (on the right of the tube)
Brownleaves1 (duplicate and one on each side)
Flowersticker1 (on left)Knottedbow2 (on right)
Flowersticker2 (on right)
Flowersticker3 (on right)
Cupcake2 (on right)
Drop shadow all of your layers by going to
Effects>3D Effects>Drop Shadow, set the drop to 3 vertical, 2 horizontal, 50 opacity, 4 blur.
Effects>3D Effects>Drop Shadow, set the drop to 3 vertical, 2 horizontal, 50 opacity, 4 blur.
Now we will add the text. I added my name and the words Sugar Coated.
I used the font Aquarelle. Set it to a size that you like and a stroke width of 4.
Foreground color to white and background color to #54a67c.
Duplicate the layer and select the second font layer with the font tool.
Set the stroke width to 0.
Merge the 2 font layer and convert to a raster layer.
I used the font Aquarelle. Set it to a size that you like and a stroke width of 4.
Foreground color to white and background color to #54a67c.
Duplicate the layer and select the second font layer with the font tool.
Set the stroke width to 0.
Merge the 2 font layer and convert to a raster layer.
Add your copyright info and your watermark.
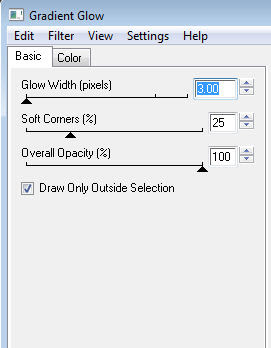
I’ve added the plugin Eye Candy 4000- Gradient Glow to this layer.
First you’ll have to convert your copyright to a raster layer.
Apply the plugin under Effect and use these settingsGlow Width- 3, Soft Corners- 25, Opacity- 100.
Use a color profile something like what you see on the right.

Now you can add the animation frames.
Open all 6 of the frames you saved earlier in PSP.
Copy and paste the first frame into your banner above the close-up tube.
There’s no need to move it or resize it, in fact if you do then you run the risk of the animation being off when you run it.
Copy Merged and paste it into AS as a new animation.
Go back to PSP and erase this animation layer in the banner.
Copy and paste the next animation frame into the banner at the same place.
Copy Merged and go to AS and paste it after your current frame by right clicking your image and go to Paste>After Current Frame.
Continue this process with each of the 6 frames from the animation.
Once done you should have 6 frames in the animation in AS.
You’ll need to change the speed of the animation.
Go to Edit>Select All, Animation>Frame Properties- 20.
You can now view your animation by going to View>Animation.
If it’s to your liking then Save it and you’re done!
For your avatar you’ll follow the same process as the banner.
Do the corners and cut them out.
I resized the paper to 150x150 before I pasted it.
Do the border the same except set it to 6 pixels.
I added the elements brownleaves1 and cupcake2 from the kit really small behind the tube.
Drop shadow everything again.
Add your copyright info and your watermark.
Add your name and rotate it 90 degrees to the left.
Once it’s the way you like it, copy merged and paste it as a new animation in AS.
Open your pink heart twink in AS.
Duplicate your avatar layer until you have the same amount of frames as your twink by going to Edit>Duplicate Selected until you have enough.
If you’re using the pink heart twink, that’s 10 frames.
Go to Edit>Select All on your avatar.
On your twink animation go to Edit>Select All, Edit>Copy.
Back on your avatar animation right-click the first frame and hit Paste>Into Selected Frame.
Your twink should appear at the end of your cursor.
Place it where you would like it to go and click.
This will place the animation onto your avatar.
You’re now done. You can view and save your avatar.
All Finished!
I’ve added the plugin Eye Candy 4000- Gradient Glow to this layer.
First you’ll have to convert your copyright to a raster layer.
Apply the plugin under Effect and use these settingsGlow Width- 3, Soft Corners- 25, Opacity- 100.
Use a color profile something like what you see on the right.
Now you can add the animation frames.
Open all 6 of the frames you saved earlier in PSP.
Copy and paste the first frame into your banner above the close-up tube.
There’s no need to move it or resize it, in fact if you do then you run the risk of the animation being off when you run it.
Copy Merged and paste it into AS as a new animation.
Go back to PSP and erase this animation layer in the banner.
Copy and paste the next animation frame into the banner at the same place.
Copy Merged and go to AS and paste it after your current frame by right clicking your image and go to Paste>After Current Frame.
Continue this process with each of the 6 frames from the animation.
Once done you should have 6 frames in the animation in AS.
You’ll need to change the speed of the animation.
Go to Edit>Select All, Animation>Frame Properties- 20.
You can now view your animation by going to View>Animation.
If it’s to your liking then Save it and you’re done!
For your avatar you’ll follow the same process as the banner.
Do the corners and cut them out.
I resized the paper to 150x150 before I pasted it.
Do the border the same except set it to 6 pixels.
I added the elements brownleaves1 and cupcake2 from the kit really small behind the tube.
Drop shadow everything again.
Add your copyright info and your watermark.
Add your name and rotate it 90 degrees to the left.
Once it’s the way you like it, copy merged and paste it as a new animation in AS.
Open your pink heart twink in AS.
Duplicate your avatar layer until you have the same amount of frames as your twink by going to Edit>Duplicate Selected until you have enough.
If you’re using the pink heart twink, that’s 10 frames.
Go to Edit>Select All on your avatar.
On your twink animation go to Edit>Select All, Edit>Copy.
Back on your avatar animation right-click the first frame and hit Paste>Into Selected Frame.
Your twink should appear at the end of your cursor.
Place it where you would like it to go and click.
This will place the animation onto your avatar.
You’re now done. You can view and save your avatar.
All Finished!

