Wednesday, January 26, 2011

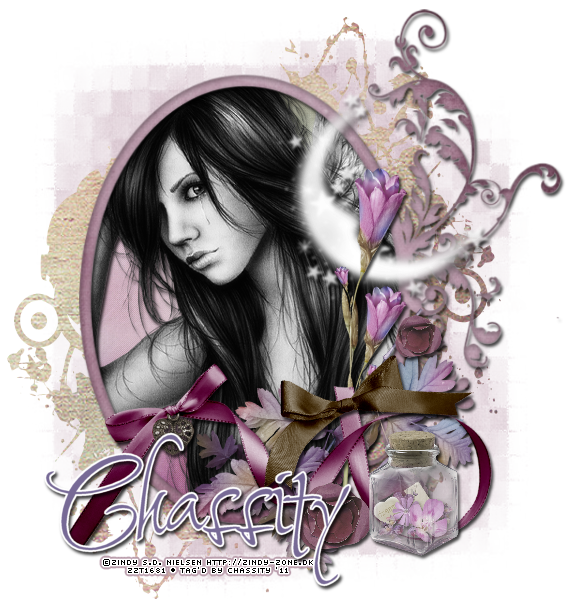
A Sorta Fairytale- PTU


Download this tutorial in a PDF file.
I've used the lovely PTU artwork of Zindy Nielsen. Get it on her Site.
This is PTU kit called A Sorta Fairytale from Designs by Sarah. Get it at PMTw/S.
I used two masks!
One mask is Vix-Mask365 by Vix PSP.
The other is MaskEmo1 by Sky Scraps.
Font used is Shalimar Swash ROB.


Let’s Begin!


Open a new canvas that’s 800x800 pixels.

Open frame4 from kit.
Copy and Paste it as a new layer.

Copy and Paste your tube below the frame.
You may need to resize your frame a little to fit the tube,
if you’re using the same tube as me.
Erase any portion of the tube hanging outside the frame.
Layers>Duplicate
Adjust>Blur>Gaussian Blur- 3
Change the blend mode to Soft Light

Open paper pp9 from kit.
Copy and Paste it below the tube layer.
Resize it to fit the frame slightly so that most of the colors show through.
Erase any portion of the paper hanging outside the frame.

Open branch2 from kit.
Copy and Paste at above the frame.
Image>Mirror
Resize and arrange it to bottom of the frame.

Open moon from kit.
Copy and Paste it as a new layer.
Resize, rotate to the left slightly and arrange it to the right as shown.

Open flowers1 from kit.
Copy and Paste it as a new layer.
Resize and arrange it at the right as shown.

Open ribbon charm from kit.
Copy and Paste it as a new layer.
Resize and arrange it at the bottom as shown.

Open paperflower3 from kit.
Copy and Paste it as a new layer.
Resize and arrange it at the bottom as shown.
Layers>Duplicate
Resize the second one a little smaller and then move to the right as shown.

Open bow2 from kit.
Copy and Paste it as a new layer.
Resize and arrange it as shown.

Open jar from kit.
Copy and Paste it as a new layer.
Resize and arrange it at the as shown.

Open paper pp5 from kit.
Copy and Paste it at the bottom of the tag.
Add your mask by going to Layer>Load/ Save Mask>Load Mask from Disk.
Apply the mask named SkyScraps-MaskEmo1.
Merge the mask group by right clicking the layer of the finished mask, go to Merge>Merge Group.
Resize and arrange it to fit as shown.
Follow the same procedure with paper pp6, and apply Vix-Mask365.

I used the font Shalimar Swash ROB. Set it to a size you like and a stroke width of 4.
Foreground color to white and background color to #776a96.
Duplicate the layer and select the second font layer with the font tool.
Set the stroke width to 0.
Merge the 2 font layer and convert to a raster layer.

Drop shadow everything except the mask.
Effects>3D Effects>Drop Shadow, set the drop to 3 vertical, 2 horizontal, 75 opacity, 4 blur.

Add your copyright info and your tag.

Merge everything in Layers>Merge>Merge Visible

Crop and resize as needed!


All Finished!

Tuesday, January 18, 2011

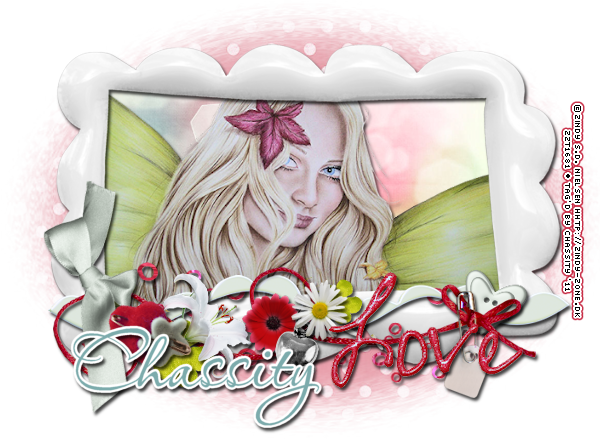
I ♥ You- PTU


Now you can download a PDF Copy of this tutorial to do without using your internet browser.
I've used the lovely PTU artwork of Elias Chatzoudis. You can get it at MPT.
This is a PTU kit called I ♥ You by Pimp’d Designz. Visit her blog for links to her stores.
The mask is WSL_Mask65, by Wee Scott Lass.
Font used is called Showcard Gothic.


Let’s Begin!

Open a new canvas that’s 800x800 pixels.

Open frame-01 from kit.
Copy and Paste it to your canvas.

Copy and Paste your tube as a new layer.

Layer>Duplicate the frame and move the second frame above the tube.
Erase any portion of the frame covering the upper portion of the tube a shown.
Erase any portion of the tube hanging out the bottom of the frame.

Open paper pp-01 from kit.
Using the magic wand tool, select inside the circle of the bottom frame layer.
Go to Selections>Modify>Expand by 5.
Copy and Paste your paper as a new layer.
Selections>Invert and hit the Delete button on your keyboard to delete the extra paper.
Selections>Select None
Move the paper layer below the bottom frame layer.

Open bracket from kit.
Copy and Paste it above the upper frame layer.
Image>Mirror
Resize and arrange it to the right as shown.

Open print-04 from kit.
Copy and Paste it as a new layer.
Resize and arrange it to the bottom as shown.

Open ribbon-04 from kit.
Copy and Paste as a new layer.
Resize and arrange it over the bracket as shown.

Open heart-03 element.
Copy and Paste it as a new layer.
Resize and arrange it over the ribbon as shown.

Open beads-01 from kit.
Copy and Paste it as a new layer.
Resize and arrange it over the bracket as shown.

Open swirl-01 from kit.
Copy and Paste it as a new layer.
Image>Mirror
Resize and arrange it to the bottom as shown.

Open tag-02 from kit.
Copy and Paste it as a new layer.
Resize and arrange it to the bottom as shown.

Open badge-01 from kit.
Copy and Paste it as a new layer.
Resize, rotate slightly and arrange it to the right as shown.

Open button-01 from kit.
Copy and Paste it as a new layer.
Resize and arrange it to the bottom as shown.

Open flower-02 from kit.
Copy and Paste it as a new layer.
Resize and arrange it to the right as shown.
Layers>Duplicate
Resize and arrange it to the left.

Open paper pp-09 from kit.
Copy and Paste it below everything.
Add your mask by going to Layer>Load/ Save Mask>Load Mask from Disk.
Apply the mask named Vix_Mask65.
Merge the mask group by right clicking the layer of the finished mask,
go to Merge>Merge Group.
Resize to fit tag as shown.

I used the font Showcard Gothic. Set it to a size you like and a stroke width of 5.
Foreground color to white and background color to #980000.
Duplicate the layer and select the second font layer with the font tool.
Set the stroke width to 0.
Merge the 2 font layer and convert to a raster layer.

Add drop shadows by going to
Effects>3D Effects>Drop Shadow, set the drop to 3 vertical, 2 horizontal, 75 opacity, 4 blur.

Add your copyright info and your tag.
Crop your image as needed.


All Finished!

Saturday, January 15, 2011

Serendipity- FTU


Now you can download a PDF Copy of this tutorial to do without using your internet browser.
I've used an FTU tube by Zindy Nielsen. You need a license to use her work.
This is my PTU kit called Serendipity. Visit my blog for links to my stores.
This kit is now FTU and available on my Blog.
The mask is WSL_Mask35, by Wee Scot Lass.
Font used is Aquarelle.


Let’s Begin!
Open a new canvas at 800x800 pixels.

Open frame3 from kit.
Copy and Paste it onto your canvas.

Copy and Paste your tube behind the frame.
Resize and arrange as needed and erase anything hanging outside the frame.

Open paper1 from kit.
Copy and Paste it below the tube.
Resize and arrange it as needed to fit behind the frame and
Have the portion of the frame you like best show through.
Using your eraser tool, erase the portions of the paper hanging outside of the frame.

Open scatter1 from kit.
Copy and Paste it above the frame.
Resize, rotate it to the right and arrange it in the center as shown.

Open doodle1 from kit.
Copy and Paste it as a new layer.
Resize and arrange it to the bottom as shown.

Open button2 from kit.
Copy and Paste as a new layer.
Resize and arrange it to the right as shown.

Open string1 from kit.
Copy and Paste it as a new layer.
Resize and arrange it to the bottom as shown.

Open ribbon2 from kit.
Copy and Paste it as a new layer.
Resize and arrange it to the left as shown.

Open flower3 from kit.
Copy and Paste it as a new layer.
Resize and arrange it in the center by the loop of the string as shown.

Open fabric flower1 from kit.
Copy and Paste it as a new layer.
Resize and arrange it to the left as shown.
Layer>Duplicate and move this second one to the center as shown.

Open flower4 from kit.
Copy and Paste it as a new layer.
Resize and arrange it to the left as shown.

Open heart pin1 from kit.
Copy and Paste it as a new layer.
Resize and arrange it to the left as shown.

Open charm1 from kit.
Copy and Paste it as a new layer.
Resize and arrange it to the center as shown.

Open flower2 from kit.
Copy and Paste it as a new layer.
Resize and arrange it to the center as shown.

Open love1 from kit.
Copy and Paste it as a new layer.
Resize and arrange it to the right as shown.

Open paper6 from kit.
Copy and Paste it at the bottom, below the leaves.
Add your mask by going to Layer>Load/ Save Mask>Load Mask from Disk.
Apply the mask named WSL_Mask35.
Merge the mask group by right clicking the layer of the finished mask, go to Merge>Merge Group.
Resize and arrange it to fit as shown.

I used the font Aquarelle. Set it to a size you like and a stroke width of 5.
Foreground color to white and background color to #7cabac.
Duplicate the layer and select the second font layer with the font tool.
Set the stroke width to 0.
Merge the 2 font layer and convert to a raster layer.

Drop shadow everything except the mask.
Effects>3D Effects>Drop Shadow, set the drop to 3 vertical, 2 horizontal, 75 opacity, 4 blur.

Add your copyright info and your tag.

Merge everything in Layers>Merge>Merge Visible

All Finished!

Thursday, January 13, 2011

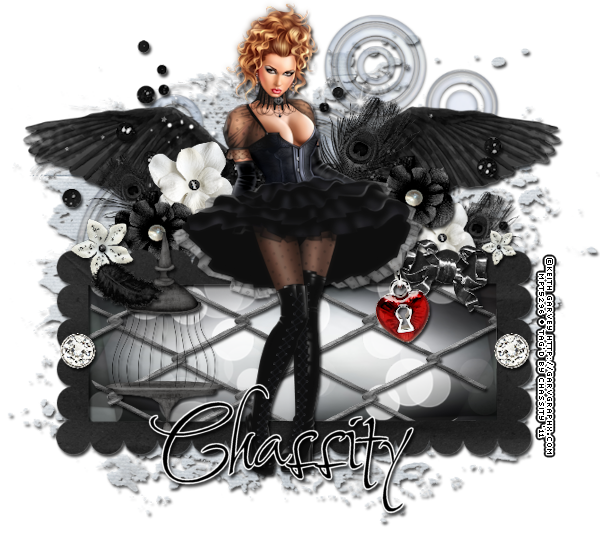
Can't Be Tamed- PTU


Now you can download a PDF Copy of this tutorial to do without using your internet browser.
I've used the lovely PTU artwork of Keith Garvey. You can purchase his art at MPT.
This is a PTU kit called Can’t Be Tamed from Pimp’d Designz. Visit her blog for links to her stores HERE.
Mask of choice.
Font used is Shalimar Swash ROB.


Let’s Begin!


Open a new canvas that’s 800x800 pixels.

Copy and Paste your tube as a new layer.

Open frame-04 from kit.
Copy and Paste it to your canvas.
Resize and arrange it below your tube as shown.

Open paper pp-01 from kit.
Copy your paper.
On your frame layer, using the magic wand tool, select within the inside of the frame.
Selections>Modify>Expand-5.
Layers> New Raster Layer.
Paste the paper Into Selection.
Selections>Select None

Open prints-01 from kit.
Copy and Paste it as a new layer.
Erase anything hanging outside of the frame.

Open fence-01 from kit.
Copy and Paste it as a new layer.
Resize it and arrange it into the frame as shown.

Open wings from kit.
Copy and Paste it below the bottom layer.
Resize and arrange it behind your tube as shown.

Open sparkle-01 from kit.
Copy and Paste it as a new layer.
Resize and arrange it over the wings to your liking.

Open glitter-01 from kit.
Copy and Paste it as a new layer.
Resize and arrange it over the wings as shown.

Open flower-02 from kit.
Copy and Paste it as a new layer.
Resize and arrange it to the left as shown.
Layers>Duplicate and size it down a little and move over to the right as shown.

Open flower-01 from kit.
Copy and Paste it as a new layer.
Resize and arrange it to the right as shown.
Layers>Duplicate and move over to the left as shown.

Open feather-02 from kit.
Copy and Paste it below the flowers.
Resize and arrange it at the center right as shown.
Layers>Duplicate it 2 times and resize and arrange them to the left and right as shown.

Open button-02 from kit.
Copy and Paste it above the frame.
Resize and arrange it to the right side of the frame.
Layer>Duplicate, Image>Mirror and place on opposite side of frame.

Open flower-03 from kit.
Copy and Paste it as a new layer.
Resize and arrange it to the left as shown.
Layers>Duplicate and resize it down slightly and arrange it to the right.

Open metal-bow from kit.
Copy and Paste it as a new layer.
Resize and arrange it to the right of the tube.

Open charm-01 from kit.
Copy and Paste it as a new layer.
Resize, rotate and arrange it as shown.

Open cage-01 from kit.
Copy and Paste it as a new layer.
Resize and arrange it to the left as shown.

Open feather-01 from kit.
Copy and Paste it as a new layer.
Resize and arrange it over the cage as shown.

Open circles from kit.
Copy and Paste it under the bottom layer.
Resize and arrange it as shown.

Open paper pp-08 from kit.
Copy and Paste it at the bottom of the tag.
Add your mask by going to Layer>Load/ Save Mask>Load Mask from Disk.
Apply the mask of choice.
Merge the mask group by right clicking the layer of the finished mask, go to Merge>Merge Group.
Resize and arrange it to fit as shown.

I used the font ShalimarSwashROB. Set it to a size you like and a stroke width of 3.
Foreground color to white and background color to black.
Duplicate the layer and select the second font layer with the font tool.
Set the stroke width to 0.
Merge the 2 font layer and convert to a raster layer.

Drop shadow everything except the mask.
Effects>3D Effects>Drop Shadow, set the drop to 3 vertical, 2 horizontal, 75 opacity, 4 blur.

Add your copyright info and your tag.

Merge everything in Layers>Merge>Merge Visible


All Finished!

Wednesday, January 12, 2011

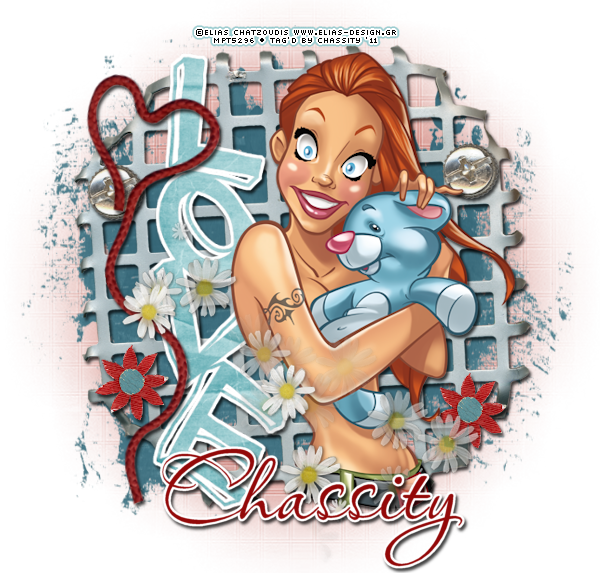
Love- PTU


Now you can download a PDF Copy of this tutorial to do without using your internet browser.
Download Here
I've used the lovely PTU artwork of Elias Chatzoudis. You can purchase his art at MPT.
This is a PTU kit called Techie Love from Pimp’d Designz. Visit her blog for links to her stores HERE.
The mask is WSL_Mask62, by Wee Scot Lass.
Font used is Aquarelle.


Let’s Begin!

Open a new canvas that’s 800x800 pixels.

Open metal-bg from kit.
Copy and Paste it to your canvas.

Open print-02 from kit.
Copy and Paste it behind the metal-bg.
Resize and arrange it as shown.

Open screw from kit.
Copy and Paste it above the metal-bg.
Resize it and arrange it to the right as shown in the tag.
Layers>Duplicate and move this new one to the left as shown.

Copy and Paste your tube as a new layer.
Resize and arrange it slightly to the right as shown.

Open wa-01 from kit.
Copy and Paste it below the tube.
Resize and arrange it to the left as shown.

Open heart-string-01 from kit.
Copy and Paste it as a new layer.
Resize and arrange it to the left as shown.

Open flower-01 from kit.
Copy and Paste it as a new layer.
Resize and arrange it to the right as shown.
Layers>Duplicate and move it to the left as shown.

Open print-03 from kit.
Copy and Paste it above your tube.
Resize and arrange it as shown.

Open paper pp-12 from kit.
Copy and Paste it at the bottom of the tag.
Add your mask by going to Layer>Load/ Save Mask>Load Mask from Disk.
Apply the mask named WSL_Mask62.
Merge the mask group by right clicking the layer of the finished mask, go to Merge>Merge Group.
Resize and arrange it to fit as shown.

I used the font Aquarelle. Set it to a size you like and a stroke width of 5.
Foreground color to white and background color to #930909.
Duplicate the layer and select the second font layer with the font tool.
Set the stroke width to 0.
Merge the 2 font layer and convert to a raster layer.

Drop shadow everything except the mask.
Effects>3D Effects>Drop Shadow, set the drop to 3 vertical, 2 horizontal, 75 opacity, 4 blur.

Add your copyright info and your tag.

Merge everything in Layers>Merge>Merge Visible


All Finished!

Monday, December 20, 2010

Gorjuss Christmas- FTU


Now you can download a PDF Copy of this tutorial to do without using your internet browser.
Download Here
I've used the lovely PTU artwork of Suzanne Woolcott at Gorjuss.
This is FTU kit called Holiday Cheer by Cora at Pimp’d Designz.
The mask is in My Supplies.
Font used is Cocktail.


Let’s Begin!

Open a new canvas 800x800, flood filled with white.

Open frame2 from kit.
Copy and Paste it to your canvas.

Copy and Paste your 3 tubes below the frame, showing through the windows.
Use your eraser tool to erase any portion hanging out.

Open papers pp-06, pp-10, and pp-04 from kit.
Copy and Paste them below your tubes to show behind the frame.

Open ribbon04 from kit.
Copy and Paste it above the frame.
Resize and arrange it as shown.

Open holly from kit.
Copy and Paste it as a new layer.
Resize and arrange it to the upper right as shown.

Open candy-cane2 from kit.
Copy and Paste at as a new layer.
Resize and arrange it to the left as shown.

Open gift02 from kit.
Copy and Paste it as a new layer.
Image>Mirror
Resize and arrange it to the left as shown.

Open gift01 from kit.
Copy and Paste it as a new layer.
Resize and arrange it to the left as shown.

Open cheer-snowman from kit.
Copy and Paste it as a new layer.
Resize and arrange it to the left as shown.


Open paper pp13 from kit.
Copy and Paste it at the bottom of the tag.
Add your mask by going to Layer>Load/ Save Mask>Load Mask from Disk.
Apply the mask named ASD_IndianSummer from my supplies.
Merge the mask group by right clicking the layer of the finished mask, go to Merge>Merge Group.
Resize and arrange it to fit as shown.

I used the font Cocktail. I set it to 72 pixels and a stroke width of 4.
Foreground color to white and background color to black.
Duplicate the layer and select the second font layer with the font tool.
Set the stroke width to 0.
Merge the 2 font layer and convert to a raster layer.

Drop shadow everything except the mask.
Effects>3D Effects>Drop Shadow, set the drop to 3 vertical, 2 horizontal, 75 opacity, 4 blur.

Add your copyright info and your tag.

Merge everything in Layers>Merge>Merge Visible


All Finished!

Merry Christmas- FTU


Now you can download a PDF Copy of this tutorial to do without using your internet browser.
Download Here
I've used the lovely PTU artwork of Suzanne Woolcott at Gorjuss.
This is an FTU called Santa’s Coming by Tracy F. Designz.
The mask is WSL_Mask41 and 341, by Wee Scot Lass.
Font used is Refreshment Stand.


Let’s Begin!
Open a new canvas at 800x800 pixels flood filled with white.

Open chimney from kit.
Copy and Paste it as a new layer.

Open gift1 from kit.
Copy and Paste it below the chimney layer.
Resize and arrange it to the left as shown in the tag.

Open tree4 from kit.
Copy and Paste it above the chimney.
Image>Mirror
Resize and arrange it to the right as shown.

Open gift2 from kit.
Copy and Paste it as a new layer.
Resize and arrange it to the left.

Open candycane1 from kit.
Copy and Paste as a new layer.
Image>Mirror
Resize and arrange it to the left as shown.

Open letter from kit.
Copy and Paste it above the tube.
Resize and arrange it to the left as shown.

Copy and Paste your tube as a new layer.
Arrange it to fit as you like.

Open paper10 from kit.
Copy and Paste it below the bottom layer.
Add your mask by going to Layer>Load/ Save Mask>Load Mask from Disk.
Apply the mask named WSL_Mask341.
Merge the mask group by right clicking the layer of the finished mask, go to Merge>Merge Group.
Resize and arrange it to fit as shown.

Open paper9 from kit.
Repeat the mask steps to apply WSL_Mask41.

I used the font Refreshment Stand. Set it to a size you like and a stroke width of 4.
Foreground color to white and background color to black.
Duplicate the layer and select the second font layer with the font tool.
Set the stroke width to 0.
Merge the 2 font layer and convert to a raster layer.

Drop shadow everything except the mask.
Effects>3D Effects>Drop Shadow, set the drop to 3 vertical, 2 horizontal, 75 opacity, 4 blur.

Add your copyright info and your tag.

Merge everything in Layers>Merge>Merge Visible

All Finished!