

Download this tutorial in a PDF file.
I've used the lovely PTU artwork of Keith Garvey. Get it at PTE.
This is PTU kit called Bad Girlfriend from Scraps With Attitude. Get it at PMTw/S.
I’ve used the template Bad Romance in Tag Temp Pack 002 by Pimp’d Designz.
The mask is Vix_Mask171, by Vix PSP.
Font used is P22 Corinthia.
Let’s Begin!
Open the tag template, and resize the canvas from the center to 800x800 by going to
Image>Canvas Size.
Delete the layers named Raster 6 and 7.
Select layer Raster 3.
Go to Hue & Saturation and use these settings:
Hue: 0, Saturation: 255.
Go to Brightness & Contrast and use these setting:
Brightness: -50, Contrast: 0.
Add noise at 50%.
Open paper4 from the kit.
Copy your paper and go to the template.
On layer Raster 5 (black rectangle), go to
Selections>Select All, Selections>Float, Selections>Defloat.
Paste your paper by going to Edit>Paste As New Layer.
Then go to Selections>Invert and press the Delete button on your keyboard to delete the extra paper.
Be sure to delete the original layer of the template.
Open pen1 from kit.
Copy and Paste as a new layer above the rectangle.
Resize and arrange it to fit the bottom of the rectangle.
Copy and Paste your tube as a new layer.
Resize and arrange it as shown.
Duplicate your tube and move the bottom tube below the layer Raster 4 (white rectangle).
On the upper tube erase the left leg covering the rectangles.
Now it should look like she is straddling the rectangles.
Open button5 from kit.
Copy and Paste it above the pen.
Resize and arrange it to the left as shown.
Open bow and star1 from kit.
Copy and Paste it as a new layer.
Resize and arrange it to the bottom as shown.
Open word1 from kit.
Copy and Paste it above the upper tube layer.
Resize and arrange it to the left as shown.
Open bead heart string1 from kit.
Copy and Paste it as a new layer.
Resize and arrange it to the center as shown.
Open dbl bow3 from kit.
Copy and Paste it below the lower tube.
Resize and arrange it to the right as shown.
Open paper5 from kit.
Copy and Paste it at the bottom of the tag.
Add your mask by going to Layer>Load/ Save Mask>Load Mask from Disk.
Apply the mask named Vix_Mask171.
Merge the mask group by right clicking the layer of the finished mask, go to Merge>Merge Group.
Resize and arrange it to fit as shown.
I used the font P22 Corinthia. Set it to a size you like and a stroke width of 3.
Foreground color to white and background color to #2f2f2f.
Duplicate the layer and select the second font layer with the font tool.
Set the stroke width to 0.
Merge the 2 font layer and convert to a raster layer.
Drop shadow everything except the mask.
Effects>3D Effects>Drop Shadow, set the drop to 3 vertical, 2 horizontal, 75 opacity, 4 blur.
Add your copyright info and your tag.
Merge everything in Layers>Merge>Merge Visible
Crop and resize as needed!
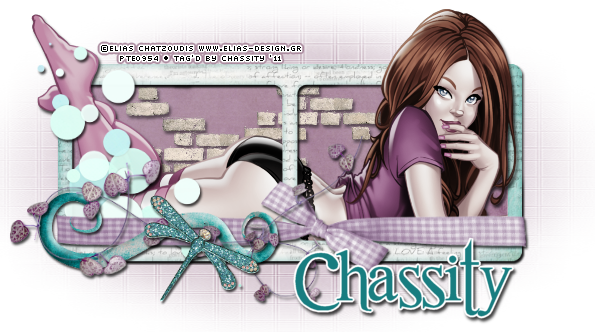
All Finished!


